Flylib.com

Books Software


USING GRIDS AND GUIDES


USING GRIDS AND GUIDES

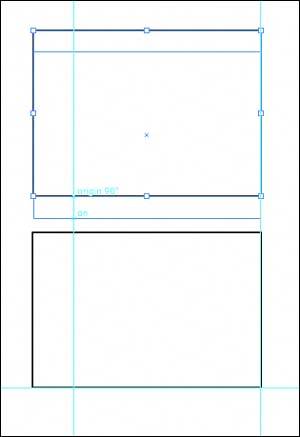
You may have set the way grids and guides display in your Preferences window; now let's look at displaying those grids and guides.

Grids

When you create objects on your page, grids can be helpful because they show exact placement of objects in relation to one another. The settings that determine the increments of the gridlines and colors are set in the Preferences window, on the Guides & Grid pane.

To display the grid, choose View, Show Grid.

If you want the objects you create on the page to snap to the grid automatically, choose View, Snap to Grid.

Guides

There are two kinds of guidelines in Illustrator. The first are ruler guides, which are vertical and horizontal lines. These are dragged out of the rulers at the top and side of your artboard (if you don't see the rulers, choose View, Show Rulers).

You can also create guides from vector objects. Create the object you want to use as a guide and select View, Guides, Make Guides (see Figure 13.19). To turn the object back into a vector object, choose View, Guides, Release Guides.

Figure 13.19. In this example, the two diagonal lines have been transformed into guides to help align a specific polygon shape.


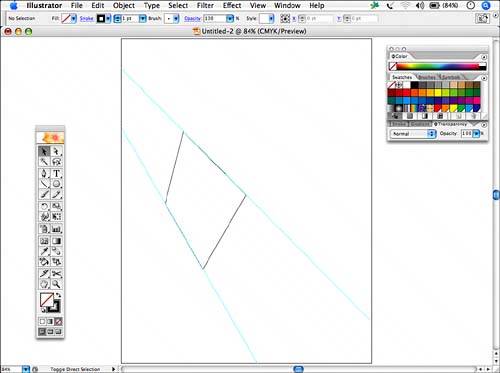
To hide any guides you temporarily place on the page, select View, Guides, Hide Guides. Bring the guides back by choosing View, Guides, Show Guides. To delete all guides, choose View, Guides, Clear Guides.

Lock guides on your page so they cannot be moved or deleted by selecting View, Guides, Lock Guides. Unlock them by reselecting that same menu command.

As long as guides are unlocked, you can move them freely on the page or delete them by selecting the guide and pressing Delete or Backspace.

Smart Guides

Smart Guides are temporary guides that appear when you move objects around on the page (see Figure 13.20). Remember that you can set your preferences for how Smart Guides appear by choosing Edit, Preferences, Smart Guides & Slices in Windows or by choosing the Apple menu, Preferences, Smart Guides & Slices on the Mac.

Figure 13.20. Smart Guides give you information about your selection and how it aligns with other guides.


Turn Smart Guides on and off by choosing View, Smart Guides. As you move objects around on the page, you'll see the Smart Guides, which can be used to help you line up objects.

Smart Guides are not available if you have the Snap to Grid option, found under the View menu, turned on.


UNDERSTANDING FILE FORMATS

Illustrator enables you to import, export, and save files of nearly every graphic type. This section lists those formats and gives more explanation when necessary. Again, the Adobe Help Center is a great source of information for specific file formats and some of the options it offers.

Importing

Import files into Illustrator by selecting File, Place. If you have the Link option selected in the Place dialog, it creates a linked fileone that is not stored inside the document but is merely referenced in it. This creates smaller files. If you do not select Link, the file is embedded in the document, creating a larger document.

Following are the file types that can be imported into Illustrator. Different file types give you different import options in the case of PDFs and Photoshop files (PSDs). See Chapter 21, "Importing, Exporting, and Saving in Illustrator," for more specific information on Import options:

  • Adobe PDF

  • AutoCAD Drawing or AutoCAD Interchange file

  • Bitmap (BMP)

  • Computer Graphics Metafile

  • CorelDRAW, versions 510

  • Encapsulated PostScript (EPS)

  • Enhanced Metafile

  • FreeHand versions 49

  • GIF89a

  • JPEG

  • JPEG 2000

  • Macintosh PICT

  • Microsoft RTF

  • Microsoft Word

  • PCX

  • Photo CD

  • Photoshop

  • Pixar

  • PNG

  • SVG and SVG Compressed

  • Targa

  • Text

  • TIFF

  • Windows Metafile

Exporting Illustrator Files

You can export Illustrator files to various file formats. Following is a list of those formats. See Chapter 21 for more specific information about each format and the options it has:

  • AutoCAD Drawing and AutoCAD Interchange File

  • BMP (Bitmap)

  • Enhanced Metafile

  • GIF

  • JPEG (Joint Photographic Experts Group)

  • Macintosh PICT

  • Macromedia Flash

  • Photoshop

  • PNG (Portable Network Graphic)

  • Targa

  • Text Format

  • TIFF (Tagged-Image File Format)

Saving As

The options available when you save your Illustrator file are

  • Adobe Illustrator

  • Adobe PDF

  • Illustrator EPS

  • Illustrator Template

  • SVG and SVG Compressed

In general, the differences between saving documents and exporting them is in the amount of control you have over the output after it's done. Saving a file preserves layer and path options so you can edit them after the object is placed or pasted in another application. When you export files, certain export options can flatten your files or make them uneditable.


More information about the various options can be found in Chapter 21.

Saving for Microsoft Office

The Save for Microsoft Office option, found under the File menu, saves the file as a PNG, as is. If you want to set options in the PNG, export the file instead of choosing this option.

Saving for the Web

Selecting the File, Save for Web command opens a dialog that gives you the following file format options:

  • GIF

  • JPEG

  • PNG-8

  • PNG-24

  • SVG

  • SWF

  • WBMP

See Chapter 21 for a complete explanation of these file formats.