|
Sams Teach Yourself Visual C++. NET in 24 Hours Authors: Simon R.J., Schmidt M Published year: 2002 Pages: 69-70/237 |
In this step, you're going to create the managed C++ application and integrate the resource file you created earlier into the build cycle. To start, open Visual Studio .NET and create a new managed C++ application.
The next step is to add your resource file into the project. Click Project, Add Existing Item from the main menu. By default, the File Open dialog that is displayed is set to only display Visual C++ source files. To find your resource file, you will have to change it to look at all files. Browse to the .resx file you created earlier and click Open.
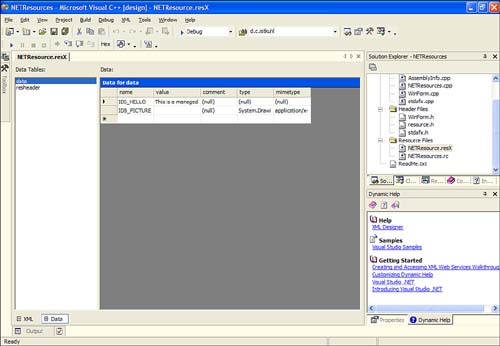
Your file should now be displayed in the Solution Explorer. Open the file by double-clicking it. You should now be in XML editing mode, similar to Figure 8.2. Clicking the XML button located at the bottom-left corner of the main IDE window will display the XML file in text mode.
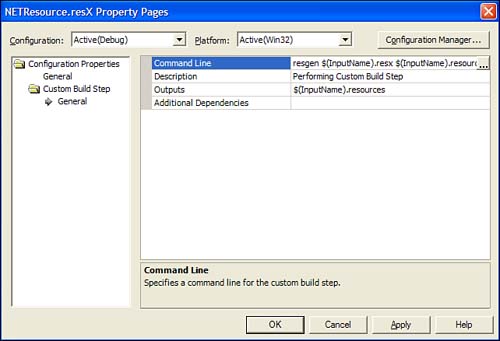
In order to gain access to the resources available in the .resx file, it must be compiled into a binary format (the .resources file format mentioned earlier). The resource compiler for the .NET Framework is named resgen .exe . To set up the build process to automatically compile the .resx file for you, right-click the .resx file in the Solution Explorer and select Properties. The dialog that is displayed is used to set the custom build step for the file. Select the Custom Build Step item on the left side of the dialog. For the Command Line property, enter the following line:
resgen $(InputName).resx $(InputName).resources
By doing this, you are invoking the resgen resource compiler. The arguments to the compiler include the input file, which in this case is the .resx file you created, and the output file you want the file to be compiled to. The $(InputName) macro shown in the preceding line of code is simply the name of the file without the extension. The only advantage of using this macro is to eliminate any errors when typing in the filename of your resource file. The last step in this dialog is to fill in the Outputs property. This value should be the same as the second command-line argument shown earlier. Figure 8.3 shows the dialog box with proper values.
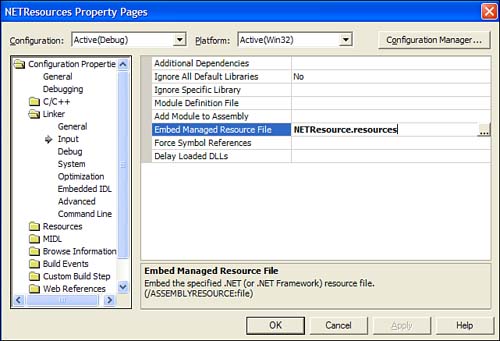
The last step in integrating your resource file is to link the compiled resource file into your assembly. Right-click your project name in Class View and select Properties from the context menu. In the dialog that is displayed, select the Input option underneath the Linker heading on the left side. For the Embed Managed Resource File property, set the value to the filename of the compiled resource file. Figure 8.4 shows the results.
| Top |
At this point, you've created a resource file, created the custom build step to create the binary resource file, and set up the project to link in that file to your built assembly. The final step this hour is to use those resources from managed C++ code.
Included within the .NET Framework is a class named ResourceManager that's specifically designed to work with application resources. In addition to being able to read resources at runtime, ResourceManager is also culture aware. By you specifying a language and sublanguage (collectively known as a culture ) when using the ResourceManager class, it has the ability to select the proper resource based on that culture. If one is not found, it returns the default resource instead. One clear advantage that this brings is the ability to easily change the language for a user interface. In this hour, however, we are just going to focus on using the ResourceManger class to retrieve the default resource.
The two main functions within the ResourceManager class that you will be using are the GetString function and the GetObject function. The GetString function, as its name implies, retrieves the value of a string resource given its string ID. The GetObject function, on the other hand, retrieves other types of data within the resource file, such as images, cursors , icons, and so on. Because the GetObject function is generic and can retrieve differing types of data, you have to cast it to the specific data type you want when assigning it to a variable. This is done by using the dynamic_cast C++ operator, which is used to change data from one type to another.
The first step, before we can start using the resources, is to create a WinForm with two controls: a Label control and a PictureBox control. Next, using the same methodology as previous lessons, create an InitForm function to handle the initialization of the form. Your header file should look similar to Listing 8.1.
1: #pragma once
2:
3: #using <mscorlib.dll>
4: using namespace System;
5:
6: // required dlls for WinForms
7: #using "System.dll"
8: #using "System.Windows.Forms.dll"
9: #using "System.Drawing.dll"
10:
11: // required namespaces for WinForms
12: using namespace System::ComponentModel;
13: using namespace System::Windows::Forms;
14: using namespace System::Drawing;
15:
16: __gc class WinForm: public Form
17: {
18: public:
19: WinForm();
20: ~WinForm();
21: void InitForm();
22:
23: protected:
24: System::ComponentModel::Container* m_Components;
25: Label* m_Label;
26: PictureBox* m_Picture;
27: };
In the InitForm function, create the Label control, the PictureBox control, and the control container. Set the properties as shown in Listing 8.2. However, you'll need to set the PictureBox control's size based on the bitmap size you created when you made your resource file. You can do this either by opening the image in the Microsoft Windows Paint program and selecting Image, Attributes from the main menu to get the width and height or by opening your .resx file in the ResEditor utility and expanding the image resource to display information about the image.
1: #include "StdAfx.h"
2: #include "winform.h"
3: #using <mscorlib.dll>
4:
5: WinForm::WinForm(void)
6: {
7: InitForm();
8: }
9:
10: WinForm::~WinForm(void)
11: {
12: Form::Dispose();
13: }
14:
15: void WinForm::InitForm()
16: {
17: SuspendLayout();
18:
19: // create component container
20: m_Components = new System::ComponentModel::Container();
21:
22: // create the label control
23: m_Label = new Label();
24: m_Label->Location = Point(10, 30 );
25: m_Label->TabIndex = 1;
26: m_Label->TabStop = false;
27: m_Label->Size = System::Drawing::Size(200, 16);
28:
29: // create the PictureBox Control
30: m_Picture = new PictureBox();
31: m_Picture->Location = Point( 10, 50 );
32: m_Picture->TabIndex = 2;
33: m_Picture->TabStop = false;
34: m_Picture->Size = System::Drawing::Size(183, 102);
35:
36: // add the controls to the container
37: Controls->Add( m_Label );
38: Controls->Add( m_Picture );
39:
40: // form properties
41: ClientSize = System::Drawing::Size(205, 200);
42: FormBorderStyle = System::Windows::Forms::FormBorderStyle::FixedDialog;
43:
44: Name = S"Hour 8";
45: Text = S"Hour 8";
46:
47: ResumeLayout();
48: }
Now that you have a basic WinForm set up that contains a Label and a PictureBox control, it's time to use the resources you created earlier to set the controls' data. In order to use the ResourceManager class discussed earlier, you must first create an instance of the class using parameters to the constructor to tell it which resource you wish to use. The resource name is the name of the output file without the .resources extension that is created when your .resx file is compiled. For this hour's lesson, the name of the .resources file is NETResources . The second parameter to the constructor is the location of this resource. As you'll recall from earlier in the lesson, the resource is linked to the assembly as an embedded managed resource file. Therefore, the location is not an actual path but an assembly class pointer that is found by calling the GetExecutingAssembly function.
Immediately following the SuspendLayout function call within the InitForm function of your WinForm class, insert the following code:
// create resource manager Resources::ResourceManager * pResources = new Resources::ResourceManager (S"NETResource", Reflection::Assembly::GetExecutingAssembly());
Now that you've created an instance of the ResourceManager class, you can use it to retrieve the string and image resources. The property for the Label control that you want to change is the Text property. Use the GetString function provided by the ResourceManager class to set this property, as shown here:
// get label text from resource m_Label->Text = pResources->GetString(S"IDS_HELLO");
Setting the Image property for the PictureBox control, however, isn't as straightforward. As mentioned earlier, the only other function available to retrieve resources using the ResourceManager class is the GetObject function. Because this function returns an Object* value, you will need to cast that return value to an Image object. This is done using the dynamic_cast operator, as the following code demonstrates :
// get image data for PictureBox from resource m_Picture->Image = dynamic_cast<Image*> (pResources->GetObject(S"IDB_PICTURE"));
The last thing to do to finish the project is to make sure you launch your WinForm from the application's main function, as shown in Listing 8.3.
1: #include "stdafx.h"
2: #include "WinForm.h"
3: #using <mscorlib.dll>
4: #include <tchar.h>
5:
6: using namespace System;
7:
8: // This is the entry point for this application
9: int _tmain(void)
10: {
11: Application::Run(new WinForm());
12: return 0;
13: }
| Top |
|
Sams Teach Yourself Visual C++. NET in 24 Hours Authors: Simon R.J., Schmidt M Published year: 2002 Pages: 69-70/237 |