Using .NET Objects Within COM Projects
Now you are going to reverse the communication flow by using managed objects within a COM project. Although there are some differences expected, the process of using .NET Framework objects in COM is similar to the process you just completed in the last project. This time, you will be creating a type library based on the information contained within the .NET assembly of your managed application.
Rather than start from scratch, you are going to start with the project named ManagedInterfaces, which you created in Hour 17, "Managed Interfaces." If you do not have that project, you can download the code for the book on the book's Web site.
Open the ManagedInterfaces project in Visual Studio .NET. Next, create a custom build step that runs a tool called RegAsm.exe. This tool performs two functions. It first creates a type library containing COM data types that were created from the data contained within the assembly manifest. The next function RegAsm.exe performs is to register that type library, just as you would register any other COM object. However, there is one difference to this registration process, which will be explained later.
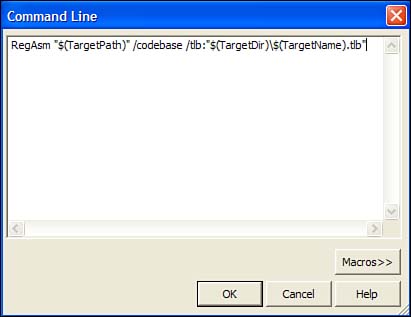
Right-click the DogLib project in Class View and select Properties. Click Build Events to expand that item and then select Post-Build Event. Open the Command Line dialog by clicking the button labeled with an ellipsis found on the far right side of the Command Line field. There are three command-line arguments for RegAsm.exe that you will use for this project. The first is the input file, which is the binary executable created when you build your managed project. This is represented by using the "$(TargetPath)" macro. The second parameter, /codebase, is optional but valuable. Without this argument, the RegAsm tool will fail because the assembly from which you are trying to create a type library does not exist within the Global Assembly Cache (GAC). In order to run the RegAsm tool without specifying the /codebase parameter, you must first run the gacutil.exe tool to import your assembly into the GAC. In fact, this is the recommended solution, but the process explained here is more than adequate for testing purposes. By using the /codebase parameter, however, RegAsm will place an entry into the Registry with the path to your assembly so that the CCW created when using COM Interop will know where to find your assembly. Finally, the last parameter to the RegAsm tool is the path to the type library file that will be created. Using macros, specify this path using /tlb:"$(TargetDir)\$(TargetName).tlb" (see Figure 21.10). Also, just as you did with the Output File path for the previous projects, change the Output File path to place the project binaries within the ../bin folder.
Figure 21.10. Creating the RegAsm.exe custom build step to create a type library from an assembly.
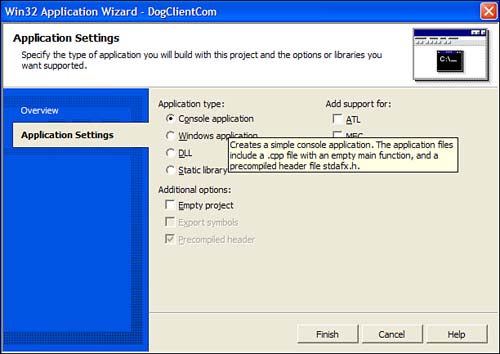
Now you can create the COM client that will use your .NET object. Select Add, Project from the main menu. Select the Visual C++ Project type from the list of project types. You will not be using ATL for this application, so select the Win32 Project template from the list of templates. Make sure the project you are creating is placed within the same solution as your .NET application by clicking the Add to Solution radio button. Give your project the name DogClientCom and click OK to close the dialog. This project will run in the console, so click Application Settings within the Win32 Application Wizard and then click the Console Application radio button under the Application Type heading, as shown in Figure 21.11.
Figure 21.11. Creating the Win32 console application by changing the application settings.
For this project, you are going to take advantage of COM smart pointers. These are created for you by using the C++ preprocessor directive #import. After the inclusion of stdafx.h in the DogClientCom.cpp file, import the path of the type library that is created whenever your .NET project is built. You can see this on line 2 of Listing 21.4.
Next, create a function that will be used to test the interaction between the COM client and the .NET object. Give this function the name CreateDogs as well as a return type of void and an empty parameter list.
Listing 21.4 Using .NET Objects Within an Unmanaged COM Application
1: #include "stdafx.h" 2: #import "../bin/DogLib.tlb" 3: 4: void CreateDogs() 5: { 6: USES_CONVERSION; 7: DogLib::IDogPtr pBulldog( __uuidof(DogLib::CBulldog)); 8: DogLib::IDogPtr pPoodle( __uuidof(DogLib::CPoodle)); 9: 10: pPoodle->Name = L"Fifi"; 11: pBulldog->Name = L"Butch"; 12: 13: printf( "The poodle named %s says %s and has %d fleas.\n", 14: OLE2A(pPoodle->Name), 15: OLE2A(pPoodle->Bark()), 16: pPoodle->NumberOfFleas ); 17: 18: printf( "The bulldog named %s says %s and has %d fleas.\n", 19: OLE2A(pBulldog->Name), 20: OLE2A(pBulldog->Bark()), 21: pBulldog->NumberOfFleas ); 22: } 23: 24: int _tmain(int argc, _TCHAR* argv[]) 25: { 26: CoInitialize(NULL); 27: 28: CreateDogs(); 29: 30: return 0; 31: } The CreateDogs function creates two COM smart pointers and instantiates two objects, as shown on lines 7 and 8. Following that, the function finishes by calling the methods and parameters of these objects. However, if you inspected Listing 21.4 closely, you may have noticed an error. On lines 7 and 8, the code refers to the CBulldog class and the CPoodle class within the DogLib namespace. However, the DogLib namespace doesn't contain these classes. This was done to circumvent problems associated with COM Interop and the way the type library is created from the assembly manifest. Within the .NET object are three main interfaces: a base interface named IDog and two derived interfaces named IPoodle and IBulldog, respectively. However, these interfaces were all implemented by the same class. This method of interface inheritance doesn't work within the architecture of COM. Interfaces within COM inherit from either IUnknown or IDispatch. Therefore, the three interfaces within the type library that was created from the assembly manifest lose the interface inheritance they employed. Because the IPoodle interface does not implement the Name property but rather inherits the IDog interfaces implementation, it does not contain a Name property when it is used within COM. To solve this problem, you must create three separate coclasses and move the inheritance logic from the interfaces to the classes themselves. This can be seen in Listing 21.5.
Listing 21.5 Creating the Managed .NET Object
1: // DogLib.h 2: 3: #pragma once 4: 5: using namespace System; 6: 7: namespace DogLib 8: { 9: public __gc __interface IDog 10: { 11: String* Bark(); 12: __property void set_Name( String* sName ); 13: __property String* get_Name(); 14: __property Int32 get_NumberOfFleas(); 15: }; 16: 17: public __gc __interface IPoodle : public IDog 18: { 19: String* Bark(); 20: __property Int32 get_NumberOfFleas(); 21: }; 22: 23: public __gc __interface IBulldog : public IDog 24: { 25: String* Bark(); 26: __property Int32 get_NumberOfFleas(); 27: }; 28: 29: public __gc class CDog : public IDog 30: { 31: public: 32: void set_Name( String* sName ) { m_sName = sName; } 33: String* get_Name() { return m_sName; } 34: String* Bark() { return "Woof Woof!"; } 35: Int32 get_NumberOfFleas() { return 20; } 36: 37: private: 38: String* m_sName; 39: }; 40: 41: public __gc class CPoodle : public CDog, public IPoodle 42: { 43: public: 44: // IPoodle interface 45: String* Bark(){ return "Yap Yap!"; } 46: Int32 get_NumberOfFleas() { return 100; } 47: }; 48: 49: public __gc class CBulldog : public CDog, public IBulldog 50: { 51: public: 52: // IBulldog interface 53: String* Bark(){ return "Grrr Grrr!"; } 54: Int32 get_NumberOfFleas() { return 2; } 55: }; 56: } Before you compile the COM client, change the Output File path to place the binary in the ../bin directory. Running your application should produce output similar to Figure 21.12.
Figure 21.12. Output of COM client using a managed .NET object.

| Top |
EAN: 2147483647
Pages: 237
- Distributed Data Warehouse for Geo-spatial Services
- Data Mining for Business Process Reengineering
- Intrinsic and Contextual Data Quality: The Effect of Media and Personal Involvement
- Healthcare Information: From Administrative to Practice Databases
- Development of Interactive Web Sites to Enhance Police/Community Relations