Configuring and Using Remote Assistance
|
|
Because supporting users (and enabling users to support each other) continues to be such an important issue, Windows XP provides a new and very helpful tool called Remote Assistance (RA). Suppose that as an A+ technician you support Windows XP in a large LAN environment. One of your users, who resides in a remote office across town, is having problems with his Windows XP computer. Sure, you can talk to the user on the phone, which is often unfruitful and aggravating, or you can drive to the user’s site and work on the computer. Or, you can use Remote Assistance and remotely see and control the computer and fix it from your office. Which alternative sounds best?
As you can see, Remote Assistance has far-reaching implications for support situations, or even for two users communicating over the Internet. I live about five hours away from my sister, who also uses Windows XP. If she has a problem, she can just send me a Remote Assistance invitation, and I can connect to her computer and control it remotely, just as I would using Remote Desktop.
When you use Remote Assistance, one user is termed the expert while the user who needs help is called the novice. When the novice properly authorizes the expert to do so, the expert can connect to the novice’s computer and see what is going on. If the novice gives the expert full control, the expert can make configuration changes on the remote computer. For Remote Assistance to work, the following must be true:
-
Both users must be connected to the same network or the Internet at the same time.
-
Both must be using Windows XP Professional or Home editions (sorry, no down-level systems are supported on either side of the connection).
-
The novice user must be an administrator on the local computer. Limited users cannot send Remote Assistance invitation.
Understanding How Remote Assistance Works
Remote Assistance works with “invitations.” The novice user sends an invitation for Remote Assistance to the expert user through e-mail or through Windows Messenger. The expert user then accepts the invitation, which opens a terminal window showing the novice user’s desktop. Using Windows Messenger, the novice user and the expert user can even communicate with messages as the session is taking place. The novice user can allow the expert user simply to “see” the computer, or the novice user can give the expert full control.
The Remote Assistance invitation is made up of eXtensible Markup Language (XML) fields, containing data and the IP address of the novice user. The expert’s computer connects to this IP address and uses TCP port 3389 for the terminal session. All of these details are hidden from the user, so the connection seems easy, immediate, and transparent.
Turning on Remote Assistance
In order to use Remote Assistance, you must first turn on the feature. Open Control Panel, then the System applet. Click the Remote tab and select the option Allow Remote Assistance Invitations to Be Sent from This Computer, shown in Figure 11-9.
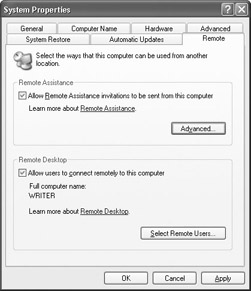
Figure 11-9: Turn on Remote Assistance
Troubleshooting: Firewalls and Remote Assistance
As with Remote Desktop, Remote Assistance can give you some problems when connecting through a firewall. Internet Connection Firewall (ICF) works transparently with Remote Assistance, automatically opening TCP port 3389 for the connection. So, if either (or both) the novice and expert user(s) are running ICF, there is nothing you need to configure; Remote Assistance will work automatically.
If you are using Windows Messenger to make the connection, you shouldn't have any problems with firewalls. Windows Messenger is configured to work around the port issue, so if the firewall allows Windows Messenger traffic, you should still be able to use Remote Assistance without any problems.
Any router or residential gateway you may be using needs to support Universal Plug and Play (UPnP). UPnP is a standard that allows devices to communicate with each other over a network. If only one Remote Assistance computer is behind a Network Address Translation (NAT)-based firewall, Remote Assistance should still work; however, if both are behind a NAT firewall, the connection cannot be established. The lesson here is that routers and residential gateways should support UPnP to allow Remote Assistance to function. If you are about to purchase a router or residential gateway for your network, make sure it supports UPnP so that you can work around this problem.
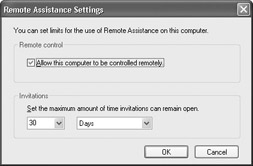
After turning on Remote Assistance, click the Advanced button. This opens the Remote Assistance Settings dialog box, shown next, which allows the novice to give the expert full control of the computer if desired, and to set a time limit for the invitation to expire. If you select the default, the invitation is good for 30 days. After the time expires, the expert can no longer connect to the novice using the invitation. You can adjust this expiration value as needed.
Requesting Help from an Expert
After turning on Remote Assistance on the novice computer, the novice user can easily request help from an expert. This can be done in a few different ways:
-
The Remote Assistance invitation can be sent through e-mail.
-
The Remote Assistance invitation can be sent using Windows Messenger.
-
The Remote Assistance invitation can be sent manually by copying the RA ticket to a floppy disk and hand-delivering it to the expert.
When the novice is ready to request help from the expert, the novice uses the Windows XP Help and Support Center to generate the ticket. The process is easy, and the following steps guide you through it.
| Secret | Remember that if you are using Remote Assistance over the Internet and a dial-up connection is in use on the novice computer, you must connect to the Internet before creating the invitation so that the correct public IP address can be used. Since you typically receive a different IP address each time you connect, you must connect and stay connected for the duration of the invitation and the session. Otherwise, you’ll have to cancel the invitation and send another one, since the expert will not receive the correct IP address if a disconnect occurs. Aggravating, but true. |
Requesting Remote Assistance
-
Click Start | Help and Support.
-
In the middle-to-upper-right portion of the window that appears (the Help and Support Center), notice there is a section labeled Ask for Assistance. Click on the green square labeled Invite a Friend to Connect to Your Computer with Remote Assistance.
-
Now the Remote Assistance portion of the Help and Support Center should be open. Click the check box Invite Someone to Help You, shown in Figure 11-10.
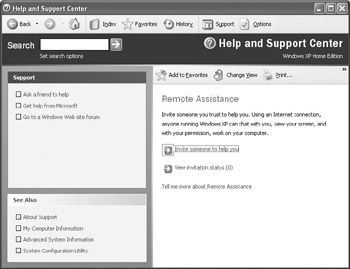
Figure 11-10: Requesting help
After you click the Invite Someone to Help You check box, there are as many as three possible methods for sending a request from a novice to an expert:
-
Windows Messenger Click the Sign In button in the Windows XP Help and Support Center. Once you are signed in to Windows Messenger, choose a name and click Invite This Person. The expert receives the request in Windows Messenger and can accept your invitation. If you want to use Windows Messenger, you can also bypass the Windows XP Help and Support Center and request help directly through Windows Messenger by clicking Actions | Ask for Remote Assistance from the Windows Messenger toolbar.
-
E-mail You can send the invitation via e-mail by entering the e-mail address in the Windows XP Help and Support Center and clicking Invite This Person. In the next window that appears, enter your name and a message, then click Continue. In the next window, specify a duration for the invitation and enter a password that the user must enter to access your computer. Click Send Invitation. The message is entered in your default mail client (such as Outlook Express). As you can see in Figure 11-11, the e-mail message contains instructions and a file called rcBuddy.MsRcIncident. When the user receives the file, he or she can double-click it to start the Remote Assistance session.
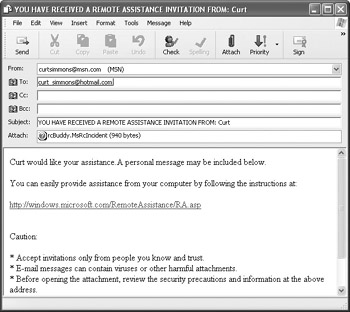
Figure 11-11: E-mail invitation -
Invitation file If you cannot e-mail the invitation or use Windows Messenger, you can save the invitation as a file, which can then be hand-delivered to the desired recipient. Using this option, you can also enter a duration for the invitation and a password. The file is saved as RAInvitation. You can then transfer the file by hand, in an e-mail message, or via a network share.
Using the Remote Assistance Session
Once the expert accepts the invitation and the connection takes place, the terminal session begins. The novice user receives a message that the invitation has been accepted. A terminal window appears on both the novice and expert users’ computers, and a chat panel appears so that the two users can talk to each other during the session, as shown in Figure 11-12. The session appears in real time, and depending on network conditions, can be somewhat slow at times. If the novice has given the expert the option to “take control,” then the expert can simply click the Take Control button that appears in the Remote Assistance terminal window. At any time during the session, the novice can get control of the session and end it by clicking the Stop Control button or by pressing ESC or CTRL-C.
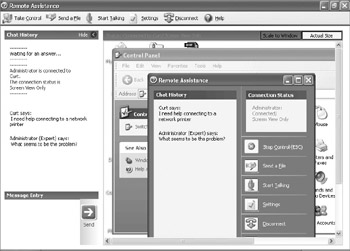
Figure 11-12: Remote Assistance session
| Note | In addition to the control features mentioned, other self-explanatory features are readily available, such as chat, file transfers, and other helpful communication options. |
|
|
EAN: N/A
Pages: 164
- Key #1: Delight Your Customers with Speed and Quality
- Key #3: Work Together for Maximum Gain
- Making Improvements That Last: An Illustrated Guide to DMAIC and the Lean Six Sigma Toolkit
- The Experience of Making Improvements: What Its Like to Work on Lean Six Sigma Projects
- Six Things Managers Must Do: How to Support Lean Six Sigma