Setting Up an Infrared Network
|
|
As I mentioned earlier, an infrared network is a great way to exchange data between a few computers, or between a computer and some device, such as a PDA, printer, mouse, game device, and so forth. In Windows XP, infrared networking technology is implemented by the Infrared Data Association’s standards (IrDA), which provide fast data transfer over an infrared beam of light. In order to communicate, the computer must be outfitted with an infrared port. Most laptop computers ship with an infrared port, and if you need one on a PC, you can purchase an infrared port device that connects to the computer via USB. As always, check the Microsoft HCL before purchasing an infrared device. Once you install an infrared device, you’ll see a wireless link icon in the Control Panel. If you double-click the wireless link icon, the Wireless Link dialog box opens, which contains a few configuration tabs. On the Infrared tab, shown in Figure 9-14, you have the following options:
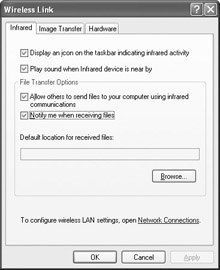
Figure 9-14: Infrared tab
-
Display an Icon on the Taskbar Indicating Infrared Activity This option will allow you to see when you are connected to an infrared link and when another computer or device is within your infrared range.
-
Play Sound When Infrared Device Is Near By A tone is played when a device first comes into range of your infrared port.
-
Allow Others to Send Files to Your Computer Using Infrared Communications If you want to let other devices send files to your computer over the infrared link, make sure this item is selected. Otherwise, users will receive an error message stating that access is denied.
-
Notify Me When Receiving Files When this item is selected, a transfer status dialog box appears when files are being received.
-
Default Location to Receive Files If you choose to receive files, you can configure a default location where those files are stored. Click the Browse button to select the location.
On the Image Transfer tab, you can choose to use the wireless link to transfer images from a digital camera to your computer, which is a popular application of infrared technology. You can enable the option and choose a default storage location for the picture files as they arrive. Also notice the Explore Location After Receiving Pictures option. If you choose this option, the folder in which the pictures are stored will automatically open after you have received the files.
The Hardware tab simply lists the infrared device that is installed. You can see basic information about the device, such as the manufacturer, COM port location, and the current device status. If you select the device in the window and click the Properties button, Device Manager properties for the device open. You’ll see the standard General and Driver tabs, but there is also an IrDA Settings tab that may come in handy. This tab, shown in Figure 9-15, allows you to set the maximum connection rate as well as the COM port. If you are having problems with communications with a certain device, try lowering this value.
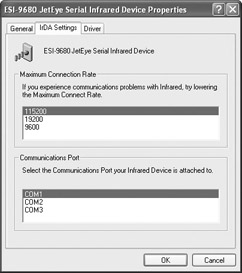
Figure 9-15: IrDA Settings tab
Once you have the infrared port up and working, there are two different connections that you can establish using Windows XP. The first is an infrared link, which allows the computer to communicate with another computer or device over an infrared link. You can connect with another Windows XP computer, a Windows 2000 computer, a Windows 98 computer, or other devices such as PDAs and digital cameras. This kind of link connection allows you to transfer files from one computer/device to the other computer/device.
Creating an Infrared Link
-
Move the infrared computers or devices so that the infrared receivers are facing each other and are within one meter of each other.
-
When the infrared device is detected, an icon appears in your Notification Area and the Wireless Link icon appears on the desktop.
-
Right-click the Wireless link icon and select Connect. The connection is made and data can now be transferred.
The second kind of connection is an infrared network connection. An infrared network connection provides a direct connection between two infrared computers where the two computers can communicate with each other over the network connection. One computer acts as the host and one computer acts as the guest, whereas the guest computer primarily accesses shared resources on the host computer. As you can see, this works basically like a direct cable connection. The guest computer provides a username and password, and then can access shared information on the host computer. The guest computer can even map to shared drives and folders. To set up an infrared network connection between two computers, just walk through the following steps.
Setting Up an Infrared Network Connection
-
On the host computer, create a user account for the guest computer if necessary.
-
Align the two computers so that the infrared transceivers are within one meter of each other and are pointing at each other.
-
The infrared icon appears in the Notification Area and the Wireless Link icon appears on the desktop.
-
To establish the network connection, open Network Connections and click Create a New Connection.
-
Click Next on the Welcome page.
-
In the Network Connection Type page, choose Set Up an Advanced Connection. Click Next.
-
On the Advanced Connection Options page, choose Connect Directly to Another Computer and click Next.
-
Choose the role of the computer, which is the Host computer in this example. Click Next.
-
On the Connection Device page, choose the infrared port as the connection device. Click Next.
-
In the User Permissions page, choose the accounts that can connect over the infrared port. Click Add if you need to add additional accounts. Click Next.
-
Click Finish. The connection now appears in Network Connections as Incoming Connection.
-
On the Guest computer, repeat this same process, but choose the Guest option. When the wizard is complete, both computers can open the connection in the Network Connections folder and click File | Connect to start the infrared network session.
|
|
EAN: N/A
Pages: 164