Other Important Network Connections
|
|
Aside from configuring workgroup and domain connections, there are a few other important networking connections that you might find useful. A major one, of course, is Internet connections, which you can learn more about in Chapter 12, but you may also find direct cable connections and even incoming connections helpful in a variety of situations. The following two sections show you how to configure these.
Direct Cable Connection
Let’s say you have two computers that need to exchange information on a temporary basis. You do not want to install a network and you do not want to install NICs in those computers. Can you do it without having to use the floppy disk shuffle? Yes, you can easily create a connection between the two computers using a direct cable connection (DCC).
A DCC connection is a great temporary solution where one computer needs to share information with another. The DCC connection uses a null modem cable (connects to serial ports), a DirectParallel cable, or even two modems or ISDN devices. The transfer speed tends to be slow (usually around 24 Kbps to 50 Kbps), but the DCC gets the job done when no network is available or is not desired. The null modem or DirectParallel cable you’ll need to connect the two computers is readily available at most computer stores.
You can create a DCC with Windows XP and another Windows XP computer, or even with Windows 95, Windows 98, Windows ME, or Windows 2000. During a DCC session, one computer acts as the host (the computer you are downloading files from) and one computer acts as the guest. The guest computer accesses information on the host, and the transfer is one way. In other words, the host cannot access information on the guest computer. As you can see, DCC isn’t a true networking solution, but a way to get files from one computer to another. To create the DCC, simply connect the two computers together using the null modem cable, DirectParallel cable, or even two modems, then follow these steps.
Creating a Direct Cable Connection
-
Log on to Windows XP with an administrator account. You cannot create a host direct cable configuration unless your account has administrative privileges.
-
Click Start | Control Panel | Network Connections.
-
In Network Tasks, click Create a New Connection. Click Next on the wizard’s Welcome page.
-
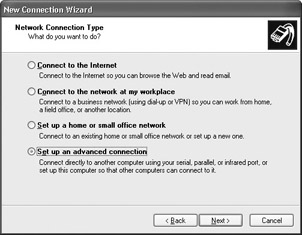
In the Network Connection Type page, shown here, select the Set Up an Advanced Connection radio button and click Next.
-
In the next page, choose the Connect Directly to Another Computer radio button option and click Next.
-
In the Host or Guest page, select the Host radio button and click Next.
-
In the Connection Device page, choose the port that you want to use for the connection (such as serial or parallel) from the drop-down menu. When you select the desired port, the port is configured for direct cable communication. You cannot use a port that currently has another device attached to it. Click Next.
-
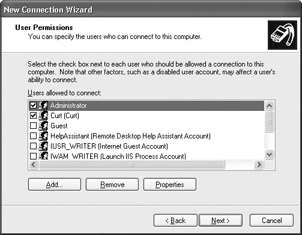
In the User Permissions page, you can select which users are allowed to access the host computer through a direct cable connection. Notice that you can also create additional user accounts as needed directly from this window, as shown here. Make your selections and click Next.
-
Click Finish. The new connection appears in the Network Connections folder under the label Incoming Connection.
Once you have the host set up, your next task is to set up the guest computer. For Windows XP computers, you simply use the Network Connections Wizard again and choose the Guest option instead of Host. If you are using another version of Windows as the guest, see that operating system’s help files for setup instructions. In Windows XP, the connection on the client computer appears as Direct in Network Connections, as you can see in Figure 9-13. Simply double-click the icon to make the connection, then enter a valid username and password. Keep in mind that you can create multiple direct cable connections to different computers as needed. Simply create the connections, enter the computer name that you want to connect to, and choose the appropriate port.
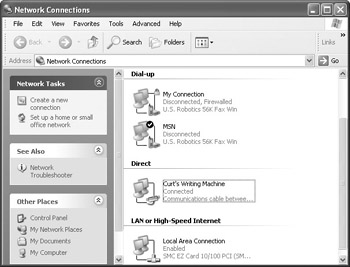
Figure 9-13: Direct connection
Incoming Connections
Let’s say you have a lot of files on a certain Windows XP computer at your office. You access those files regularly when you travel with your laptop computer. Your network does not use a proxy server, so you need to configure a dial-up connection so that you can dial into the Windows XP computer and access files. Although you can accomplish this task using Remote Desktop (see Chapter 11), Windows XP also allows you to create a simple incoming connection. Connect the computer’s modem to the desired phone line, then simply use a dial-up connection from the remote computer to dial the Windows XP computer in your office. You can determine what users can have dial-up access, and as you can see, this is an easy way to access your computer when you are away. This same principle is true if you want your computer to accept incoming virtual private network connections, which you can learn more about in the next section.
Setting up an incoming connection on a Windows XP computer is easy—just follow these steps.
Setting Up an Incoming Connection
-
Log on with an administrator account.
-
Click Start | Connect To | Show All Connections.
-
Click the Create a Connection link in the Network Tasks portion of the window.
-
Click Next on the Welcome page.
-
In the Network Connection Type page, choose the Set Up an Advanced Connection option. Click Next.
-
In the Advanced Connections Options page, click the Accept Incoming Connections option and click Next.
-
In the Devices for Connection page, select your modem and click Next.
-
In the next page, you can choose to allow VPN connections or not. If you choose to allow VPN connections, the wizard configures ICF for VPN connections. Make a selection and click Next.
-
In the User Permissions page, select the users that can connect using the incoming connection. You can create additional user accounts as needed by clicking the Add button. Click Next.
-
In the Networking Software page, you can choose to enable or disable any protocols or services that can be used on the connection. Make any necessary changes and click Next.
-
Click Finish. The incoming connection now appears in the Network Connections folder.
| Note | You can make changes to the connection, such as VPN support or user permissions, at any time by simply right-clicking the connection and selecting Properties. |
|
|
EAN: N/A
Pages: 164