Setting Up a Home or Office Network
|
|
As an A+ technician, your first thought might be that home and small office networking is beneath your skills. However, don’t assume things are that simple. How about a small office network with 50 Windows XP clients, a single Internet connection, and a network that spans several rooms? How about adding laptop computers to that mix that need to travel from room to room? Or what about a home network of five computers, each one running different versions of Windows and even using different types of networking components?
As networking has become more complex, so has home and small office networking, and it is not at all unusual for home users to hire extra help (like you!) to set it all up. Also, small businesses may use a workgroup rather than a domain, but still hire a full-time network and computer manager (you again). So the importance of home and small office networking in today’s computing environment cannot be understated, and your skills in this area will surely be put to use at some time or another. The following sections explore the issues you should keep in mind when configuring home or small office networks with Windows XP.
Home and Small Office Hardware
The networking hardware you need for a home or small office network is typically the same as you might see in larger networks, but much more scaled down and simplified, of course. The following bullet list gives you an overview of the hardware you’ll need:
-
Network interface cards Regardless of the type of network you want, each computer must be outfitted with a NIC. The NIC gives the computer access to the network. Before purchasing NICs, you’ll need to decide what kind of network you want to configure (which we’ll explore in the next section).
-
Cabling You’ll need the correct cabling to connect computers on a home or small office network. The exception, of course, is wireless networks, where no cabling is needed. We’ll cover wireless networking later in this chapter.
-
Hub or access point A hub is a device in which all computers connect in a home or small office network. The hub routes traffic between computers; think of it as a central connection device. Hubs come in a number of different sizes that support different numbers of clients. Some hubs even provide DSL/cable connections and firewall functionality. An access point is like a hub, but is used for wireless networks.
-
Routers and residential gateways Depending on the needs of your network, you may need a router or residential gateway. A router or residential gateway manages traffic coming onto the network from the Internet as well as traffic flowing from the network to the Internet. You can think of a router or a residential gateway as a gatekeeper between the workgroup and the Internet. Routers and residential gateways often provide firewall services and even network address translation (NAT) functions as well. The purpose of this configuration is to keep all computers separated from the Internet. The router or residential gateway is the only device that connects to the Internet (on behalf of the network clients), and with the client management functions, it provides a great measure of security. Of course, you can use Internet Connection Firewall and Internet Connection Sharing to achieve this same purpose (see Chapter 13), but many people prefer the flexibility and additional security features provided by some routers and residential gateways.
I mentioned that a number of routers and residential gateways provide network address translation (NAT). NAT is an industry standard service that hides the internal IP address of a LAN from the Internet or other destinations beyond the gateway. NAT translates all internal IP addresses of LAN clients into a different IP address range. These new addresses are then used on the Internet. If a hacker on the Internet attempts to break into a network computer using the IP address, guess what? He doesn't have the real IP address of the client, so the attack fails. In many cases, the router or residential gateway will use a translated address to act like one computer connecting to the Internet, when in fact all of the clients sit behind the router or residential gateway. This measure is very helpful when it comes to security. Routers and residential gateways typically cost from $100 to around $400, depending on what you want. You'll find them at most computer stores, and you can find them for sale on the Internet as well from a number of providers, such as NetGear (www.netgear.com). If you want to know more about the technical details of NAT, access RFC 1631 on the Internet.
Choosing a Type of Network
When working with home and small office networks, you have some flexibility when it comes to the type of network that you want to use. There are three primary options that are commonly supported (and for which you’ll find plenty of hardware).
Ethernet
Ethernet is a networking standard and the most popular kind of network in use today. When you think of a network with a typical wired configuration, you are generally thinking of Ethernet. Ethernet was introduced in the 1970s by Xerox, and it is defined by the Institute of Electrical and Electronics Engineers (IEEE) specification 802.3. This specification defines how hardware devices must function in order to conform to the Ethernet standard. For this reason, you can use a mixture of Ethernet NICs from different vendors with no compatibility problems. Ethernet NICs connect to RJ-45 cables (looks like a larger phone cable), and you’ll need an Ethernet hub, router, or residential gateway, depending on your needs. Ethernet networks provide three different speeds, which must be supported by the NICs that you purchase:
-
10 Mbps The 10BaseT Ethernet standard defines 10 megabits per second (Mbps) transfer speed.
-
100 Mbps The 100BaseT (also called Fast Ethernet) standard supports up to 100 Mbps transfer speed.
-
Gigabit Ethernet Gigabit Ethernet is a standard that provides 1000 Mbps, or 1 Gbps. You must have Gigabit Ethernet NICs and hubs in order to get the speed, but you still use the same RJ-45 cabling.
| Note | Since Ethernet is the most common type of home and small office network (not to mention larger networks as well), you’ll find a plethora of NICs, routers, hubs, and residential gateways at any computer store. |
HomePNA
HomePNA is another type of network topology that is designed for home use, but it works well in small offices too. HomePNA networks use typical PCI or USB NICs, but each NIC connects to a standard phone jack in the home or small office using standard RJ-11 phone cable. Rather than using a hub and having wiring running everywhere, you simply use the existing phone lines in the home as the network. Even though the computers are connected to the phone lines, you can still have voice conversations. This type of setup works great in homes where computers reside in different rooms, or in small offices with the same situation. You don’t have to run additional cabling and you don’t have to worry about a hub. If this sounds like a dream come true, it certainly does solve a number of problems. However, the problem with HomePNA is that you are limited to 10 Mbps. If you are only sharing files, printers, and accessing the Internet, but you need to run large multimedia files over the network or play network games, the speed is a little slow. For most users, though, the 10 Mbps speed is all you need to use the network and access a broadband Internet connection from a residential gateway or ICS host computer. Some small office networks even combine existing Ethernet networks with HomePNA networks for more flexibility. In this case, you’ll need one Windows XP computer to act as a network bridge. See the “Network Bridges” section later in this chapter for details.
Wireless Networks
Windows XP brings a lot of wireless networking capabilities to the table, making it easier for you to configure and use wireless networks than ever before. Since this is a newer kind of network and one that requires a little more thought, I’ve devoted an entire section to wireless networking later in this chapter.
Setting Up a Home or Small Office Network
As you are preparing to create a home or small office network, you’ll need to gather the hardware that you’ll need and determine the kind of network that you want, such as Ethernet, HomePNA, or wireless. If you have an existing network and you want to create a different network using a different network type, such as Ethernet and HomePNA, you can use a Windows XP Professional computer as a network bridge, which is explored in the next section. Before you get started configuring Windows XP for networking, you’ll need to complete the following tasks:
-
Install any necessary NICs and gather cables (if needed).
-
Arrange the physical topology of the computers and connect the network cabling (if needed) to the hub, router, or residential gateway. You should review any documentation and instructions that accompanied the hardware.
-
Once the computers are all connected, determine if you will use Internet Connection Sharing (see Chapter 13 for more information). If you will be using ICS, you need to start the configuration of the home or small office network with the computer that will host the ICS connection. Follow the steps provided here to configure the computer.
Configuring the First Windows XP Computer on the Home or Small Office Network
-
Click Start | Control Panel | Network Connections. In the Network Tasks pane of the Network Connections window, click the Set Up a Home or Small Office Network link.
-
The Network Setup Wizard appears. Click Next on the Welcome page.
-
In the Before You Continue page, read the instructions and make sure that all network components are connected and working. If you want to set up the ICS host at this time, connect to the Internet.
-
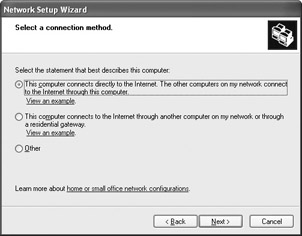
In the Select a Connection Method page, shown here, select the first button option if the computer will function as the ICS host. If not, choose the second button option if there currently exists another ICS host. If neither of these options apply to you, click Other. Make a selection and click Next.
-
If you chose the Other option, the next page allows you to select one of the following:
-
This computer connects to the Internet directory or though a network hub. Other computers on my network also connect to the Internet directly or through a hub.
-
This computer connects directly to the Internet. I do not have a network yet.
-
This computer belongs to a network that does not have an Internet connection.
-
-
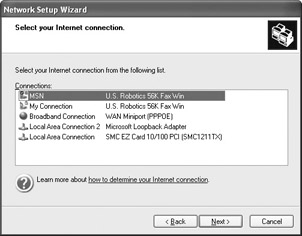
In Step 4, if you determined that the computer should function as the ICS host, an Internet connection page appears, shown here. Select the Internet connection that you want to share and click Next.
-
If you have multiple LAN connections installed on your computer, a page appears asking if you want to bridge those connections. You can choose to allow Windows XP to automatically bridge the connections by selecting the provided button option, or you can choose the button option so that you can choose your own bridge connections. Make a selection and click Next.
-
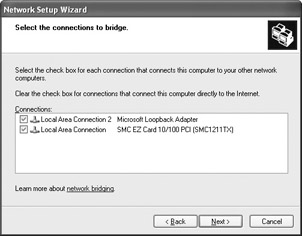
If you chose to select your own bridge connections, a page appears so that you can select the connections to bridge, shown next. Do not choose any Internet connections—you cannot bridge a LAN connection with an Internet connection, and doing so presents a serious security breach on your network! Make your selections and click Next.
-
In the next page, give the computer a name and a description. The name you assign the computer should be a friendly name that is easily recognizable on your network. However, if you are using a broadband connection, your computer may have a required name (often true of cable modems). In that case, do not change the name if it is required by your ISP. See your ISP documentation for additional details. Click Next.
-
In the next page, assign a name for your network by typing it in the provided dialog box. By default, your workgroup is named MSHOME. However, you can change it to anything you like. The name should be friendly, and all computers on your network must use the same workgroup name. Click Next.
-
Review the settings you are about to apply on the next page. When you are sure they are correct, click Next. Use the Back button to make any necessary changes.
-
Windows XP configures the computer for networking, and you see a “waiting” page while the computer is configured.
-
When prompted, you can choose to create a network setup disk to use any downlevel clients. Make a selection if necessary and click Next.
-
Follow any additional instructions to create the network setup disk and click Finish. If all of the clients on your network are Windows XP clients, you will not need a network setup disk.
Once the first computer is installed, you are now ready to begin installing the other Windows XP computers. Simply follow these same steps to install the networking software on the additional client computers. If you are using ICS, keep in mind that the Network Setup Wizard will ask you to choose how the computer connects to the Internet. Select the option to connect “through another computer,” and the Network Setup Wizard will locate the ICS host and proceed with setup from there.
Windows 98, Windows ME, Windows NT 4.0, and Windows 2000 clients can also natively function in your workgroup with your existing Windows XP clients. Windows 95, Windows 3.x, and earlier versions of Windows NT are not supported. These clients, collectively called down-level clients, can be configured manually for networking, or you can run the Network Setup Wizard on these clients as well. To use the Network Setup Wizard, you can either use the floppy disk that you created when you configured the Windows XP clients, or you can use the Windows XP installation CD-ROM to run the Network Setup Wizard.
Installing Down-level Clients
-
Insert the Windows XP CD-ROM into the down-level client’s CD-ROM drive.
-
On the Welcome screen that appears, click the Perform Additional Tasks option.
-
In the next window, click the Set Up a Home or Small Office Network option.
-
Depending on the operating system version you are using, the Network Setup Wizard may need to copy some additional files to your computer and restart it. Click Yes to continue.
-
At this point, the Network Setup Wizard Welcome page appears. Click Next to continue. The remaining steps are the same. See the steps earlier in this section for instructions.
When you run the Network Setup Wizard, APIPA is used to automatically assign IP addresses to network clients. Clients on your workgroup assign themselves an APIPA address in the 192.168 range. Each client on the network has a unique IP address, and a query method is used during setup to make sure that the IP address being assigned is unique.
If you want to manually assign different IP addresses to the clients on your workgroup, you can easily do so by accessing Internet Protocol properties from the General tab of the NIC's properties pages. APIPA is designed to service workgroups and was specifically developed for networks where no centralized DHCP server is in use. The fact is, manual IP address configuration can be complicated and problematic, so before making any static changes to the IP addressing scheme automatically used on your network, keep the following issues in mind. First, each client on your network must have a unique IP address in the same range and an appropriate subnet mask. You must manually change the IP addressing properties of each client on the network. If you use ICS, the default gateway assigned to your network clients must be the address of the ICS host.
|
|
EAN: N/A
Pages: 164