Configuring Hard Disks
|
|
Windows 2000 introduced several new disk technologies to Windows and made the configuration and management of hard disks much easier than it had been in the past. You can configure, reconfigure, and adjust hard disk settings without rebooting, and you can make a number of changes that were once available only if you chose to reformat the disk.
The same capabilities are available in Windows XP Professional. You can access the Disk Management console through Computer Management, which is available in Start | Control Panel | Administrative Tools | Computer Management. Select Disk Management in the left console pane and you can see the disks and their configuration in the right console pane, as shown in Figure 7-1.
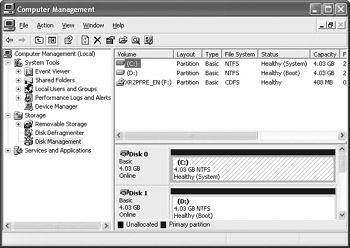
Figure 7-1: Disk Management
Using Basic and Dynamic Disks
Windows XP Professional, like Windows 2000, continues to support basic and dynamic disks. It is important to define the two types of disks. A basic disk is the same kind of disk that you have always worked with in the past. It is a standard hard disk that supports standard configuration. A basic disk can have a primary partition and extended partitions that make up logical disk drives. For example, you can configure the basic disk so that it has a C drive (primary) and a D drive (extended). You can use the D drive for storage or other purposes (or to set up a dual-boot configuration). On a basic disk, you can have up to four primary partitions, or alternative configurations, such as three primary partitions and one extended partition. One of the primary partitions is considered active and is to start the computer. Basic disks behave as disks have in the past and do not provide the advanced management features supported under Windows XP Professional. Disks are always basic when first installed, but you can convert them to dynamic in order to take advantage of all that Windows XP Professional has to offer.
| Note | Keep in mind that on basic disks, extended partitions are “logical” partitions—they are a logical organization of an existing partition. For this reason, they do not contain drive letters. |
A dynamic disk, which currently is supported only on Windows 2000 and XP systems, is a drive configured by the Disk Management console so that it can support volume management. In other words, the Disk Management utilities configure the drive so that it can make use of Windows XP Professional’s Disk Management features, such as unlimited volumes, spanned volumes, mirrored volumes, and striped volumes. In essence, if you want to take advantage of volume management and lose the partition restrictions placed on basic disks, you need to convert the disk to a dynamic disk. Otherwise, dynamic disks offer no performance features, so there is no reason to convert. However, if you want to take advantage of volume management, then you can easily convert your existing drives to dynamic disks, as shown in the following steps.
| Note | If you are using Windows XP in a dual-boot scenario, do not convert the disk to dynamic, since previous versions of Windows (excluding Windows 2000) cannot read dynamic disks. |
Converting a Basic Disk to a Dynamic Disk
-
In the Disk Management console, right-click the disk number in the graphical portion of the Disk Management display, and click Convert to Dynamic Disk. You can also click Action | All Tasks | Convert to Dynamic Disk.
-
In the Convert to Dynamic Disk dialog box, shown here, select the disk that you want to convert, then click OK.

-
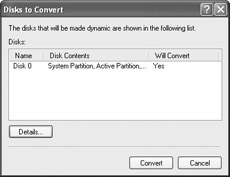
In the Disks to Convert dialog box, shown here, review the settings. Click Convert to continue.
-
You will see a message telling you that other operating systems (down-level systems such as NT, 9x, and Me) will not be able to start from the disk once the conversion has taken place. Click OK to continue.
-
You may see a message telling you that you need to dimount any mounted disks. Click OK to continue.
-
The conversion process occurs, and you are prompted to reboot the computer. Once you reboot, you can see that the disk’s status has changed from basic to dynamic, as shown in Figure 7-2.
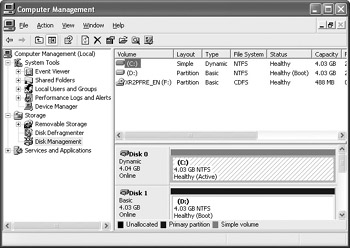
Figure 7-2: Check the disk’s changed status in Disk Management
Once a basic disk has been converted to a dynamic disk, you can begin taking advantage of the features of dynamic disks right away. However, you first should be able to understand and interpret many of the monitoring and management features of dynamic disks, which are explored in the next few sections.
Dynamic Disk States
Dynamic disks are capable of displaying several different states. This information tells you the current status of the disk and helps you understand problems that may exist. The following bulleted list explains the states that a dynamic disk may display:
-
Online The disk is online and functioning with no errors.
-
Online (Errors) The disk is online, but there have been some errors. These errors are usually minor. You can usually fix them by running the Error Checking tool found on the Tools menu of the disk’s properties dialog box.
-
Offline The disk is not accessible. This problem can occur due to corruption or an input/output (I/O) problem. Try right-clicking the disk and then clicking Reactivate Disk in order to bring the disk back online.
-
Missing The disk is not accessible or is disconnected, or corruption has caused the disk to be unreadable. Try right-clicking the disk and then clicking Reactive Disk in order to bring the disk back online.
-
Initializing This message occurs when the disk is temporarily unavailable due to a conversion to dynamic state.
-
Not Initialized This message occurs when you are installing a new disk that does not have a valid signature. When the Disk Management utility appears, the disk appears as “Not Initialized.” To write a valid signature so that you can format and begin using the disk, simply right-click the disk, then click Initialize.
-
Foreign This status appears when a physical, dynamic disk is moved from a Windows 2000/XP Professional computer to another Windows 2000/XP Professional computer. When this message appears, right-click the disk, then click Import Foreign Disk.
-
Unreadable This status appears when I/O errors keep the disk from being readable. Choose Action | Rescan Disks to fix the problem.
-
No Media This status appears on removable drives when no media is inserted into the drive.
Configuring Drive Letters and Paths
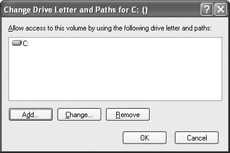
Dynamic disks make drive letter and path configuration easy. You can assign a drive any alphabet letter, and you can also assign a drive to an empty NTFS folder. First, if you want to make a change to a dynamic disk volume, simply right-click the volume in the Disk Management console, then click Change Drive Letter and Paths. A simple Change Drive Letter and Paths dialog box appears, as you can see here.
You can do the following actions:
-
Add If you click the Add button, a second window appears where you can mount the drive to an empty NTFS folder (which is discussed later in this section). Since a drive can only have one drive letter, you cannot assign multiple drive letters for the same drive.
-
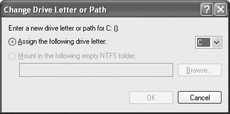
Change If you click the Change button, the Change Drive Letter or Path dialog box appears, as you can see here. You can choose a different drive letter from the drop-down menu.
-
Remove You can also remove the drive letter. Dynamic disks do not require a drive letter or path to identify a drive. However, some programs may not function if you remove the drive letter.
In addition to assigning a different drive letter, you can also mount a volume to a local, empty NTFS folder. The purpose is to give you freedom and flexibility beyond the 26-letter alphabet limitation. When you mount a volume to an empty NTFS folder, a drive path is used instead of a drive number. For example, suppose that you have a local volume that is used only for storage. You could create a folder called Storage, and then mount the drive to the empty storage volume. You can then access the drive by simply accessing C:\Storage, just as you would a folder. The result is that you can have an unlimited number of drives and use them like folders rather than standard drive letters that you must keep track of. You can use both a drive letter and a mounted volume on the same drive, if you like. The following steps show you how to mount a volume to an empty NTFS folder:
-
In the Disk Management console, right-click the volume that you want to mount to
an empty NTFS folder, then click Change Drive Letter and Paths. -
In the Change Drive Letter and Paths dialog box, click the Add button.
-
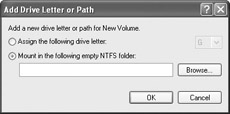
In the Add Drive Letter or Path dialog box, shown here, select the Mount radio button, and then enter the path to the folder that you want to mount, or click the Browse button to select the folder.
-
If you click the Browse button to browse for the folder, a browse window appears. You can locate the folder or create a new one by clicking the New Folder button. Make your selection and click OK.
-
Click OK again in the Add Drive Letter or Path dialog box. You can now open the drive by simply opening the folder to which it is mapped.
|
|
EAN: N/A
Pages: 164