Using Encryption
|
|
Like Windows 2000 systems, Windows XP Professional also provides built-in encryption so that users can encrypt files. Once files are encrypted, other users cannot read them. For example, if several different people use a Windows XP Professional computer, each user can encrypt his or her own private data so that other users cannot read it. Encryption is seamless and easy to use, and it is a feature of the NTFS file system. The user does not have to be aware of any keys or the underlying encryption technology. The user simply selects to encrypt data, but can open the data and use it seamlessly without any kind of manual decryption. If another user attempts to access the encrypted data, that user’s key will not decrypt the data and he or she will still be unable to read it.
There are a couple of important issues to consider when working with Encrypting File System (EFS). First, EFS is a feature of NTFS and only works on NTFS drives. However, encryption and compression are not compatible—you can either encrypt a file or folder or compress it, but you cannot do both. Also, encryption tends to slow access down—using encrypted files is slower than using regular files because Windows XP Professional must encrypt and decrypt files as they are opened or closed. A new encryption feature in Windows XP, however, enables you to give several users access to the same encrypted file or folder.
To use encryption, simply right-click the file or folder that you want to encrypt, click Properties, and then click the Advanced button on the General tab. The Advanced Attributes window, shown here, gives you a simple encryption check box that you can use to turn on EFS.
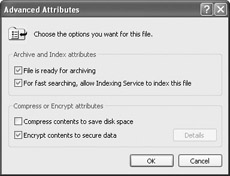
| Note | You cannot encrypt any files that have the system attribute or any files located in %SystemRoot% or any of its subfolders. You also cannot encrypt any files or folders in a roaming user profile. |
As you can see, encrypting data is rather easy. At any point, you can permanently decrypt the file or folder by returning to the Advanced Attributes window and clearing the check box. However, what if you need to access your encrypted data over the network via several different workstations? You can do so in a couple of different ways. First, if you set up a roaming user profile, then the key will be available no matter where you log on. If not, you can copy your key and carry it with you on a floppy disk. Then, you can use the key to open your encrypted data. This export process is rather easy, and the following exercise walks you through the steps.
Exporting a Private Key
-
Click Start | Run. Type MMC and click OK.
-
In the MMC, click File | Add/Remove Snap-In.
-
In the Add/Remove Snap-In window, click Add. In the snap-in list that appears, click Certificates and click Add.
-
In the Certificates snap-in window, select My User Account and click Finish. Then click Close on the Snap-in window, and then click OK on the Add/Remove Snap-In window.
-
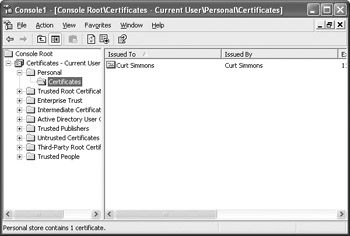
In the MMC, expand Certificates – Current User, as shown here.
-
Expand the Personal folder, and then select the Certificates folder. In the right pane, select the desired certificate.
-
Click Action | All Tasks | Export, which will start the Export Certificate Wizard.
-
Follow the wizard’s simple steps. Make sure that you select to send your private key with your digital certificate. If you are moving to another Windows XP or 2000 system, choose the Enable Strong Encryption option.
-
Choose a password, which you will need to import the certificate in the new location.
-
The wizard saves your certificate and private key to a file (*.pfx, which is a Personal Information Exchange file). You can now copy this file to a floppy disk and move it to a new computer.
-
Once you have copied your certificate and private key, you can import the certificate and private key to another computer. Open the Certificates MMC.
-
Open Certificates – Current User. Expand the Personal folder and select the Certificates folder.
-
Click Action | All Tasks | Import. This will launch the Import Wizard.
-
Use the Browse option to select the file that you want to import, then complete the wizard steps. You will need to provide the password that you assigned to the file when you were exporting it.
Although using encryption is rather easy for end users, many difficulties that you will face as an A+ technician will involve data recovery. Aside from using the private key to encrypt/decrypt data, Windows XP Professional also provides Recovery Agents for this purpose. Consider this example: A certain user knows just enough to be dangerous, and accidentally deletes his private key. The computer is full of company-sensitive encrypted data that no one can read without the user’s private key. What can you do? The answer is to use the Recovery Agent. In same manner, what if a user leaves the company and leaves important data encrypted? Again, the answer is to use the Recovery Agent.
The Recovery Agent can be assigned so that the data can be recovered if the user’s private key is lost or corrupted, or if the user suddenly decides to never return to work. To prevent data from being hopelessly lost in encryption, a Recovery Agent can decrypt the data. It is important to note that the agent can only decrypt data, not reencrypt it.
To configure a Recovery Agent, you must be logged on to Windows XP Professional as an administrator and you need to know the location of the certificate of the person who will become the Recovery Agent. If you are part of a domain, a network administrator will need to assist in this process since certificates are most often stored in the Active Directory in Windows domain networks. To configure a Recovery Agent, follow the steps described in the next section.
Configuring a Recovery Agent
-
Click Start | Run. Type MMC and click OK.
-
In the console window, click File | Add/ Remove Snap-In.
-
In the snap-in window, click Add. In the Add Standalone snap-in window, click Group Policy, then click Add.
-
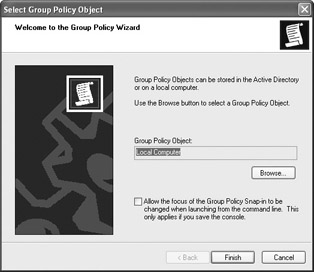
In the Group Policy Object window, leave the Local Computer option selected, as shown here, and click Finish.
-
Click Close on the Add Standalone snap-in window, then click OK on the Snap-In window. You now see the Local Computer Policy in the MMC. Expand Local Computer Policy | Computer Configuration | Windows Settings | Security Settings | Public Key Policies | Encrypting File System.
-
Right-click the Encrypting File System folder and click Add Data Recovery Agent. This starts the Add Recovery Agent Wizard. Click Next on the Welcome screen.
-
Using the wizard, locate the desired user certificate. You can select the certificate from the Active Directory. If the certificate is not located in the Active Directory, you need to choose a local *.cer file. The certificate must be saved as a *.cer file.
Aside from the using the Windows XP GUI interface for encrypting and decrypting data, you can also use the Cipher command-line tool. The command-line syntax and switches for the tool are as follows:
Cipher [/e] [/d] [/s[:dir]] [/a] [/i] [/f] [/q] [/h] [pathname [...]]
Table 3-2 defines each of the command switches.
| Switch | Explanation |
|---|---|
| /e | Encrypts the specified file or folders |
| /d | Decrypts the specified file or folders |
| /s: dir | Performs the selected operation on all folders and subfolders in the specified directory |
| /a | Performs the selected operation on all files with the specified name |
| /I | Continues the selected operation even if errors occur |
| /f | Forces the encryption operation on all specified files, including currently encrypted files |
| /q | Reports only the most essential information |
| /h | Performs the selected operation on hidden files |
You can also allow other users to access an encrypted file. This feature, which is new in Windows XP, provides a great way to secure a file that only a few people need to access. To give other users access to an encrypted file, follow the steps in the next section.
| Note | You can give access only to individual encrypted files, not folders. Also, if you want to give access, you must first encrypt the file and close the Advanced Attributes dialog box before following these steps. |
Giving Other Users Access to an Encrypted File
-
Right-click an encrypted file and click Properties.
-
On the General tab, click the Advanced button.
-
On the Advanced Attributes dialog box, click the Details button.
-
In the Encryption Details dialog box, shown next, use the Add and Remove buttons to manage the users that can access the encrypted file.
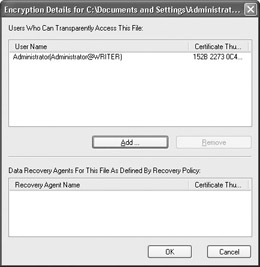
Only users who have an EFS certificate on the computer appear as selection options. If a user does not appear that you need to give access, have the user log on to the computer and encrypt a file. This will create the needed certificate. The user will then appear in the Encryption Details dialog box as a selection option.
|
|
EAN: N/A
Pages: 164