Exploring the Desktop, Start Menu, and Taskbar
|
|
When users new to Windows XP first boot the operating system, they are often in for a shock, especially if they have used previous versions of Windows. The interface looks quite different. After all, where is My Computer? Where is My Network Places? In fact, in a typical XP installation, the only thing that appears on the desktop is the Recycle Bin. A+ technicians often receive interface support calls from users reporting a faulty installation. Most likely the installation is fine, but the differences between Windows XP and previous versions of Windows often confuse new users. For this reason, you need be very familiar with the Windows XP interface. The good news is that Microsoft has attempted to streamline the design of Windows XP to reduce desktop clutter and make the operating system easier to use. Whether or not Microsoft succeeded is ultimately up to you and the users you support. In either case, Windows XP is here to stay and has become the most popular operating system since Windows 95.
Although your job as an A+ technician typically involves more complicated problem-solving and configuration issues than the Start Menu and the taskbar, you need to know how to configure these two items to help users in your environment. In fact, if Windows XP is new in your environment, you must spend quite a bit of time helping users reduce the learning curve.
Configuring the Start Menu
The XP Start Menu, shown in Figure 2-1, gives you an easy place to access the most common Windows configuration items as well as other items that you might decide to put on the menu.
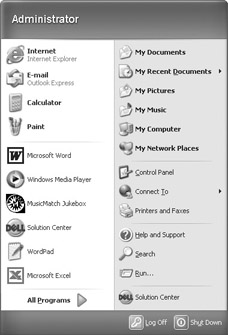
Figure 2-1: Windows XP Start Menu
The new Windows XP Start Menu consists of two primary parts. The left side of the Start Menu lists programs, and the right side of the Start Menu provides access to common Windows folders, as well as the Help, Search, and Run commands. The Start Menu lists items that you use most frequently. So, if you open a program, Windows XP will remember it and place an icon in the Start Menu so you can more easily open the program next time. As you can see in Figure 2-1, I use Microsoft Word a lot, so Windows XP has put Word on the Start Menu so I can more easily access the program. Typically, I have to click Start | All Programs | Microsoft Word. Once I open Word for the first time, Windows XP adds the Word icon to my Start Menu. The next time I want to use Word, all I have to do is click Start and then click the Word icon. In a nutshell, the Start Menu simply adds shortcuts to itself on your behalf. You can easily manage these icons by right-clicking on them. This action gives you typical menu options, such as Open, Send To, Copy, Remove from This List, Rename, and Properties for the shortcut. If you want to remove the shortcut from the Start Menu, just click the Remove from This List option. This action only removes the shortcut from the Start Menu.
When you right-click an item, you also see an option called Pin to Start Menu. This action simply moves the item to the top-left portion of the window, where it will always be visible. You’ll notice that Internet Explorer and Outlook Express are available in the Start Menu by default, but you can remove them by right- clicking the items and clicking Remove from This List.
Why should you use pinning? Over time, Windows XP will remove from the Start Menu items that the user no longer uses frequently. For example, if you stop using Microsoft Word, XP will remove it from the Start Menu after a period of inactivity. If you want Word always to be available, whether you have used it recently or not, you can simply pin it to the Start Menu to keep it there. Below the pinned items (separated by a line), you see a list of most frequently used items. When you open a program, Windows XP will place the program link to this list for quick reference in the future. If you no longer use the program, Windows XP will eventually remove the link from the Start Menu.
Painful Lessons I’ve Learned: Diffuse Start Menu Confusion
Users are often worried about deleting items from the Start Menu. Instruct users that everything on the Start Menu—including all programs and even documents that users store on the Start Menu—is simply a link. Deleting an item from the Start Menu never deletes the item from the operating system, it only deletes the shortcut. However, some icons, such as My Documents and My Computer, cannot be deleted from the Start Menu. You can drag and drop them to the desktop, though, if you want to access those items directly from the desktop.
Finally, you can also click All Programs to access typical Windows menus and installed applications.
| Note | If you want to use Internet Explorer (IE) and Outlook Express from the Start Menu, you can right-click the icons to find easy access options. For example, you can choose to read e-mail, browse the Internet, or even access Internet properties. See Chapter 9 for more information about configuring Internet properties. |
On the right side of the Start Menu, you see common Windows items that you will need to access. The included items are as follows:
-
My Documents, My Pictures, and My Music The My Documents folder is the default storage location for files of all kinds, including pictures, music, and movies. My Documents contains default subfolders of My Music and My Pictures, and may also contain My Videos and Remote Desktops. You can learn more about My Documents and folder management in Chapter 3.
-
My Computer This default folder stores information about drives connected to your computer.
-
My Network Places This folder contains information about other computers and shared folders on your network. You can learn more about My Network Places in Chapter 8.
-
Control Panel This is the default location for managing all kinds of programs and services on your XP computer. You will explore Control Panel later in this chapter.
-
Network Connections This folder contains your dial-up and broadband connections as well as local area network connections. You can learn more about networking in Chapter 8.
-
Help and Support Windows XP includes a Help and Support feature that can answer your questions and even locate answers on the Internet.
-
Search The Search feature enables you to find items on your computer or items on the Internet.
-
Run You can use the Run dialog box to start programs quickly or connect to network shares.
-
Log Off / Turn Off Computer These standard icons enable you to log off, shut down, or restart the computer.
Customizing the Start Menu
To customize the Start Menu, you need to access the Start Menu’s Properties menu. To access this menu, open Control Panel and double-click the Taskbar and Start Menu icon, then click the Start Menu tab. If you don’t see a Taskbar and Start Menu icon, switch Control Panel to Classic view using the Control Panel link on the left side of the window.
| Note | You can also access the Start Menu’s properties in two other quick ways. First, you can right-click any empty area of the taskbar, click Properties, then click the Start Menu tab, or better yet, just right-click the Start button and click Properties. |
Regardless of which of these methods you use, you will arrive at a simple Start Menu properties page, shown in Figure 2-2.
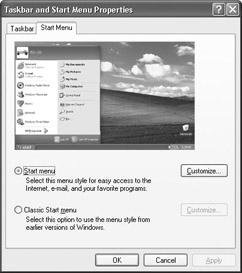
Figure 2-2: Start Menu properties page
The Start Menu properties page offers two options: You can click the Start Menu option to use the current Windows XP version of the Start Menu, or you can click the Classic Start Menu option to use the Start Menu familiar in previous versions of Windows. The following two sections explore the configuration of each of these different options.
Using the XP Start Menu
To continue using the XP Start Menu, just click the Customize button. This takes you to a Customize Start Menu dialog box that includes General and Advanced tabs. The General tab, shown in Figure 2-3, offers three different customization options:
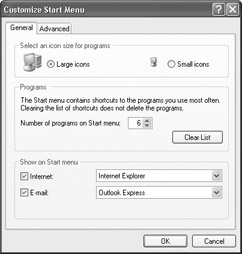
Figure 2-3: The Customize Start Menu dialog box’s General tab
-
Icon Size You can choose to use large or small icons in the Start Menu. Small icons may be harder to see, but you can put more shortcut icons directly on the Start Menu. Large icons are selected by default.
-
Programs By default, your Start Menu will place five program shortcut icons in viewing range when you click Start. You can change this number by using the drop-down menu. The Start Menu can display up to nine icons. This setting just makes your Start Menu larger so it can display all of nine program icons you place on it.
-
Show on Start Menu This panel allows you to display Internet and e-mail options on the Start Menu, then provides you a drop-down menu to select the application (Internet Explorer and Outlook Express by default). If you have other browser or e-mail clients installed on your computer, you can use the drop-down menu and select a different browser or e-mail client, or just clear the check boxes if you don’t want to display these items at all.
The Advanced tab, shown in Figure 2-4, presents some additional options that you may find very useful.

Figure 2-4: The Customize Start Menu dialog box’s Advanced tab
First, you see the Start Menu Settings panel, which provides two check box options:
-
Open Submenus on Hover When I Pause on Them with My Mouse By default, the Start Menu stores folders such as My Documents and My Computer as a link. You can click them to open the folders in a different window. However, you can use a menu option so that a menu appears where you can choose subfolders. For example, suppose that you have a folder called My Files in My Documents. Without using the menu option, you have to click My Documents, then open My Files. Using the menu option, if you point to My Documents on the Start Menu, a pop-out menu appears showing your other folders, such as My Folders, and you can just click on My Folders to open it directly. This check box simply asks whether you want the pop-out menu to appear when you put your mouse cursor over the item, or if you want to have to click the item to see the pop-out menu. You will see how to use the menu option later in this section.
-
Highlight Newly Installed Programs When applications are first installed on your XP computer, the Start Menu highlights them until you use them for the first time. This highlighting serves as a simple reminder that you have new stuff that you haven’t used. If this feature gets on your nerves, just clear the check box.
The next part of the Advanced tab is a scroll box where you can select the folder and Windows items that appear on the Start Menu. The scroll box also enables you to control how the Start Menu displays those items. For example, by default, the Start Menu displays Control Panel as a link. You can change this behavior so that Control Panel is shown as a menu, or not at all. Simply scroll through the list and click the desired check boxes and radio buttons to determine what Windows items you want to include and how those items are presented (link or menu). You may want to experiment with these settings until you find the combination that is right for you. And remember, you can change these settings as often as you like.
Painful Lessons I’ve Learned: “Windows XP Keeps Popping Out Menus at Me!”
Have you heard this support call? You might! Windows XP provides easy access to submenus through pop-out menus, if the Open Submenus on Hover When I Pause on Them with My Mouse option is selected on the Advanced tab. Although many users find this feature handy, others simply find it disturbing. If you get a support call about out-of-control pop-out menus, this setting is probably the culprit.
On the last panel of this configuration window, you can configure the Start Menu to list recently used documents. For example, suppose that you’re writing your life story. Once you open the document and then close it, the Start Menu will put your manuscript in Recent Documents, which is a folder that will now appear on the Start Menu. Then you can easily access the document from the Start Menu the next time you need it.
Troubleshooting: Users Have No Control over the Start Menu
If you are using Windows XP Professional in a domain environment, you may receive help requests from users who state that they cannot configure any items on the Start Menu, or even on the taskbar for that matter. If this happens, you usually need to address one of two issues:
-
There is a local Group Policy. The local computer administrator on the Windows XP Professional computer can configure a local Group Policy that prevents limited users from making changes to the Start Menu and taskbar.
-
There is a network Group Policy. In a Windows domain, a site, domain, or organizational unit policy can prevent users from making Start Menu and taskbar changes.
If the user really needs to make some kind of configuration change, you'll need to check with the administrator of the local computer concerning any local Group Policy. You'll also need to check with a domain administrator about corporate Group Policies that may be in place.
Using the Classic Start Menu
To use the Classic Start Menu, select the Classic Start Menu option on the Start Menu tab of Taskbar and Start Menu Properties dialog box. This option allows you to use the Start Menu that previous versions of Windows provided. If you want to use the Classic Start Menu, select the radio button and click the Advanced button, which displays the Customize Classic Start Menu dialog box shown in Figure 2-5.
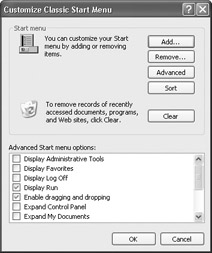
Figure 2-5: The Customize Classic Start Menu dialog box
This interface offers the same basic Start Menu options, just in a different format. If you want to add items to the Classic Start Menu, click the Add button; a wizard will then help you select items on your computer to add to the Start Menu. Click the Remove button to remove items and the Advanced button to open Windows Explorer so you can manually add and remove any items you want. You can also sort the items and clear recent documents, programs, Web sites, and so on. The Advanced button enables you to display a number of Windows items, use expandable (menu) folders, and more. These items are self-explanatory; feel free to experiment and try new configurations.
Customizing the Taskbar
You can also customize your taskbar just as you customize your Start Menu. You can access the taskbar and Start Menu properties by double-clicking on the icon in Control Panel. Or, just right-click any empty area of the taskbar, click Properties, then click the Taskbar tab. The Taskbar configuration page then appears as shown in Figure 2-6.
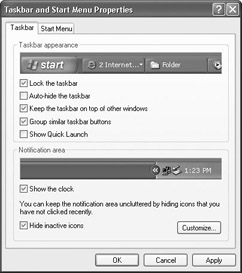
Figure 2-6: The Taskbar tab
The tab has two basic customization panels: Taskbar Appearance and Notification Area. The Taskbar Appearance panel includes a few check box options that enable certain features:
-
Lock the Taskbar You can drag the taskbar to different places on your desktop. For example, if you want the taskbar at the top of the screen instead of the bottom, just drag it to the top. If you use the Lock the Taskbar check box, then the taskbar will be locked on the bottom of the screen and you will not be able to move it.
-
Auto-Hide the Taskbar This feature keeps the taskbar out of your way. When you are not using the taskbar, it disappears below your screen view. When you need it, just point your mouse to the location of the taskbar and it will reappear. Some users like this setting, so experiment with it.
-
Keep the Taskbar on Top of Other Windows As you are using various windows, they may cover up portions of the taskbar. This setting always keeps the taskbar on top.
-
Group Similar Taskbar Buttons This feature keeps similar items together. For example, if you open two Web pages, then minimize them both, they will appear next to each other on the taskbar. Also, if you have several items opened by the same program (such as three Word documents), they are collapsed into one menu when the taskbar becomes too crowded.
-
Show Quick Launch This option shows the Quick Launch option on the toolbar, if selected.
The Notification Area, formerly called the System Tray, is the small icon area on the right side of your taskbar. It tells you which functions are running on your computer and can notify you of certain application functions. The Notification Area panel offers two simple check box options. You can choose the Show the Clock option to display the time in the Notification Area, and you can choose the Hide Inactive Icons option, which simply “cleans up” the Notification Area so that it displays only active icons. You can try both of these settings to see whether you like them.
|
|
EAN: N/A
Pages: 164
- Linking the IT Balanced Scorecard to the Business Objectives at a Major Canadian Financial Group
- Measuring and Managing E-Business Initiatives Through the Balanced Scorecard
- A View on Knowledge Management: Utilizing a Balanced Scorecard Methodology for Analyzing Knowledge Metrics
- Managing IT Functions
- Governance in IT Outsourcing Partnerships