| By default, a Windows Application project includes a single form. However, you can add additional forms as needed, to represent the dialog boxes and other screens in your application. In an event-driven environment like Windows, each form can accept events independently; you can allow the user to have complete freedom in moving, resizing, and switching between the forms of your application. In this section, we'll discuss managing multiple forms in your Visual Basic projects. Adding Additional Forms to a Project The easiest way to add an additional form to your project is to right-click the project name and display the context menu. Choose "Add Windows Form" to add a new form to the project. You can also add an existing form from a disk file by choosing Add Existing Item. Setting a Form's Name Windows forms have a filename and a class name. The class name works like the name of any other class in VB .NET; you use it in code to create new instances of the form class. The filename is just the name of the operating system file in which the code for the class is stored. It is generally a good idea to keep these two names the same to avoid confusion. By default, new forms are assigned generic names similar to the way Visual Basic assigns control names (for example Form2, and so on). However, it is good programming practice to name your forms more appropriately. If you specify a form's filename when adding it to your project, the class name will automatically be set to the same name, without the .vb extension. To change the name of a form already in your project, you need to set both its class name and filename. You can specify a form's filename by renaming it in the Solution Explorer. To set the class name, you can simply modify the form class in the Code Editor, as shown in Figure 10.14. Figure 10.14. The first line of the code for a form contains its class name. Code within the form class can use Me to reference it. 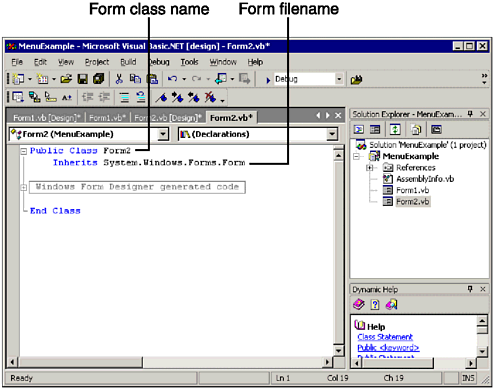 Note You can also set the class name of a form in design mode by right-clicking it and displaying the Properties window.
When you rename a form class you may need to change the startup object for your project, as we will see in a moment. Adding Inherited Windows Forms Every form you create is a class based on the Windows Form class provided by the .NET framework. In Figure 10.14, you can actually see that the new form class (Form2) is defined using an Inherits statement. In addition to inheriting from the .NET classes, you can also add forms that inherit the characteristics of forms you have previously created. One reason you might want to do this is to copy the looks and controls of a form instead of creating them again. Let's construct a quick example to show how you can use inheritance to save time when designing forms: -
Start Visual Studio .NET and create a Windows Application project. -
Rename the default form's class name to frmBase. This form will be the base form from which other forms can inherit characteristics. -
Drag two text box controls to the form. Display the Properties window for TextBox1 and set its Modifiers property to Public, as shown in Figure 10.15. Figure 10.15. The Modifiers property determines whether inherited forms can modify control properties. 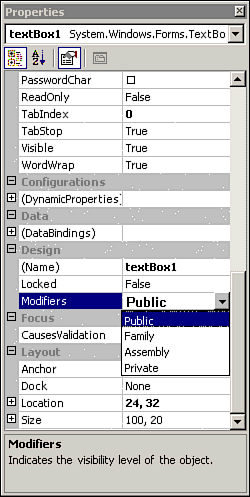 -
In order to use Inherited forms, you must first build your project. Choose Build from the Build menu. -
Right-click the project name in the Solution Explorer to display the context menu. Choose "Add Inherited Form . . . " from the context menu. -
In the Add New Item dialog box, enter frmInhertied.vb for the filename and press Open. The Inheritance Picker dialog box will appear, as shown in Figure 10.16. Figure 10.16. The Inheritance Picker allows you to create a form based on an existing form, copying its properties and controls. 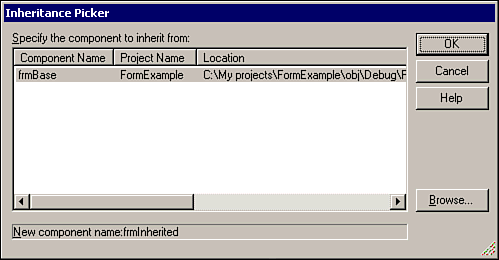 -
Select frmBase and click OK. Your new form should be added to the project. Notice that it already contains the two text boxes from the base form, and also has inherited other properties, such as the size and title bar text. -
Open the form designer for frmInherited. Set the Text property of the form to Inherited Form. -
Add a new textbox to frmInherited. You should now have three text boxes on the form. Notice that the two inherited text boxes have an icon in the upper-left corner to indicate they are inherited controls, as shown in Figure 10.17. Figure 10.17. Hovering over an inherited text box will display a ToolTip indicating it is an inherited object. 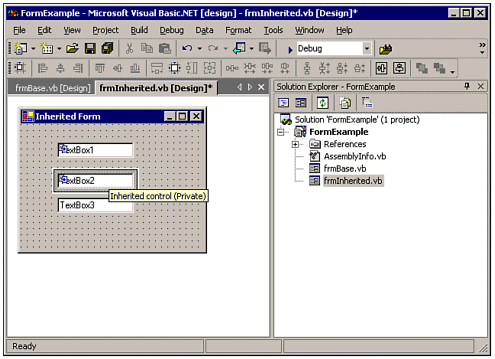 -
Display the Properties window for each of the inherited text boxes. Notice that you can only change the one marked as Public; the private text box is locked and cannot even be moved around on the form. -
As a final test, display the designer for frmBase again, change the Text properties of its text boxes, and move them around. You should notice that the changes are propagated down to the inherited form.
As we have seen from the example, Visual Basic allows you to design a form once and reuse its visual characteristics via inheritance,just as you would with inherit any other object in object-oriented programming. Showing and Hiding Forms with Code Each Windows Application project has a startup object, which is set to Form1 by default. Using the Project Property Pages dialog box, as shown in Figure 10.18, you can set the startup object to any of the forms in your project, or to the Main procedure of a form or module. Figure 10.18. When you run your program, Visual Basic will create an instance of the startup form and display it on the screen. You must write code statements to display additional forms. 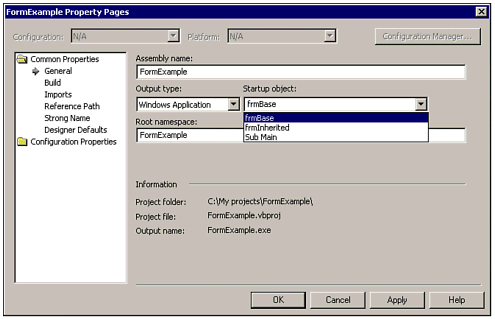 Because forms are classes, to show a new form you simply create an instance of the form class and call its Show method: Dim MyForm as New frmTemp MyForm.Show() It is very easy to create forms based on a class. In fact, you could enclose the previous statements in a loop and create as many instances of frmTemp as you want using the MyForm variable. (Of course, if you need to manipulate the form after you show it, you will need to keep the reference to it.) If you have a reference to another form, you can access its public properties, methods, and controls: MyForm.Text = Now.ToString MyForm.txtInfo.Text = "This is some text" MyForm.Hide() The first line of code sets the Text property of the form to the current time. The second line sets the Text property of a text box on the form. (In this example, the Modifiers property of txtInfo is assumed not to be Private, as described in the previous section.) The third line of code uses the Hide method to make the form invisible. Using Modal Forms If you show a form with the Show method as described in the previous section, the form acts totally independent. However, there are times when you might want to have more strict control over the order in which the user processes the forms. For example, you may want to display a secondary form so that the user must view it before returning to the main form. You can achieve this effect by displaying the second form modally. Modal forms appear on top of a parent form, and the user cannot access the parent form until the modal form has been closed or hidden. To show a modal form, you use the ShowDialog method. As a demonstration of modal forms, we will look at how a form can be shown modally to aid in data entry. Figure 10.19 shows the sample project with both forms. Figure 10.19. Modal forms can be used to display helper dialog boxes, such as the list of valid hotel code selections. 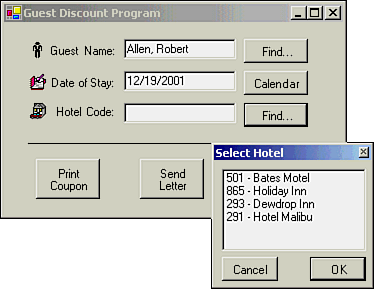 Figure 10.19 is a fictional application that collects information about a hotel guest and prints a discount coupon. The form in the background is the main data entry form. If the user knows all the information (name, date, and hotel code number), he can quickly key it in using a single form. If he does not know all the information, he can display helper forms with the buttons to the right of the text boxes. In the figure, the user did not know the hotel code, so he clicked the Find button to display a list of valid hotel codes. The user can then select a hotel code from the secondary form. When the user clicks OK to close the secondary form, the text box is populated with the selected hotel. Now, let's look at how the code works. The hotel search form itself is very simple, it just has a list box and two buttons. There are two public properties on the helper form used to pass the information back to the main form: Public SomethingSelected As Boolean Public SelectedHotel As String The first property, SomethingSelected, holds a true or false value indicating whether the user actually selected a hotel or just clicked the Cancel button. The second property, SelectedHotel, stores the selected hotel code from the list box. (For the purposes of this discussion, assume the helper form also contains internal methods that load the hotel list from a database.) Note An alternative to using properties would be to make the controls on a secondary form public, and access their properties directly from the main form. However, this would not be a very good programming practice. Using properties or other interfaces allows you to change the design of the helper form independent from the other parts of the application.
The code for the OK and Cancel buttons simply sets the properties appropriately and closes the form: Private Sub btnOK_Click(ByVal sender As System.Object,_ ByVal e As System.EventArgs) Handles btnOK.Click If Not (lstHotels.SelectedItem Is Nothing) Then SomethingSelected = True SelectedHotel = lstHotels.SelectedItem.ToString Me.Close() End If End Sub Private Sub btnCancel_Click(ByVal sender As System.Object,_ ByVal e As System.EventArgs) Handles btnCancel.Click SomethingSelected = False Me.Close() End Sub The code that initiates the display of the helper form is in the Click event of a button on the main form: Private Sub btnSelectHotel_Click(ByVal sender As System.Object,_ ByVal e As System.EventArgs) Handles btnSelectHotel.Click Dim frmSelect As HotelSelectForm frmSelect = New HotelSelectForm() frmSelect.ShowDialog() If frmSelect.SomethingSelected Then txtHotelCode.Text = frmSelect.SelectedHotel End If frmSelect = Nothing End Sub The first three lines of code create a new instance of the form and display it using its ShowDialog method. Next, the If statement pulls information out of the helper form and populates the text box. Finally, the reference to the helper form is set to Nothing because we no longer need it. As you look at the previous code, you should keep in mind a very important property of modal forms: Code execution in the parent form stops until the modal form is closed. In other words, the previous If statement is not executed until frmSelect is closed. This is the main difference between the ShowDialog and Show methods. If you used the Show method in the preceding code, the If statement would be executed immediately, which is not the intended effect. Closing Forms and Ending the Application As you saw in Chapter 5, you can use the Application.Exit method to end your application. This will close all open forms. However, you also can end your application by closing the startup object. For example, suppose you have a startup form, Form1, which uses the Show method to display Form2. Whenever the user closes the startup form (Form1), the other forms will disappear and the application will end. This behavior is different from previous versions of Visual Basic, where as long as there was a form loaded the program would continue running. The reason for the change can be found in VB .NET's more object-oriented nature; in our example Form2 was created within the context of Form1, so it makes sense that it should be closed if Form1 is closed. | 


