Customizing the User's File System Of course, the main function performed by a setup package is to modify the file system of the user's computer. To manage the modifications that the setup package will make to the target PC's file system, double-click the Primary Output item under the setup project in Solution Explorer. This will open the File System pane for the project in the Visual Basic .NET IDE, as shown in Figure A.8. Figure A.8. The File System pane lets you control how the setup package modifies the user's file system. 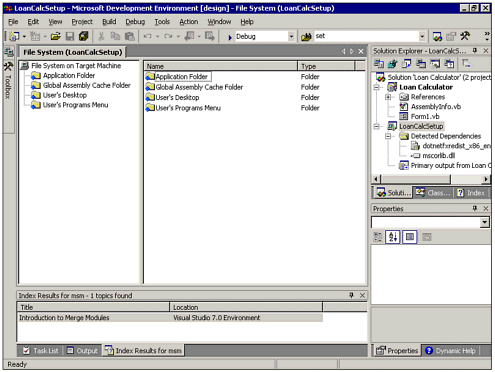 By default, a Windows Application setup package created by the Setup Project Wizard will install the application's primary output (typically an EXE or a DLL file) into the user's Program Files folder. There will be no Start menu or other shortcuts generated unless you customize the setup package. This section discusses how to modify the location into which the application's primary output is placed, as well as how to control the creation of program shortcuts on the user's computer. The Application Folder As mentioned, the only file system modification automatically generated by the wizard is to place the program's primary output in an application folder on the user's PC. The exact location is determined by the Application folder's DefaultLocation property. To access the DefaultLocation property, click Application Folder in the File System pane (after you have double-clicked the project's Primary Output in the Solution Explorer, as directed previously). The Properties window now shows properties for the Application folder. As you can see in the Properties window, the default value of the DefaultLocation property is [ProgramFilesFolder][Manufacturer]\[ProductName]. This causes the application's output to be placed in a folder named for the ProductName property, which is created in a folder named for the Manufacturer property, which is in turn created under the user's Program Files folder. Therefore, if the manufacturer's name (stored in the Manufacturer property) is Pyramid Custom Systems, and the ProductName property has been set to Loan Calculator, the default installation location will be C:\Program Files\Pyramid Custom Systems\Loan Calculator (assuming that the user's Program Files location is the standard C:\Program Files). Of course, the user has the option of modifying the installation location when he runs the setup package. If you want to include files in the Application folder other than those that are already included, right-click the Application Folder icon; then select Add, File from the Context menu. You can browse to files that you want to include. Adding a Shortcut to the User's Start Menu Typically, you will want to create one or more Start menu shortcuts that your users can use to start your application. By default, the Setup Project Wizard does not automatically set up such shortcuts. The User's Programs Menu folder, which represents your end user's Start/Programs folder, is provided in the File System pane for you to manage the creation of shortcuts for your program. Normally, you should not place your program's shortcut(s) in the top level of the user's Start/Programs folder; you should create a folder for your program's shortcuts. To create a folder for your program's shortcuts on the user's PC, and to create the actual Start menu shortcuts, follow theses steps: -
Right-click the User's Programs Menu folder in the File System pane; then select Add, Folder from the Context menu. A new folder is created under the User's Programs folder; you can rename this new folder to be the container for your application's shortcut(s). (You can use a similar process if you want your application's Start Menu folder to have subfolders.) -
Under the Application folder, right-click the Primary Output from (projectname) icon that represents your project's compiled EXE or DLL file. Select Create Shortcut to Primary Output in the Context menu. This process is depicted in Figure A.9. Figure A.9. The Application folder contains the project's primary output, to which you will want to create a shortcut. 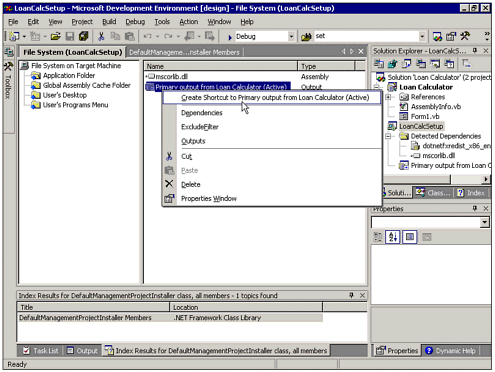 -
A shortcut to the primary output will be created and placed in the Application folder. You may want to rename the shortcut to something that may be meaningful to the user, such as the name of the program (without "Shortcut to"). -
Drag the shortcut from the Application folder to the appropriate subfolder that you created under the User's Programs Menu folder.
Now, when the user runs the setup package, his Start menu will be updated to include a shortcut to your application according to the specifications that you laid out previously. If you want to include other shortcuts to other items in the user's Start menu, such as system utilities or documentation, you can add them using the User's Programs Menu folder as described previously. You can right-click the appropriate folder and select Add, or you can even drag-and-drop items such as shortcuts or other files directly into this window. The User's Desktop Folder If you want to have items installed directly onto your user's desktop, you can do so by manipulating the user's Desktop folder in the File System pane using the techniques described previously. Be judicious in doing so, however, as users are often irritated when programs litter their desktops against their wishes. | 