| The Microsoft Excel object library, which is installed on a PC whenever Excel is installed, includes a group of objects that let applications control the Excel application behind the scenes. By leveraging this background process, you can create a Visual Basic program that begins an Excel session and works with an Excel workbook just as if a user were sitting at the keyboard and using Excel normally. As you can see, the Excel object functionality is exposed as a Component Object Model (COM) component; however, Visual Basic .NET will be able to create a .NET platform bridge to Excel's COM functionality. Note In order to use these techniques to interact with Microsoft Excel, you must have Excel 2000 or later installed on your system.
Adding a Reference to the Excel Object Library To create an application that will interact with Microsoft Excel, you must first add a reference to the Excel object library to your application. Because the Office applications are exposed as COM components, a .NET "wrapper" will need to be created in order to utilize them within the .NET framework. You can begin creating the sample application, as well as creating the .NET wrapper for Excel, by following these steps: -
Start a new Windows Application project. Name the project ControlOfficeDemo. -
In the Solution Explorer window, right-click References (under the ControlOfficeDemo project); then select Add Reference from the Context menu. -
In the Add Reference dialog box, click the COM tab to indicate that you want to add a COM reference. -
Select Microsoft Excel 9.0 Object Library under Component Name, and then click the Select button to place this library in the Selected Components box, as depicted in Figure 25.1. Figure 25.1. Use the Add Reference dialog box to add a COM component to your application.  -
If you are presented with a primary interop assembly message asking if you would like to have a wrapper generated, as shown in Figure 25.2, click Yes. This action will cause a .NET wrapper for the Excel COM component to be generated, allowing the COM-based Excel component to be used in the .NET environment. Figure 25.2. A .NET wrapper can be created to include COM components in your application.  -
Notice in the Solution Explorer window that references for both Excel and Office have been added to the project.
At this point, you have added a reference to the Excel object library to your project. This will enable you to use Excel's built-in version of Visual Basic for Applications (VBA) to control it. In the remainder of this example, we will use simple VBA commands to interact with the Excel objects to control Excel programmatically. Tip If you want to learn more about Excel's implementation of VBA, including the objects that are exposed through the Excel COM component, you can utilize Excel's Help system. To get there, open Excel's Visual Basic editor by selecting Tools, Macro, Visual Basic Editor from the Excel menu system. If you do not see the Office Assistant, press F1 to display it. You can then ask the Office Assistant about the VBA commands.
Setting Up the Sample Excel Application We will now continue building the application by preparing the main form. Let's say that we want to create an application in which the user can type projected amounts for sales and expenses; then the program will set up an Excel worksheet containing his projected figures along with a formula to calculate net profit. The user can then manipulate the figures inside Excel however he desires. When he is done, the Visual Basic application will retrieve the final calculation from the Excel worksheet and then display it in a message box. Of course, this is a very simple example of using Excel from within a VB application, but it demonstrates the power of the concept of remote application control. Continue building the application by following these steps: -
View Form1's Designer window. Set its Text property to Office Remote Control Example. -
Add two TextBox controls to Form1; name them txtSales and txtExpenses. Clear their Text properties. -
Add two Label controls to the left of the two TextBox controls on Form1; set their Text properties to Sales: and Expenses:. -
Add a Button control to Form1. Name it btnExcel and set its Text property to Launch Excel.
Once you have completed building the sample application's interface, it should resemble Figure 25.3. Figure 25.3. The sample application will allow the user to enter sales and expenses data and launch an Excel session to manipulate these entries. 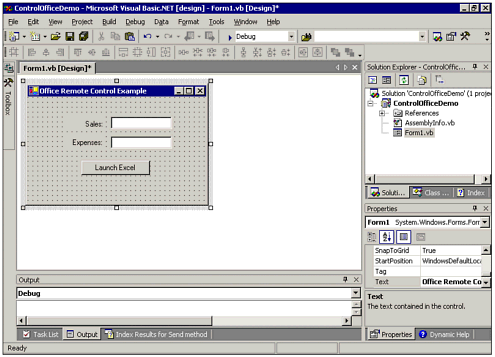 Launching the Excel Application Now it's time to write the code that will launch and control Excel. You will do this by creating an Excel.Application object in your program; this type of object is available through the referenced Excel object library. In turn, you will use objects, methods, and properties contained in the Excel object library to control the application instance you create. Your code must first allow the Form1 class to access the Excel functionality provided via the program's reference to the Excel object library; this will be accomplished by adding a reference to the Excel namespace that is available through the Excel object reference. Then, you will declare a variable named ExcelApp, which is of type Excel.Application; this object variable will act as the gateway to the Excel object library. Next, you will populate the ExcelApp object variable to create a new instance of the Excel application. After doing so, Excel will be running; however, it will not be visible to the user. You can remedy this by setting ExcelApp's Visible property to True. The following steps will get the application going: -
View the Code window for Form1. Add a reference to the Excel namespace by typing Imports Excel at the very top of the Code window (even above the Public Class Form1 line). -
Display the Click event handler for the btnExcel Button control by selecting btnExcel from the Class Name drop-down and then choosing Click from the Method Name drop-down. (Alternatively, you can double-click btnExcel in the Designer window to display its Click event handler.) -
We will need to declare a form-level variable of type Excel.Application. Enter the following variable declaration in the Code window, just below the Windows Form Designer generated code area: Dim ExcelApp As Excel.Application -
To invoke the new instance of Excel and make it visible, enter the following code into the btnExcel_Click event handler: ExcelApp = New Excel.Application() ExcelApp.Visible = True
Save and run the application at this point, then click the Launch Excel button. An instance of Excel starts up and becomes visible to the user. Your program has interacted with another application! Note The complete code for this application is presented as a listing later in this chapter. You can download the entire sample project at www.vbinsider.com. Look for the file named ControlOfficeDemo.zip.
Notice that the Excel application window does not contain any workbooks. When you start Excel "manually" through the Start menu, an empty workbook containing three worksheets is automatically created for your use. Because we are driving the instance of Excel, nothing is automatically created. If we want Excel to contain a workbook, we must arrange for it to be created. This will be handled in the next section. For now, go ahead and manually close Excel. Stop your test application as well. Adding a Blank Workbook As we mentioned, you probably want Excel to contain a blank workbook when it starts. You will accomplish this by creating a Workbook object, which will be added to the Excel Application object's Workbooks collection. To do so, add the following variable declaration just below the declaration of the ExcelApp variable: Dim MyWB As Workbook Then add the following line of code to the end of the btnExcel_Click event handler: ExcelApp.Workbooks.Add(XlWBATemplate.xlWBATWorksheet) Note the parameter passed to the Add method of the Excel Application object's Workbooks collection. This parameter specifies the template to be used to create the new workbook. The value xlWBATWorksheet, provided via the XlWBATemplate enumeration, indicates that the new workbook is to consist of a normal worksheet. Save and run the application again. When you click the Launch Excel button, an instance of Excel starts again. This time, however, you will see a workbook containing a single blank worksheet. Close Excel manually again and end your application. Adding More Worksheets If you want to add more worksheets to the workbook contained in the Excel application, you can invoke the Add method of the Worksheets collection of the Workbook object. The Add method supports several parameters, the first two of which allow you to specify an existing member of the Worksheets collection before or after which the new worksheets are to be added. Members of the Worksheets collection are identified by a 1-based numbering scheme; therefore, the first (and only, so far) member of the Worksheets collection is MyWB.Worksheets(1) (or, alternatively, ExcelApp.Workbooks.Worksheets(1), if we want to bypass the Workbook object MyWB). To add a single worksheet after MyWB.Worksheets(1), add the following line of code to the btnExcel_Click event handler: MyWB.Worksheets.Add(, MyWB.Worksheets(1)) If you save and run the application at this point, you will see that a second worksheet has been added to the open workbook. However, you may also notice that this second worksheet is now the active sheet, when you might reasonably expect the first worksheet to be active. We will remedy this situation in the next section. Creating a Worksheet Object Variable The work of populating cells will be done at the worksheet level; therefore, it will be advantageous to us to create a Worksheet object variable representing the first worksheet in the open workbook. This is a simple matter. First, add the following code just below the other two form-level variable declarations you have already entered: Dim MyWS As Worksheet Then, add the following line of code to the end of the Click event handler that you have been working on: MyWS = MyWB.Worksheets(1) This code declares a worksheet-type variable named MyWS; then it sets it to the first member of the Worksheets collection of our Workbook object variable MyWB. We will be using the MyWSWorksheet variable in the next section to populate cells contained in that worksheet. Now that we have created a Worksheet variable representing the first worksheet in the open workbook, we can use the Worksheet object's Activate method to bring that worksheet to the front of the workbook, fixing the problem we noted at the end of the last section. To do so, add the following line of code to the Click event handler: MyWS.Activate() Populating Cells Next, we want to populate some cells in the worksheet. Specifically, we want the following information contained in the respective cells: | Cell | Contents |
|---|
| A1 | The label Sales | | A2 | The label Expenses | | A4 | The label Net Profit | | B1 | The contents of txtSales | | B2 | The contents of txtExpenses | | B4 | The formula =A1-A2, which will calculate net profit and display the result |
To populate the cells, we will utilize the Range property of the MyWSWorksheet object variable, which exposes a Range object representing a range of cells in the worksheet. For simplicity's sake, we will work with single-cell ranges. Setting a Range object's Value property sets the contents of a cell; setting its Formula property lets you program a formula into the cell. Add the following code to btnExcel's Click event handler to populate the six cells specified previously: MyWS.Range("A1").Value = "Sales" MyWS.Range("A2").Value = "Expenses" MyWS.Range("A4").Value = "Net Profit" MyWS.Range("B1").Value = txtSales.Text MyWS.Range("B2").Value = txtExpenses.Text MyWS.Range("B4").Formula = "=B1-B2" Save and run the application again. This time, before clicking the Launch Excel button, enter some numbers into the two text boxes. You will see a copy of Excel appear, a new sheet will be added, the original Sheet1 will be brought to the front of the workbook, and six of its cells will be populated by your program! The result is depicted in Figure 25.4. Figure 25.4. This Excel worksheet was created and populated by a Visual Basic program. 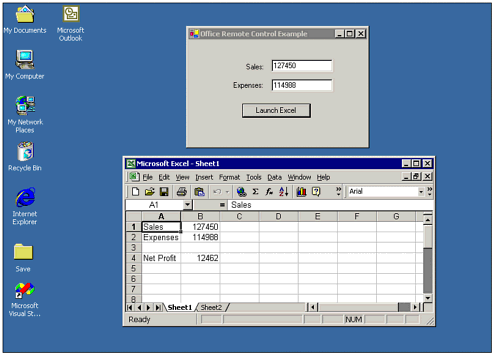 The complete btnExcelClick event procedure is shown in Listing 25.1. Listing 25.1 ControlOfficeDemo.ZIP The Form-Level Code for the Excel Spreadsheet Generated by Your VB Application Private Sub btnExcel_Click(ByVal sender As Object, _ ByVal e As System.EventArgs) Handles btnExcel.Click ExcelApp = New Excel.Application() ExcelApp.Visible = True MyWB = ExcelApp.Workbooks.Add(XlWBATemplate.xlWBATWorksheet) MyWB.Worksheets.Add(, MyWB.Worksheets(1)) MyWS = MyWB.Worksheets(1) MyWS.Activate() MyWS.Range("A1").Value = "Sales" MyWS.Range("A2").Value = "Expenses" MyWS.Range("A4").Value = "Net Profit" MyWS.Range("B1").Value = txtSales.Text MyWS.Range("B2").Value = txtExpenses.Text MyWS.Range("B4").Formula = "=B1-B2" End Sub Retrieving Information from Cells Now that we have harnessed the power of Excel to perform data manipulation and calculations, we will demonstrate how to retrieve data from Excel. Specifically, we want to retrieve the Sales and Expenses figures from the worksheet, just in case the user modified them while Excel was active; we also want to retrieve the result of the calculation that is stored in cell B4. We will accomplish this by adding a second Button control to our application's main form and coding that button's Click event handler to perform the retrieval. Perform the following steps to code the retrieval part of the sample application: -
Add a Button control named btnRetrieve to the application's main form. Set its Text property to Retrieve, and place it next to the Launch Excel button. -
Enter the following code as btnRetrieve's Click event handler: Private Sub btnRetrieve_Click(ByVal sender As System.Object, _ ByVal e As System.EventArgs) Handles btnRetrieve.Click Dim sTemp As String txtSales.Text = MyWS.Range("B1").Value txtExpenses.Text = MyWS.Range("B2").Value sTemp = "The calculated Net Profit is " sTemp += FormatCurrency(MyWS.Range("B4").Value) & "." MessageBox.Show(sTemp) End Sub
The preceding code uses the Range property of MyWS to retrieve the current contents of cells B1 and B2, placing the retrieved values into txtSales and txtExpenses, respectively. It then retrieves the contents of cell B4, which contains the calculated Net Profit figure; formats it as Currency; and then creates a string to display the result using a message box. Save and run the program (after shutting down any running copies of Excel that may be left over from previous trial runs). Enter sample data into the two text boxes; then click the Launch Excel button. This time, change the figures in the worksheet to different values and notice how the Net Profit changes. Finally, click the Retrieve button on the VB form to put the new values into the text boxes and display the calculated Net Profit. Figure 25.5 shows an example of the program after it has retrieved the new values from the worksheet. Figure 25.5. The application has retrieved modified data from the Excel worksheet. 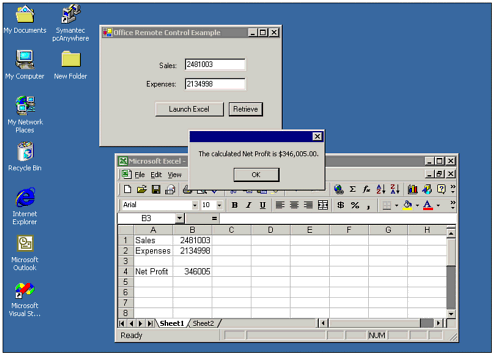 Shutting Down the Excel Application Depending on your program's purpose, you may want to close Excel automatically or leave it running for further interaction. In this example, let's assume that it has done its job and we want to close it automatically. Further, we will assume that we do not want to save the workbook that we created. To accomplish this, add the following three lines of code to the end of the btnRetrieve Click event handler: MyWB.Saved = True MyWB.Close() ExcelApp.Quit() The first line of code "lies" to Excel and tells it that the current workbook (represented by MyWB) has been saved. This is to keep it from asking the user if he wants to save the workbook, which it will do if it detects that an unsaved workbook is about to be closed. The second line closes the MyWB workbook, and the last line shuts down the Excel application itself. If the user had other Excel workbooks open that had nothing to do with our VB application, they will remain open. Excel 2000 now treats open workbooks as independently running applications. The complete btnExcelClick and btnRetrieveClick event handlers, along with the form-level variable declarations from Listing 25.1, are presented in Listing 25.2. Listing 25.2 ControlOfficeDemo.ZIP Code to Add Excel Functionality Dim ExcelApp As Excel.Application Dim MyWB As Workbook Dim MyWS As Worksheet Private Sub btnExcel_Click(ByVal sender As Object, _ ByVal e As System.EventArgs) Handles btnExcel.Click ExcelApp = New Excel.Application() ExcelApp.Visible = True MyWB = ExcelApp.Workbooks.Add(XlWBATemplate.xlWBATWorksheet) MyWB.Worksheets.Add(, MyWB.Worksheets(1)) MyWS = MyWB.Worksheets(1) MyWS.Activate() MyWS.Range("A1").Value = "Sales" MyWS.Range("A2").Value = "Expenses" MyWS.Range("A4").Value = "Net Profit" MyWS.Range("B1").Value = txtSales.Text MyWS.Range("B2").Value = txtExpenses.Text MyWS.Range("B4").Formula = "=B1-B2" End Sub Private Sub btnRetrieve_Click(ByVal sender As System.Object, _ ByVal e As System.EventArgs) Handles btnRetrieve.Click Dim sTemp As String txtSales.Text = MyWS.Range("B1").Value txtExpenses.Text = MyWS.Range("B2").Value sTemp = "The calculated Net Profit is " sTemp += FormatCurrency(MyWS.Range("B4").Value) & "." MessageBox.Show(sTemp) MyWB.Saved = True MyWB.Close() ExcelApp.Quit() End Sub | 