| Another type of Web project available in Visual Basic .NET is the Web Service. Web Services provide a standard framework for sharing functionality and data within different areas of your organization, or even the whole world via the Internet. Like Web Applications, Web Services are built on ASP.NET technology and run in IIS. However, they do not have a user interface component; people do not access Web services, programs do. Some other important characteristics of Web services are Clients and Web services communicate by passing text messages using standard communication protocols. This layer of abstraction makes it easier to use Web services across different operating systems, because most operating systems can easily handle text messages. The client of a Web service only knows how to send and receive messages; it is not concerned with implementation of the Web service. Because of their message-passing nature, Web services and their clients are said to be loosely coupled. They are designed to make different systems work together, rather than being a part of one tightly integrated system. (For another way to call remote methods that allows more tight coupling, see the section on Remoting in Chapter 9, "Creating Code Components.") Web services have discovery capabilities, which means you can browse the Web services available on a particular Web server and obtain details about the available methods and parameters. Visual Studio .NET uses the discovery feature to allow you to add a Web reference to your project. A Web reference lets you program against the Web service using Intellisense editing features.
In the remainder of this section, we will create a sample Web service and then show how to access it from a Visual Basic .NET application. Our sample Web service will provide the loan calculation logic from the Loan Calculator sample application introduced earlier. Creating a Web Service To begin creating the new Web service, start Visual Studio and choose to create a new project. For the project type, select ASP.NET Web Service. For the project name, enter LoanCalcService. Visual Studio .NET will then create project files on the Web server. The structure of a Web Service project is very similar to that of a Web Application project. Each project contains one or more classes, although they are called Web services instead of Web Forms. A Web service has both a visual representation and a code window, although the visual representation is just for the developer's benefit; Web services do not have a user interface. (The reason for a visual mode is so you can add components to the class from the Toolbox, such as the Timer control.) Much like Web applications, there are two files that make up a Web service class: an .asmx file that is the entry point for the service and a .vb file that contains the code. As usual, Visual Studio automatically assigns a generic name to a new Web Service project, in this case Service1.asmx. Before we begin writing code for our sample service, let's change it to a more descriptive name. To change the name of the Web service, you have to change both the filename and the class name in code: -
Right-click Service1.asmx in the Solution Explorer and choose Rename. -
Change the name of the file to LoanInfo.asmx. Your Solution Explorer should look similar to the one in Figure 18.8. Figure 18.8. A Web Service project consists of one or more Web service classes, represented by an .asmx file in the Solution Explorer. 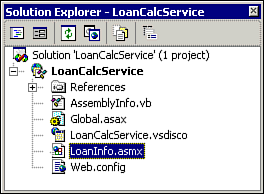 -
Next, right-click LoanInfo.asmx and choose View Code. -
In the code editor, change the name of the class from Service1 to LoanInfo.
Now that you have set up a new Web Service project, you can start adding Web methods in the code editor. Understanding Web Methods The class that contains the code for a Web service is just like any other class in a Visual Studio .NET project in that you add methods to it by simply entering them in the code editor. These methods can contain modifiers (Public, Private, and so forth) to indicate their accessibility level. However, for a method to be accessible via a Web service, it must be declared in the following manner: -
Make sure the method is declared to be Public. -
Add the special <WebMethod()> tag before the method name.
The following code defines two methods in a Web service class, but only one method is directly accessible to clients: <WebMethod()> Public Function HelloYou(ByVal YourName As String) As String Return CreateHelloString(YourName) End Function Public Function CreateHelloString(ByVal Name As String) As String Return "Hello and welcome, " & Name End Function The previous code sample contains two public functions, HelloYou and CreateHelloString. However, only the HelloYou function will appear available to clients of the Web service. Even though the CreateHelloString method is marked as Public, it will not be available through IIS, because there is no <WebMethod()> tag. (Of course, you can still register the class directly in another project and call the CreateHelloString method, but that's not really the point of a Web service.) This brings about an interesting question: How much code should you put in a Web service? Consider these options: You can code all your business logic in a single Web service class and simply mark the methods you want to expose through the Web service. You can create a separate business layer and use the Web service as one of many interfaces to it.
As a developer, you have an enormous amount of flexibility in where to put your code. In our loan calculator Web service, we will just put code in the Web service class itself. However, in more complex applications with a number of different interfaces, you should take the more flexible second approach. We will discuss the concept of breaking an application up into different layers further in Chapter 22.  For a description of multi-tier applications, p.599 For a description of multi-tier applications, p.599
Creating the Loan Calculator Methods As you may recallfrom the example in Chapters 2 and 3, the loan calculator program had basically two functions: calculating a monthly payment and an amortization schedule. These two functions correspond nicely to two Web methods in a Web service. The code from the original loan calculator example will also have to be changed somewhat, so it can function as a service. In the original example, the business logic and user interface were mixed, so you could directly access the text boxes on the form. However, a Web service does not know or care about the user interface. Instead, it follows the request-and-response model of the World Wide Web. Therefore, we will need to create functions with all the necessary parameters to perform the calculation and return the result to the calling program. Listing 18.2 contains the code for the CalculatePayment and CalculateAmortization methods. Listing 18.2 LOANCALC.ZIP Creating Web Methods <WebMethod()> Public Function CalculatePayment( _ ByVal PrincipalAmount As Decimal, _ ByVal InterestRate As Decimal, _ ByVal TermInYears As Integer) As Decimal Dim TermInMonths As Integer 'Convert interest rate to its decimal equivalent ' i.e. 12.75 becomes 0.1275 InterestRate = InterestRate / 100 'Convert annual interest rate to monthly ' by dividing by 12 (months in a year) InterestRate = InterestRate / 12 'Convert number of years to number of months ' by multiplying by 12 (months in a year) TermInMonths = TermInYears * 12 'Calculate and return the monthly payment. Return PrincipalAmount * (InterestRate / _ (1 - (1 + InterestRate) ^ -TermInMonths)) End Function <WebMethod()> Public Function CalculateAmortization( _ ByVal PrincipalAmount As Decimal, _ ByVal InterestRate As Decimal, _ ByVal TermInYears As Integer, _ ByVal MonthlyPayment As Decimal) As DataSet Dim MonthInterest As Decimal 'Interest part of monthly payment Dim TotalInterest As Decimal = 0 'Total interest paid Dim MonthPrincipal As Decimal 'Principal part of monthly payment Dim TotalPrincipal As Decimal = 0 'Remaining principal Dim Month As Integer 'Current month Dim NumPayments As Integer 'Number of monthly payments Dim i As Integer 'Temporary loop counter Dim ScheduleTable As DataTable 'DataTable to hold schedule Dim ResultSet As DataSet 'DataSet to return Dim rowTemp As DataRow 'Used to add rows to the table 'Set up the data table object with the column names and data types ScheduleTable = New DataTable("AmortizationSchedule") ScheduleTable.Columns.Add("PaymentNumber", GetType(Integer)) ScheduleTable.Columns.Add("Interest", GetType(Decimal)) ScheduleTable.Columns.Add("Principal", GetType(Decimal)) ScheduleTable.Columns.Add("TotalInterest", GetType(Decimal)) ScheduleTable.Columns.Add("Balance", GetType(Decimal)) 'Calculate the Amortization Schedule NumPayments = TermInYears * 12 TotalPrincipal = PrincipalAmount For Month = 1 To NumPayments 'Determine Values for the Current Row MonthInterest = (InterestRate / 100) / 12 * TotalPrincipal TotalInterest = TotalInterest + MonthInterest MonthPrincipal = MonthlyPayment - MonthInterest If MonthPrincipal > PrincipalAmount Then MonthPrincipal = PrincipalAmount End If TotalPrincipal = TotalPrincipal - MonthPrincipal 'Add the values to the datatable rowTemp = ScheduleTable.NewRow rowTemp.Item("PaymentNumber") = Month rowTemp.Item("Interest") = MonthInterest rowTemp.Item("Principal") = MonthPrincipal rowTemp.Item("TotalInterest") = TotalInterest rowTemp.Item("Balance") = TotalPrincipal ScheduleTable.Rows.Add(rowTemp) Next Month 'Finally, return the data table to the caller ResultSet = New DataSet() ResultSet.Tables.Add(ScheduleTable) CalculateAmortization = ResultSet End Function Each function inListing 18.2 accepts several numeric parameters used to perform loan payment calculations. The CalculatePayment function returns a value of type Double, whereas the CalculateAmortization function returns a more complex data type, a DataSet. We will discuss data and DataSets further in Chapter 22, but for now just consider a DataSet a structure that can accommodate the entire amortization schedule in tabular format. Web services can return almost any type of data structure to a client, provided that structure is serializable, or convertible to and from text.  For an example of DataSets, p.613 For an example of DataSets, p.613
Testing Your Web Service Web Services can be tested by calling their methods from another application. However, the Web Service framework also provides a test page you can use to perform rudimentary testing of some of your Web methods. After entering the code from Listing 18.2, press F5 to start the Web service project in Visual Studio. You will see the default test page for a Web service, which lists all your public Web methods. Click the CalculatePayment link and an HTML form will be generated so you can test the method, as pictured in Figure 18.9. Figure 18.9. The .NET framework provides a test page for Web services that appears when you enter the Web service address in a browser. 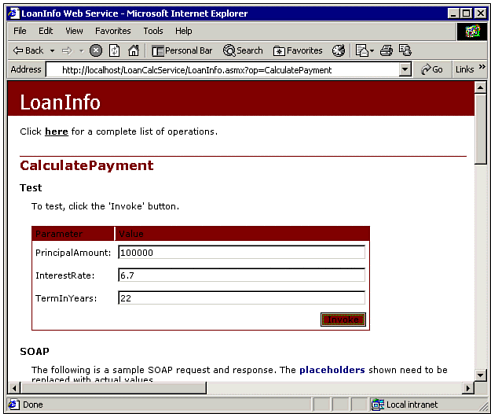 Go ahead and enter the parameters for the CalculatePayment function and click the Invoke button. Your browser should display the response from the Web service, which is formatted as XML: <?xml version="1.0" encoding="utf-8" ?> <double xmlns="http://tempuri.org/">725.0596381989036</double> Even if you don't know XML, the response from the Web service is simple enough that you can pick out the monthly payment value, $725.06. To see how a more complex data type is represented using XML, execute the CalculateAmortization method from the test page. Note You may have noticed the reference to the tempuri.org Web site in the XML response. Tempuri is not a way to cook shrimp, but rather a temporary Universal Resource Indicator for your Web service's namespace. For more information on creating your own namespace, see the help topic "XML Namespaces."
When executing a Web method from the test page, note that the parameters to the function call are visible in the URL query string, because the test page used a simple GET request to execute this function. Web methods can be called either by submitting http GET and POST requests, or by sending a SOAP (Simple Object Access Protocol) message to the server. The Web Services test page only supports simple parameter types that can be typed in directly; if your Web method had contained a data set or array as an input parameter, the test page would not be able to invoke it. However, as long as you are developing in Visual Studio, the communication process is transparent, as we will see in the next section. Note For developers still working with Visual Basic 6.0, Microsoft has developed a program that creates a type library so you can call Web Services from VB 6.0. For more information, search the msdn.Microsoft.com Web site for "Web Service Proxy Wizard."
Accessing a Web Service Now that you have created a Web service, let's access it from an application. Assuming you ran the test successfully as described in the previous section, you can close the Web service project you have been working on. Go ahead and start a new Windows Application project. Set up the controls on the form as described in Table 18.1. Arrange the controls as shown in Figure 18.10. Figure 18.10. In this version of the loan calculator we will use a DataGrid to display the amortization schedule, which we will calculate at the same time as the payment. 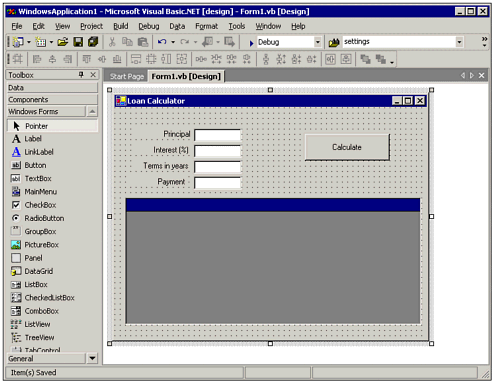 Table 18.1. Controls for the Loan Calculator| Control Type | Control Name | Text Property |
|---|
| Label | lblPrincipal | Principal | | Textbox | txtPrincipal | (blank) | | Label | lblInterest | Interest (%) | | Textbox | txtInterest | (blank) | | Label | lblTerm | Terms in years | | Textbox | txtTerm | (blank) | | Label | lblPayment | Payment | | TextBox | txtPayment | (blank) | | Button | btnCalculate | Calculate | | DataGrid | dgAmortization | (n/a) |
Adding a Web Reference To make the methods of a Web service available to your program, you have to add a Web reference. First, right-click the References folder in the Solution Explorer and choose Add Web Reference. The Add Web Reference dialog box will appear, where you can type in the address of a server and/or Web service. In the Address field, enter http://computername, where computername is the name of the Web server on which you created the LoanCalcService Web service. Press the Enter key and Visual Studio will then query the Web server and display a list of the available Web references on the server. Click the link for the LoanCalcService and the dialog box will display additional information about the service, as shown in Figure 18.11. Figure 18.11. The Add Web Reference dialog box can be used to browse Web services and Web service documentation before adding a reference. 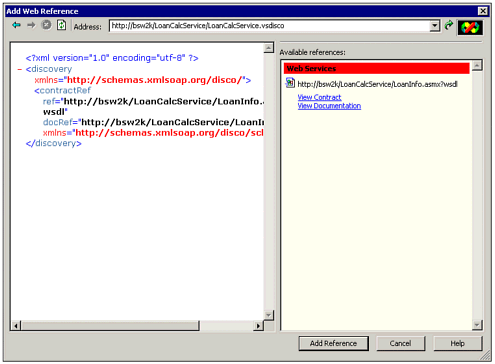 Note You do not have to browse the available services if you enter the complete name of the desired Web service.
The page shown in Figure 18.11 contains links for the Web Service description and contract. The description link takes you to the test pages so you can try the Web service's methods. The contract link takes you to an XML page containing detailed information about the structure of the messages necessary to communicate with this Web service. To complete adding the Web reference to your project, click Add reference to close the dialog box. The Solution Explorer should now show the name of your Web server under the Web references section. Using the Web Service Objects The classes exposed by the Web service can now be accessed in your program. Just type the server name followed by a dot and you will see the CalculatePayment and CalculateAmortization methods available. Enter the code from Listing 18.3 in the button's Click event to complete the sample application: Listing 18.3 LOANCALC.ZIP Accessing a Web Service Private Sub btnCalculate_Click(ByVal sender As System.Object, _ ByVal e As System.EventArgs) Handles btnCalculate.Click Dim LoanCalcService As localhost.LoanInfo Dim dsAmort As DataSet Dim decPayment, decIntRate, decPrincipal As Decimal Dim intYears As Integer decIntRate = Convert.ToDecimal(txtInterest.Text) decPrincipal = Convert.ToDecimal(txtPrincipal.Text) intYears = Convert.ToInt32(txtTerm.Text) 'Create an instance of the Web service class LoanCalcService = New localhost.LoanInfo() 'Determine the payment amount decPayment = LoanCalcService.CalculatePayment(decPrincipal,_ decIntRate, intYears) txtPayment.Text = Format(decPayment, "$0.00") 'Determine the amortization schedule dsAmort = LoanCalcService.CalculateAmortization(decPrincipal, _ decIntRate, intYears, Decimal.Round(decPayment, 2)) dgAmortization.DataSource = dsAmort dgAmortization.DataMember = "AmortizationSchedule" End Sub Run the program and enter values for the principal amount, interest rate, and number of years. Figure 18.12 shows what the screen will look like after it has retrieved information from the Web service. Figure 18.12. The Loan Calculator Web service can be accessed from Windows or Web-based Applications. 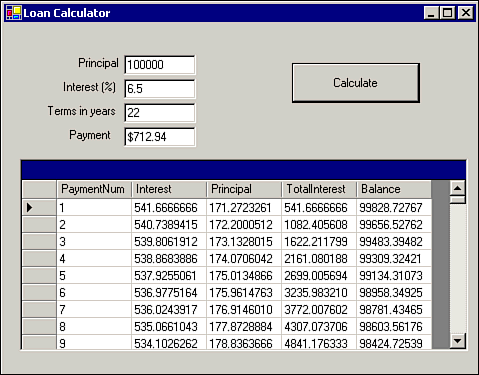 Note Because the Web service and client are independent processing units, you may want to investigate asynchronous calls for longer requests. Microsoft includes a great example of some Visual Basic code to do this on the MSDN Web site; just visit http://msdn.microsoft.com/code and search for "Web Service."
Changing the Web Server When you add a Web reference to your project, Visual Studio automatically associates the reference with the server where it found the discovery information about the Web service. However, sometimes you might want to dynamically change the location of the Web service in the client app; for example, if you want to switch between development and production Web servers running the same service. To override the default location, you can set the URL property of your Web service class, as in the following example: Dim LoanCalcService As LoanCalc.LoanInfo LoanCalcService = New LoanCalc.LoanInfo() LoanCalcService.Url = "http://servername/LoanCalcService/LoanInfo.asmx" Note that the URL setting includes the complete path to the .asmx file. In addition, notice the name of our Web reference is LoanCalc. By default, when adding a Web reference, the server name is used, for example localhost. However, you can rename the reference in the Solution Explorer if you want to use a more generic name in your code. By using a generic name and setting the URL property dynamically, you can avoid tying your client to one particular Web service host. |