| The configuration steps outlined in Chapter 2, "One-Time Configuration for Query Tool Use," describe how easy it is to configure the SAP Query tool for use. As you learned in Chapter 2, you can complete the one-time configuration in four quick and easy steps: 1. | Create query groups.
| 2. | Assign users to query groups.
| 3. | Create InfoSets.
| 4. | Assign your InfoSet to your query group.
|
The basic need for creating query groups and InfoSets (the data sources) for use in SAP HCM reporting is the same for any type of reporting. You need query groups to segregate your users into meaningful working groups such that only the appropriate users access, create, and change reports within their areas of expertise. For example, in a typical large organization, you might have query groups for payroll, benefits, savings, rewards, and so onbasically, a query group for every relevant area within the HR department. There is really only one primary difference between the general configuration steps and the steps specific to the HCM module, and it has to do with InfoSet configuration (step 3). The four steps just listed are covered in great detail in Chapter 2, in the section "Steps in Configuring the Query Tools." Step 1 (create query groups) and step 2 (assign users to query groups) should be performed according to the instructions outlined in Chapter 2. To create a new InfoSet specific to reporting in the HCM module, you need to follow these steps: 1. | Log in to the area of your SAP client where your InfoSets will be maintained. (Best practice dictates that you maintain InfoSets in your development client.)
| | | 2. | Navigate to the screen InfoSet: Initial Screen, shown in Figure 16.1, by using the transaction code /nSQ02.
Figure 16.1. You create and modify InfoSets for all modules in SAP R/3 by using the InfoSet: Initial Screen. 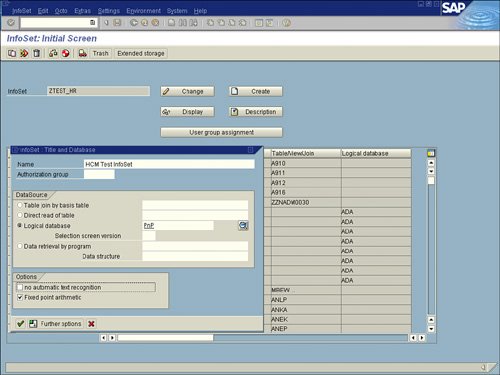
| 3. | Ensure that you are in the appropriate query area by selecting Environment, Query Areas and then selecting Standard Area. (Best practice dictates that you maintain your queries in the standard area.)
| 4. | Type in the InfoSet name you will be creating (for example, ZTEST_HR) and click the Create button. A dialog box labeled InfoSet: Title and Database appears.
| 5. | Type the InfoSet description (for example, HCM Test InfoSet) in the Name field.
| | | 6. | Select the logical database you want to use as a source. As mentioned earlier, you can create InfoSets by using a variety of sources, the most common of which is the logical database. Three logical databases are available for the HCM module, as detailed in Table 16.1. Select the Logical Database radio button, select or input PnP in the field to its right, and then click the green check mark Continue button. A dialog box like the one shown in Figure 16.2 appears.
Table 16.1. Logical Databases Available for HCM Reporting| | Logical Database |
|---|
Characteristic | PnP | PcH | PaP |
|---|
Selection of: | Persons | Objects from personnel development submodule | Applicants | Infotypes | Infotypes for: Personnel Administration (00000999) Time Management(20002999) Payroll result infotypes Infotypes for Personnel Planning objects that can be related to persons Custom Infotypes (9000 series)
| If the object type is specified: If the object type is not specified: All infotypes
| Infotypes for: | Considerations | Use the logical database PnP to report on human resources (HR) master data. It is possible to use the logical database PcH to access this data, but PnP meets such reporting requirements more quickly because it is best suited to the task of electing persons. The logical database PnP enables you to access HR master data and infotypes from Personnel Planning. | This logical database generally enables you to report on all HR infotypes. However, SAP advises not using this logical database unless you want to report on Personnel Planning data. | The logical database PaP enables you to access data from Recruitment. |
Figure 16.2. The Infotype Selection dialog box lists the primary infotype categories within the Personnel Administration submodule of HCM. 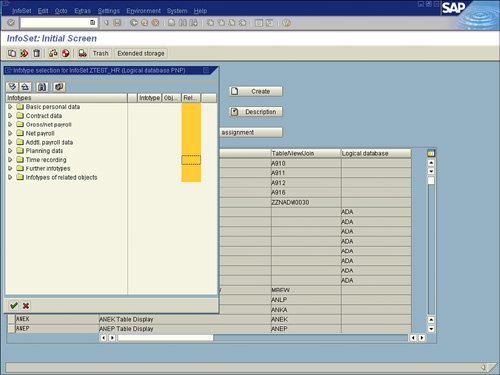
Note There are no published translations for the three-character logical database names used in SAP. Earlier chapters use the SAP-delivered Training Flight Scheduling logical database, which is called F1S, presumably for Flight Scheduling 1, but there is no documentation to support this. With regard to the HCM logical databases, PnP refers to the Personnel Administration submodule, PcH refers to the Personnel Development submodule, and PaP refers to the Recruitment submodule. | | | 7. | In the Infotype Selection dialog, use the small arrows to the left of each infotype category to see a list of all the infotypes included in each. Then select the small box to the right of each infotype that you want to be available within your data source (see Figure 16.3).
Figure 16.3. You should indicate only the infotypes that you currently use because you will always be able to return to the Infotype Selection dialog to add more. 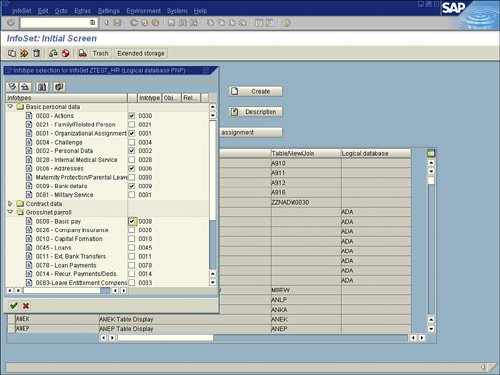
| | | 8. | Click the green check mark Continue button. A Change InfoSet screen similar to the one shown in Figure 16.4 appears, listing all the infotypes you previously indicated that you wanted to include in your InfoSet. The Change InfoSet screen is divided into three sections:
The top-left section of the Change InfoSet screen displays a list of all previously selected infotypes, with two indicators under each. The first is a small blue box indicating the table that stores this infotype's fields. The second is related additional fields for that infotype. The top-right section of the screen, labeled Field Groups, lists all the necessary field groups, already created for you. These infotypes (field groups) are what the end user sees when creating reports using the SAP Query tools. The bottom-right section of the screen is populated with options and information only when a field from a table is selected on the left (see Figure 16.5).
Figure 16.4. The Change InfoSet screen is divided into three sections. 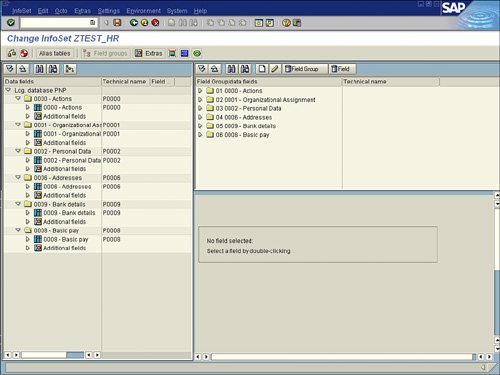
Figure 16.5. You see some fields listed that you do not recognize because the Change InfoSet screen displays every available field for the infotype, regardless of whether it is one used by your organization. 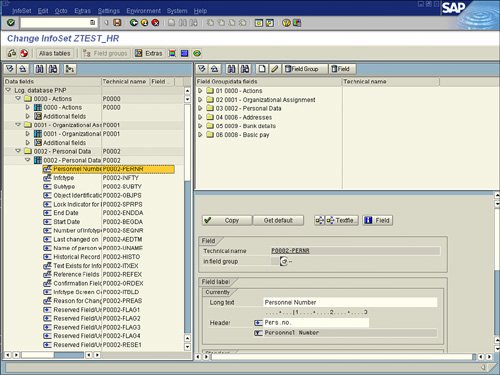
| 9. | To view the fields in each of the infotypes, click the expand subtree button next to each table name. The table expands and displays the fields under it, as shown in Figure 16.5.
| | | 10. | View the fields in each of the field groups on the top right of the screen by clicking the expand subtree button next to each field group. The field group expands, displaying the fields under it. These field groups will display in your query tools while reporting; only the fields that you include in your field groups will be available for field selection in your query reporting tools that use this InfoSet as their data source. By default, these field groups will be prepopulated for you, by default containing the most commonly used fields from each of the infotypes (see Figure 16.6).
Figure 16.6. The most commonly used fields for each infotype are already included in its respective field group. 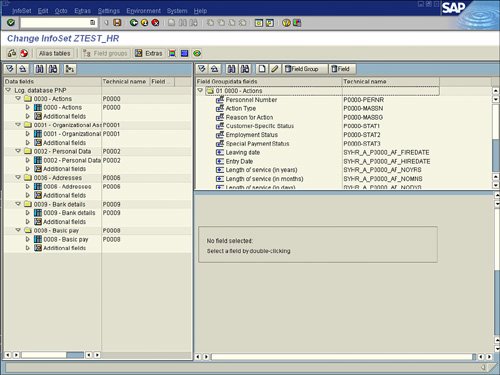
| | | 11. | If you determine that some fields are missing from your field groups that you want to include, you can add them by placing your cursor on the appropriate infotype (field group) on the top-right side of your screen and double-clicking to make that infotype (for example, 0002: Personal Data) the selected infotype (field group); it will appear highlighted. Next, select fields from the left side of the screen in the appropriate table from Infotype 0002: Personal Data and then add them to the appropriate infotype (field group) at the top-right of the screen. You do this by placing your cursor on a field on the left side of the screen, right-clicking, and selecting the option Add Field to Field Group (see Figure 16.7).
Figure 16.7. You should only add a field to its corresponding infotype's field group (for example, fields from Infotype 0002 to field group Infotype 0002: Personal Data). 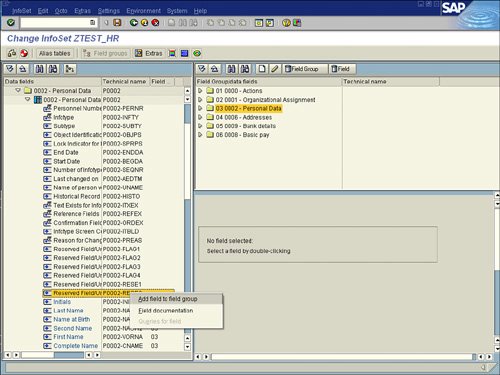
The field you just added to the indicated infotype (field group) now appears at the top right of the screen. You can continue to add fields using the same procedure. Be sure to add fields to the appropriate field group. For example, fields from Infotype 0001 should only be added to the field group for Infotype 0001: Organizational Assignment.
| 12. | When each field group contains the fields you want, click the Save button on the toolbar. A message appears in the status bar, saying that your InfoSet was saved.
| 13. | Generate the InfoSet by clicking the Generate (red beach ball) button on the Application toolbar. A message appears in the status bar, saying that your InfoSet was generated.
Note When you generate an InfoSet, SAP checks to see if any errors are present in the logic of the InfoSet's configuration. | 14. | Exit the InfoSet by clicking the green Back button.
|
Of the four steps mentioned at the start of this section, step 1 (create query groups) and step 2 (assign users to query groups) should have been performed before you began this exercise. Now that the special configuration of the InfoSet for the HCM module is complete, you simply need to perform step 4 (assign your InfoSet to your query group), which is covered in great detail in Chapter 2, in the section "Steps in Configuring the Query Tools." You can also easily remove fields from infotype field groups that you are not using. For example, if your organization does not use some of the fields that are listed in a field group by default, you can remove them from the field group to reduce confusion. Removing fields from field groups involves virtually the same process as just described: You simply place your cursor on a field on the left side of the screen, right-click, and select the option Delete Field from Field Group. |


