| After you have made the administrative decisions described in Chapter 1, you can perform the one-time configuration of the Query tools in four quick and easy steps: 1. | Create query groups.
| 2. | Assign users to query groups.
| 3. | Create InfoSets.
| 4. | Assign each InfoSet to a query group.
|
Step 1: Create Query Groups A query group (known as a user group in versions of SAP prior to version 4.6) is a collection of SAP users who are grouped. The best way to think of query groups is to think of them along the lines of departments within an organization and the functional areas within those departments. For example, an organization's Finance department may have multiple functional areas, including Accounts Payable, Accounts Receivable, Payroll, and so on. Creating user groups allows an organization to group its reporting users (and subsequently their reports) into functional areas. A user's assignment to a query group determines which queries he or she can execute or maintain. Using query groups is an easy way to group and segregate your report users and reports. To create a new query group, you perform the following steps: 1. | Log in to your SAP client where your query groups will be maintained. (As noted in Chapter 1, best practice dictates that they be maintained in your live production client.)
| 2. | Navigate to the User Groups: Initial screen by using the transaction code /nSQ03, as shown in Figure 2.1.
Figure 2.1. SAP query groups are created and modified using the User Groups: Initial screen. 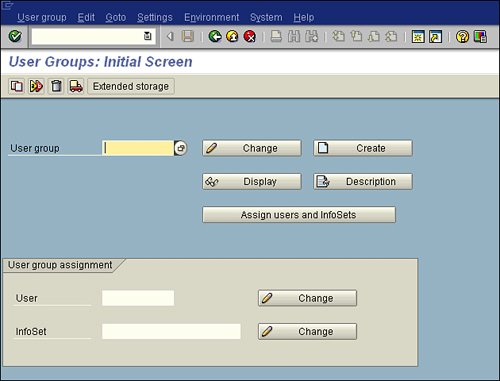
| 3. | Ensure that you are in the appropriate query area by following the menu path Environment, Query Areas and selecting Standard Area. (Best practice dictates that you maintain query areas in the standard area, as discussed in Chapter 1.
| 4. | Type in the name for your query group in the User Group field. (For purposes of this example, I'm naming mine ZTEST.) Then click the Create button.
| 5. | When a dialog box appears, asking you to provide a description for your query group, type Test Query Group 1 and then click the green checkmark Save button.
|
Step 2: Assign Users to Your Query Groups To assign users to a query group, perform the following steps: 1. | Click the Assign Users and InfoSets button.
| | | 2. | Type in the SAP user IDs of any users you wish to include in your test group, making sure to include your own user ID (see Figure 2.2).
Figure 2.2. Input the SAP user IDs for any user you wish to belong to the query group. 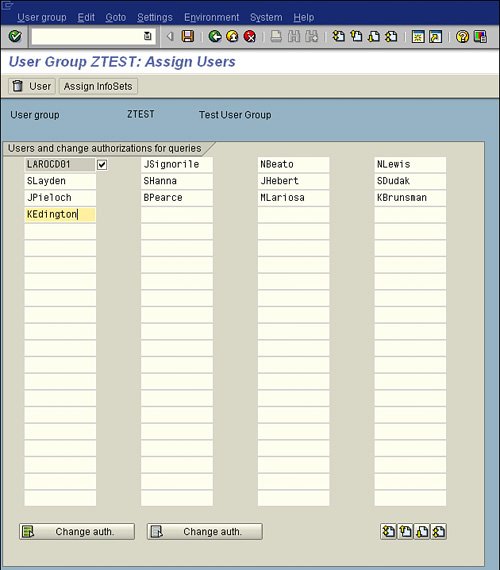
| 3. | Click the Save button on the toolbar. A message appears in your SAPGUI status bar, saying "User group ZTEST saved."
|
Now that you have a query group created, the next step is to create an InfoSet. Step 3: Create InfoSets You create InfoSets (known as functional areas in versions of SAP prior to version 4.6) on the InfoSet: Initial screen, shown in Figure 2.3. As stated in Chapter 1, an InfoSet is basically the data source from which you get the data to use in your reports. You can picture an InfoSet as an organized container that holds all your stuff. InfoSets can be built on a variety of different sources, but the most common is the use of a logical database. Figure 2.3. A list of all previously created InfoSets is displayed on the InfoSet: Initial screen. 
To create a new InfoSet, you perform the following steps: 1. | Log in to your SAP client where your InfoSets will be maintained. (As noted in Chapter 1, best practice dictates that you maintain them in your development client.)
| 2. | Navigate to the InfoSet: Initial screen by using the transaction code /nSQ02 (see Figure 2.3).
| 3. | Ensure that you are in the appropriate query area by selecting Environment, Query Areas and then selecting Standard Area. (Best practice dictates that you maintain query areas in the standard area, as covered in Chapter 1.)
| 4. | Type in a name for your InfoSet. (For purposes of this example, I'm naming mine ZTEST.) Then click the Create button.
| 5. | On the InfoSet: Title and Database screen, type an InfoSet description in the Name field. (For purposes of this example, I'm naming mine Test InfoSet 1.)
| | | 6. | On the InfoSet: Title and Database screen, select the Logical Database radio button and select or input logical database f1s in the field to its right (see Figure 2.4), and then press Enter.
Figure 2.4. There are several hundred logical databases to choose from. 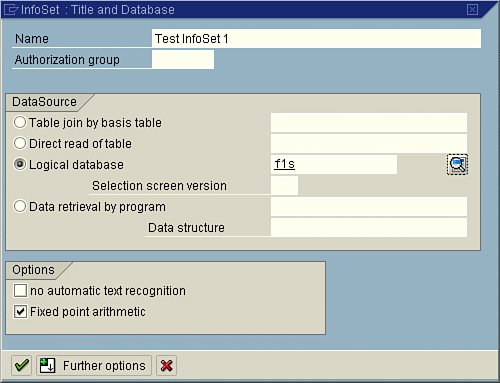
Helpful Hint InfoSets can be created with various data sources, including logical databases, tables, table joins, and so on. The best business practice is to use the SAP-delivered logical databases as your data source. They have been created for this purpose, and at least one logical database is delivered with your system for each application area/module in SAP. The F1S logical database used in this example is the database that SAP uses in its training classes, which use a fictional airline scheduling system. It is best to use this for your test cases. If you have difficulty accessing this predelivered SAP test training solution, contact your system administrator, who can ensure that it was installed. A Change InfoSet screen, similar to the one shown in Figure 2.5, appears. The Change InfoSet screen displays a list of all tables available in the selected logical database for your InfoSet. The logical database selected, F1S, contains three test tables, called SPFLI, SBOOK, and SFLIGHT, which correspond to the three field groups listed at the top right. The field groups are what the end users see when they are creating reports using the SAP Query reporting tool.
Figure 2.5. The Change InfoSet screen is divided into three sections. 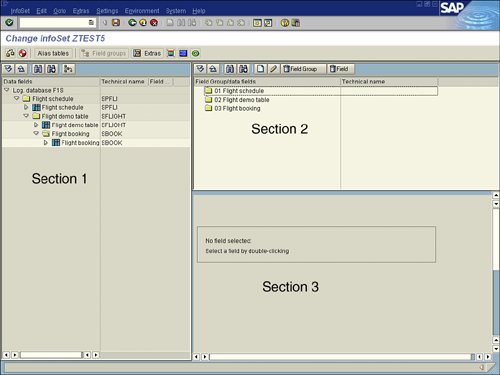
| 7. | To view the fields in each of the three tables, use the expand subtree button next to each table name. The table selected expands and displays the fields underneath, as shown in Figure 2.6.
Figure 2.6. The left side of the screen lists the tables and fields, and the right displays the field groups. 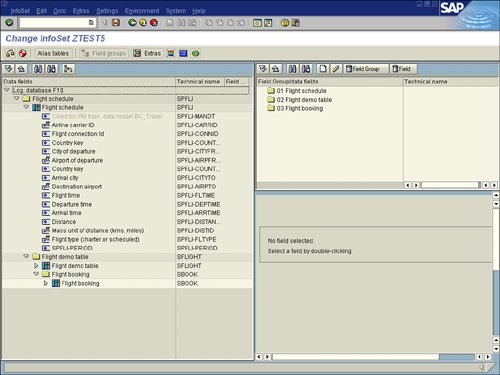
| | | 8. | Assign fields to the field groups (shown on the top right of the screen) within the InfoSet. These field groups will display in the SAP Query tool during reporting. Only the fields that you include in your field groups will be available for field selection in the SAP Query tool that uses this InfoSet as its data source. By default, these field groups are empty.
Note For all modules in SAP, by default, your field groups will be empty, and you will need to manually insert fields into them. This is true for all modules except for the Human Capital Management module and the InfoSets that support it. For those, the field groups will already be created for you, with a default set of fields; you can add additional fields, if required, as discussed in Chapter 15, "HR and Payroll Reporting Options in the HCM Module." | 9. | Place your cursor on the first field group, Flight Schedule, and double-click to highlight that field group as the selected field group. Next, select fields from the left side of the screen from the Flight Schedule table and add them to the Flight Schedule field group by placing your cursor on a field on the left side of the screen, right-clicking, and selecting the option Add Field to Field Group (see Figure 2.7).
Figure 2.7. You should only add fields to their corresponding field groups (for example, Flight Schedule table to Flight Schedule field group). 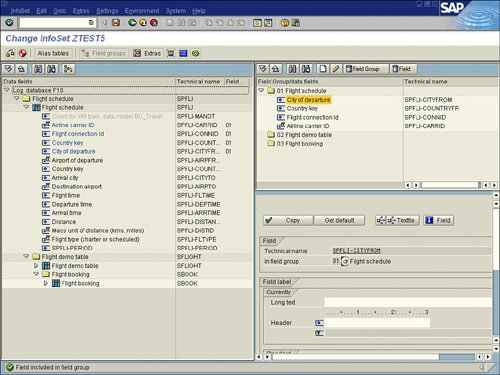
| | | 10. | When the field you just added to the Flight Schedule field group appears at the top right of the screen, add fields to your selected functional group by following the procedure outlined in step 9. Be sure to add fields to the appropriate field groups. For example, fields in the Flight Schedule table should be added to the Flight Schedule field group, and fields from the Flight Booking table should be added to the Flight Booking field group.
| 11. | After you have added a series of fields to your field groups, click the Save button on the toolbar. A message appears in the status bar, saying that your InfoSet was saved.
| 12. | Generate the InfoSet by clicking the Generate button (the red beach ball) on the Application toolbar. A message appears in the status bar, saying that the InfoSet was generated.
Note Clicking the Generate button for your InfoSet causes SAP to check whether any errors are present in the logic of the configuration of the InfoSet. | 13. | Exit the Change InfoSet screen by clicking the green back arrow.
|
Step 4: Assign Each InfoSet to a Query Group You have now created a Query group, assigned users to it, and created an InfoSet. The last step before you begin creating reports is to assign your InfoSet to your Query group. This is an easy task: 1. | On the InfoSet: Initial screen (which you reach by entering transaction code //nSQ02), make sure your InfoSet name (in my example, ZTEST) is present in the InfoSet text box, and click the User Group Assignment button.
| 2. | In the InfoSet: Assign to User Groups screen that appears, highlight your query group (in my example, ZTEST) by selecting the gray button to the left of it, and then click the Save button. A message appears in the status bar, saying that the assignment of InfoSet has been saved.
| 3. | Exit the InfoSet: Assign to User Groups screen by clicking the green Back arrow.
You are now ready to begin creating reports with the SAP R/3 Query reporting tools. Chapter 3, "Creating Basic Reports with the SAP Query Tool," describes how to do so using SAP Query.
|
|