Monitoring and Optimizing Security
|
EXAM 70-293 OBJECTIVE 5, 6, 6.3, 6.3.1
Monitoring security in Windows Server 2003 is an important task that you should not take lightly. Windows Server 2003 has added functionality that will enable you to monitor for security breaches on a daily basis and move on with your other administrative duties. The results of your monitoring should be used as a basis for evaluating and optimizing the security measures in place on your network. You can use the following tools to help monitor and optimize security in your organization:
-
Wireless Monitor
-
Object-based access control
-
Auditing
-
Security policies
Each of these tools is discussed in the following sections.
Wireless Monitor
If you have implemented wireless networking in your organization, you will need to monitor your wireless network for day-to-day activity. Good security begins with being aware of what is happening on your network.
The Wireless Monitor MMC snap-in allows you to view wireless network activity such as MAC addresses, network names, strength of the signal, and the data rate that the wireless network will support, just to name a few available monitoring details.
You can view information about both the WAP and the clients. There are two nodes in the left pane of the console: Access Point Information and Wireless Client Information. To enable or disable logging of client information, right-click the Wireless Client Information node and make the appropriate selection.
The information shown in the Wireless Monitor console is collected from the Wireless Configuration service. You will be able to view configuration changes and track the reaction of the Wireless Configuration service to events generated outside the network. The client events you can log include the following:
-
The addition of a NIC (wireless or otherwise)
-
Association to a network using a random WEP key
-
Failure to detect the presence of an ad hoc network
-
Failure to associate to an infrastructure (WAP) network
-
Failure to associate to any wireless network
-
Successful association to a wireless network
-
Driver errors
-
Resetting of the network interface
-
Beginning or completing a scan for wireless networks
-
Configuration changes needed
-
Processing of commands
-
Device arrival notifications
-
Media connect and disconnect notifications
-
Timeout notifications
Note You do not need to have administrative credentials to add the Wireless Monitor snap-in and view wireless information.
Object-based Access Control
Object-based access control can be added to a GPO to allow administrators to apply or modify auditing policy settings for items such as the following:
-
Files and folders (object auditing must be enabled in Group Policy before these items can be audited)
-
Printers
-
Services
-
Registry keys
Auditing
Administrators should set up auditing on items that have high sensitivity (for example, folders and files containing confidential documents). You should not attempt to audit all items, because this would create a system and work overload for the following reasons:
-
Auditing uses memory and processor resources, resulting in performance issues.
-
Audit logs use hard disk space (and can use a considerable amount if you audit many items).
-
Sorting through hundreds or thousands of entries can make it difficult for you to find the audit events that are important.
Auditing must be turned on before it will work. To turn on auditing for a local computer (not a domain controller), perform the following steps:
-
Select Start | All Programs | Administrative Tools.
-
Select Local Security Policy.
-
In the left pane of the GPO Editor, expand Local Policies.
-
Click Audit Policy.
-
In the right console pane, double-click Audit object access.
-
In the Local Security Setting tab, shown in Figure 11.2, under Audit these attempts, check the Success and/or Failure check box depending on the type of attempts you want to audit.
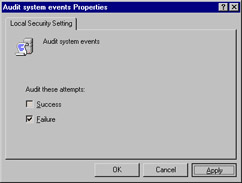
Figure 11.2: Enabling Object Access Auditing -
Click OK.
Note If the computer is a member of a domain, the domain policy will override local settings. If the Success and Failure check boxes are grayed out in the Security Policy Setting dialog box and you cannot change them, this means that a domain policy is in effect.
To turn on auditing for a domain controller, follow these steps:
-
Select Start | All Programs | Administrative Tools | Active Directory Users and Computers.
-
Right-click the domain name in the left console pane and select Properties.
-
Select the Group Policy tab.
-
Select the policy you want to edit (Default Domain Policy) and click Edit.
-
In the left pane of the GPO Editor, expand Computer Configuration, then Windows Settings, then Security Settings, then Audit Policy, then Local Policies.
-
In the right console pane, double-click Audit object access.
-
In the Security Policy Setting dialog box, check Define these policy settings. Check the Success and/or Failure check box depending on the type of attempts you want to audit. For example, if you want to know only when someone attempts to open a folder on which you enable auditing and is unable to do so, check only the Failure check box. If you want to know when anyone tries to access the folder whether successful or not, check both check boxes.
-
Click OK.
After you have enabled object auditing, the security setting appears in the right console pane, as shown in Figure 11.3.
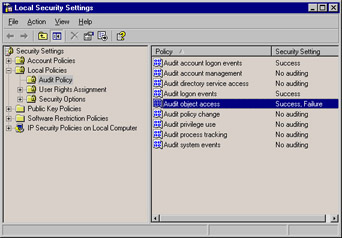
Figure 11.3: Turning on Auditing for Object Access Using the Local Security Settings Console
| Note | After you make the change to the audit policy, you might need to run gpupdate to refresh the policy before it will take effect. |
Now that object auditing is enabled, you must pick the objects you want to audit and set auditing on their properties. To set auditing on a folder, perform the following steps:
-
In Windows Explorer, navigate to the folder, right-click it, and select Properties.
-
Click the Security tab, and then click the Advanced button.
-
In the Advanced Security Settings dialog box, click the Auditing tab.
-
To add an auditing entry, click the Add button.
-
In the Select User or Group dialog box, enter the name of a user or group whose access to the object you want to audit. If you want to audit all access, select the Everyone group.
-
In the Auditing Entry for <foldername> dialog box, select the access types you want to audit. For example, if you only want to know when someone reads the data, select List Folder / Read Data. Check the Successful and/or Failed check box to indicate which type of access you want to audit. For example, if you only want to know when someone tries unsuccessfully to read data, check the Failed check box.
-
Click OK.
On the Auditing tab, you can also select whether you want to allow inheritable auditing entries from the parent object to propagate to this object and its child objects. If you check this box (which is checked by default), any auditing properties set on a parent object will flow down through the tree to all objects under it. Additionally, you can choose to replace the auditing entries that are on this object’s child objects with the ones you are setting here.
Auditing Registry Keys
To audit Registry keys, use the following steps:
-
Drilling down from Computer Configuration, select Windows Settings, Security Settings, and then Registry.
-
Right-click the Registry option and choose Add Key.
-
Browse to the key that you wish to audit and click the OK button.
-
To change settings on a file or folder that has been added to this GPO, in the details pane, right-click the Registry key and click the Properties button.
-
Click Edit Security, choose Advanced, and click the Auditing tab.
-
Click Add and type in the name or the group that you wish to audit.
-
From the correct entry, choose the Apply Onto list.
-
From the Access box, choose the actions that you wish to audit. Select Successful to audit successful events, Failed to audit events that failed, or deselect these actions to stop auditing those events. To stop all auditing, click the Clear All box.
-
To stop any subfolders or files in the tree from inheriting these audit properties, choose the Apply these auditing entries to objects and/or containers within this container only box.
Auditing Files or Folders
To audit files or folders, use the following steps:
-
Drilling down from Computer Configuration, select Windows Settings, then Security Settings, and then File System.
-
Right-click the File System option and choose Add File.
-
Browse to the file that you wish to audit and click the OK button.
-
To change settings on a file or folder that has been added to this GPO, from the details pane, right-click the file or folder and click the Properties button.
-
Click Edit Security, choose Advanced, and click the Auditing tab.
-
Click Add and type in the name or the group that you wish to audit.
-
From the correct entry, choose the Apply Onto list.
-
From the Access box, choose the actions that you wish to audit. Select Successful to audit successful events, Failed to audit events that failed, or deselect these actions to stop auditing those events. To stop all auditing, click the Clear All box.
-
To stop any subfolders or files in the tree from inheriting these audit properties, choose the Apply these auditing entries to objects and /or containers within this container only box.
Test Day Tip If check boxes are not available in the Advanced Security Settings dialog box for a particular file or folder, this means that auditing has been inherited from the parent folder. This is also the case if in the Auditing Entry dialog box for the file or folder, the Remove option is not available.
Viewing the Results of Auditing
After you have enabled object auditing in Group Policy and set auditing on at least one object, you can view the results in the Security log in Event Viewer.
Security Log Settings
Auditing security events can take up a great deal of system resources and disk space. This is especially true when you audit items such as logon and logoff times, folder access, OUs, and users. Make sure that you either have a large amount of hard drive space available on the server or you set your Security log to overwrite itself at a certain point, such as if the log reaches 50MB of space. To configure your event log settings, use the following steps:
-
Select Start | Administrative Tools | Event Viewer.
-
Choose Security Log, right-click the log, and select Properties.
-
In the log’s property page, you can change the maximum log size by entering the size in the Maximum Log Size field.
-
To set the log to overwrite itself as needed (when the maximum size has been reached) or when it is a certain number of days old, click Overwrite events older than and selecting the number of days in the drop-down box. You can also specify that events should not be overwritten if you want to always clear the log manually.
-
To clear the log, click the Clear log option. You will be prompted to save the Security log file before the clear is complete. Enter a name for the Security log file, and it will be saved with an .evt extension in a specified location. It can then be opened in Event Viewer for later viewing.
Test Day Tip Understand how to audit users for folder and object access. Also, remember that auditing must be enabled in Group Policy before it can function and log audited events.
Security Policies
Windows Server 2003 makes it easy to set security policies on local computers or for a domain, using Group Policy. To set security policies on a local computer, open the Local Security Policy GPO by selecting Start | All Programs | Administrative Tools and selecting Local Security Policy (you will not find this option on domain controllers). To set security policies in a domain, edit the default domain policy as follows:
-
Select Start | All Programs | Administrative Tools | Active Directory Users and Computers.
-
Right-click the domain node in the left pane and click Properties.
-
Choose the Group Policy tab.
-
Select the Default Domain Policy and click Edit.
-
In the left pane of the GPO Editor, expand Computer Configuration, then Windows Settings, then Security Settings.
In either case, you will see the following folders under Security Settings:
-
Account Policies Password, Acount Lockout and Kerberos policy settings.
-
Local Policies Audit, User rights assignment and Security options, Guest account names, CD-Rom access, driver installation and logon prompts.
-
Public Key Policies Certificate submission, certificate requests and installations and create then distribute certificate trust lists.
-
Software Restriction Policies Used to create hash rules, certificate rules. File identity through a specified path and the ability to create an internet zone rule.
-
IP Security Policies Used to create and manage IPSec security policies.
In the case of the domain policy, you will also see other entries under Security Settings, including Restricted Groups, System Services, Registry, File System, and Wireless Networks.
Some of the most important aspects of your security strategy include the configuration of password policies, Kerberos policies, account lockout policies, and user rights policies. In the following sections, we will discuss each of these in more detail.
Password Policies
Password policies allow administrators to enforce password history, age, and complexity and also use reverse encryption. Some options you can enforce include:
-
Enforce password history This will allow or disallow the availability of password histories. Changing this setting to 1, for example, would make it impossible for the user to use the last password he or she had used and force the user to create a new one. However, the user could reuse the password he or she had prior to the current one, because only one previous password would be remembered. The default setting is 24.
-
Maximum password age This is used to set the age for the password. After the number of days specified has been met, the password will expire and need to be reset. If password history is enforced, the user will need to change the password to a new one. If not, the user could reenter the same password. It makes little sense to set a maximum password age unless you also enforce password history. The default setting is 42 days.
-
Minimum password age This setting allows you to specify a time that a password must be in effect before it can be changed again. You can use this to keep users from continually changing their passwords. The default setting is one day.
-
Minimum password length This setting allows you to set a minimum length for passwords. If a user tries to set a password that is less than the minimum specified length, he or she will receive a message that the password is unacceptable. The default setting is seven characters.
-
Password must meet complexity requirement You can set passwords to meet a complexity requirement, which means they must contain both uppercase and lowercase letters and numeric characters to make them more difficult to guess. If a user tries to set a password that doesn’t meet the complexity requirements, he or she will receive a message that the password is unacceptable. This would stop users from using dictionary or easy-to-guess passwords. This policy is set to either Enabled or Disabled (you cannot define the specific required characteristics for the password within this policy; Microsoft has preset them).
-
Store password using reversible encryption for all users in the domain This setting allows you to use reversible encryption to store user passwords. Reversible encryption is not secure because it is the same as storing password in plaintext. This setting should be used only when necessary for compatibility purposes. By default, it is disabled.
Kerberos Policies
Kerberos policies are used for domain user accounts only. They determine Kerberos-related settings, such as ticket lifetimes and enforcement. Kerberos policies do not exist in Local Computer Policy. By right-clicking the policy, you can change the following options:
-
Enforce User logon restrictions Enabling this could slow your network performance. This is used to specify whether the Kerberos v5 Key Distribution Center (KDC) validates each request it receives for a session ticket against the target computer’s user rights policy.
-
Maximum lifetime for service ticket This setting must be greater than 10 minutes and less than or equal to the setting for the Maximum lifetime for user ticket setting. This is used to specify the time in minutes that a granted session ticket can be used to access a specified service.
-
Maximum lifetime for user ticket This setting is used to specify the time in hours that a user’s ticket granting ticket (TGT) can be used. A new TGT must be requested when the old one expires. By default, this is set to 10 hours.
-
Maximum lifetime for user ticket renewal This is used to determine the time in days during which a user’s TGT can be renewed. The default is seven days.
-
Maximum tolerance for computer clock synchronization This can be used to prevent replay attacks. This setting will determine the maximum time in minutes that can differ between the time on a server clock and the time on a user clock.
Account Lockout Policies
Account lockout policies are used by administrators to lock out an account when someone tries to log on unsuccessfully several times in a row. We can usually assume that a legitimate user might type his or her password incorrectly once or twice, but not numerous times. Thus, numerous failed logons can indicate that someone is trying a brute-force password attack (trying to keep guessing the password until he or she gets it right). There are three options:
-
Account lockout duration You can specify the time in minutes that the account can be locked out. For example, if the account locks out for two hours, the user can try again after that time. The default is no lockout. When you define the policy, the default time is 30 minutes. The setting can be from 0 to 99,999. When set to 0, the account will remain locked out until an administrator manually unlocks it.
-
Account lockout threshold This specifies the number of failed attempts at logon a user is allowed before the account is locked out (for example, three). After the threshold has been reached, the account will be locked out. If this value is set to 0, the account will not lock out. This setting can be from 0 to 999.
-
Reset account lockout counter after You can choose to have the account lockout counter reset after a number of minutes. At that time, the count will start over at one.
User Rights
When configuring user rights, it is important to remember how user rights differ from permissions:
-
Permissions are attached to a specific object such as a file, folder, or printer and determine who can access that object and what level of access is granted.
-
User rights are attached to user (or group) accounts and determine what a user can do on the computer in general, not in regard to a particular object.
User rights can be assigned to group accounts or individual accounts. These assigned rights will give the user the ability to do specific tasks, such as backing up and restoring system files, shutting down the server, and installing programs. It is easier and more efficient to assign user rights to groups rather than to specific users. For instance, if you work at a large company with more than 10,000 users, it is much easier to manage a user group with 1000 users than to manage the 1000 users individually. If you need to remove user rights for a user, you can just remove that user from the group.
Users are granted two types of rights: logon rights and privileges. Logon rights will give the user the right to log on to the system locally. Privileges are set to give the user access to perform specific tasks on the computer.
| Test Day Tip | Understand the difference between user rights and permissions. Also be able to distinguish between logon rights and privileges. Know what each of these allows in regard to security pertaining to a specific user. |
Security Templates
You can use the Security Configuration and Analysis MMC snap-in to apply specific security templates to a local machine. The templates can also be imported into Group Policy and applied throughout the domain. There are two different types of security templates available in the Windows Server 2003 family:
-
Local Security Policy, which is used to maintain local security settings on a computer
-
Security Settings extension to Group Policy, which is used to maintain security settings in AD for a domain, a site, or an OU
With the Security Configuration and Analysis console, you can compare the current security settings to a database that uses one or more security templates, or directly configure security by importing templates and applying them to the local computer. To access and use this console, follow these steps:
-
Select Start | Run, type mmc, and click OK.
-
In the console, File | Add/Remove Snap-in.
-
Select Add, choose Security Configuration and Analysis from the list, and click Add.
-
Click Close, and then click OK to open the console.
-
To create a new analysis database, right-click the Security Configuration and Analysis item and choose Open Database.
-
Type in a new database name and click Open.
-
Choose a security configuration file to import and click Open. Seven templates are available:
-
COMPATWS, which is compatible with the default permissions for workstations and servers granted to administrators, power users, and users (should not be applied to domain controllers)
-
HISECDC, for a high-security domain controller
-
HISECWS, for a high-security workstation
-
ROOTSEC, for system root security, specifies root permissions (can be used to reapply root directory permissions if they are changed)
-
SECUREDC, for a secure domain controller
-
SECUREWS, for a secure workstation
-
Setup Security, for default security, created during the installation of each computer and contains the default security settings (can be used on clients and servers but not domain controllers)
Note Never modify the default security.inf file because it is the default security template. If you make a modification and save the file as security.inf, you will have changed the default template. Then, if you have a problem, you will not be able to set security back to the default level.
-
An additional tool that you can use to automate security configuration is the Secedit command-line utility. This utility can be handy for administrators who like working at the command prompt instead of dealing with GUI. Type secedit at the command line to see the command’s syntax, as shown in Figure 11.4. The following switches are available:
-
secedit /configure Used to configure security information that will be stored inside a database. Type secedit /configure at the prompt to see a detailed list of this command’s multiple parameters.
-
secedit /import Used to import security configuration settings into a computer for use or to be analyzed. This command also has many parameters which can be viewed by typing the command at the prompt.
-
secedit /export Allows administrators to export security settings stored in the database. The syntax is:
secedit /export /DB filename /mergedpolicy /CFG filename /areas area1 area2 /log filename and /quiet
-
secedit /analyze Allows administrators to analyze the settings on a computer using a baseline stored in a database. The syntax is:
secedit /analyze /db filename.sdb /cfg /overwrite /log filename /quiet
-
secedit /validate Validates the syntax of a security template that you are trying to import into a database. The syntax is:
secedit /validate /cfg filename
-
secedit /generaterollback Used when you wish to configure a rollback template. This will reset the security settings to values that were applied before the newer security template. The syntax is:
secedit /generaterollback /CFG
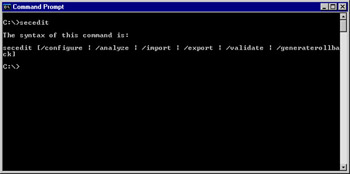
Figure 11.4: The Secedit Command Syntax
The CFG is the security template that you are creating a rollback template of:
-
filename.inf /RBK (this is the name of the rollback security template that is being created)
-
/SecurityTemplatefilename.inf
-
/log RollbackFileName.inf /quiet
| Exam Warning | Know how and why you would use the secedit.exe syntax and switches. Understand that you also need to know the security database name in order to use this tool at the command prompt. |
|
EAN: 2147483647
Pages: 173