Allowing Inbound Traffic
|
Up to this point in the chapter, we have not discussed how to allow traffic from an untrusted host, such as one on the Internet, to contact a server protected by the PIX. The PIX would not be entirely functional to most organizations if it did not allow traffic from an untrusted source to contact servers within the organization, such as a corporate Web server. The PIX ASA treats traffic entering a lower security-level interface and exiting a higher security-level interface, defined as inbound traffic, very differently than outbound traffic.
Unlike outbound traffic, inbound traffic is denied by default. This is to ensure that the security domains defined by the security levels of the interfaces are valid and not bypassed. Much as with outbound traffic, allowing inbound traffic to traverse the PIX is a two-step process. The first is configuration of a static translation. The second is to configure an access list or conduit that will specifically enable the required traffic to enter the PIX. Similar to the outbound/apply commands, the functionality provided by the conduit command has been replaced by access lists.
Static Address Translation
When a publicly accessible server (hopefully located in a DMZ) is protected by a PIX firewall, it becomes a requirement to allow connections initiated on a lower security-level interface to a higher security-level interface. The first step in accomplishing this task is creating a static address translation. The static command creates a permanent map in the PIX translation table for the global-to-local IP address mapping. The syntax for the command is as follows:
static [(<internal_if_name>, <external_if_name>)] {<global_ip> | interface} <local_ip> [netmask <mask>] [<max_conns> [<em_limit>]] [norandomseq] The static command requires two interface arguments: the internal interface, which is the interface name to which the server being translated is connected, and the external interface, which is where the global IP address will sit. The global_ip and local_ip parameters are self-explanatory. The netmask parameter is used when you are statically translating more than one IP address at a time. The default value for both max_conns and em_limit is 0 (unlimited), and these parameters are the same as in the nat command.
For example, Secure Corp. has added a DMZ interface to its PIX. It has decided to move its Internet Web server to the PIX DMZ and to allow access to it from the Internet. Figure 9.4 shows the network layout. The format for the static command, in this case, is as follows:
PIX1(config)# static (dmz, outside) 10.1.5.10 192.168.1.2 netmask 255.255.255.255 0 0
If the company had more than one Web server, instead of configuring a separate static entry for each, you could configure a single static command with the correct netmask. For example, for 14 Web servers that had the IP addresses of 192.168.1.1 through 192.168.1.15, you would use the following command:
PIX1(config)# static (dmz, outside) 10.1.5.0 192.168.1.0 netmask 255.255.255.240 0 0
Now consider the fact that the Web server located in the DMZ needs to access a database server located on the inside interface of the PIX. The process is the same: Whenever a lower security-level interface needs to access a higher security-level interface, a static translation needs to be created. The database server IP address does not need to be translated, since the Web servers on the DMZ are a part of the private address network. The following static command simply translates the IP address to itself. This is very similar to nat 0:
PIX1(config)# static (inside, dmz) 192.168.1.2 192.168.1.2 netmask 255.255.255.255 0 0
We are now halfway to allowing inbound traffic access to a protected server. The static command only creates a static address mapping between global and local IP addresses. Since the default action for inbound traffic is to drop it, the next step is to create an access list or conduit to allow the traffic to enter the PIX. Like the outbound/apply commands, the conduit command became a legacy command in favor of access lists when version 5.0 of the PIX software was released.
Access Lists
The process of creating an access list to allow inbound access is very similar to creating an access list for outbound access, which was discussed earlier in this chapter. The command syntax is the same, as are all the parameters. The key difference between an access list applied to a lower security-level interface and an access list applied to a higher security-level interface is that static translation must be configured to enable the traffic to traverse up to the higher security-level interface.
Conduits
Conduits, another method for allowing inbound access, have the following syntax:
conduit permit | deny <protocol> <global_ip> <global_mask> [<operator> <port> [<port>]] <foreign_ip> <foreign_mask> [<operator> <port> [<port>]]
By default, all inbound traffic is denied unless explicitly permitted. The purposes of the deny and permit keywords are obvious. The protocol, operator, and port parameters are the same as access lists. The global_ip parameter defines the global IP addresses of the host to allow access to, and the foreign_ip parameter defines the IP address to allow access from. The global_mask and foreign_mask parameters are the subnet masks applied to global_ip and foreign_ip, respectively.
The PIX processes the conduit commands in the order they are typed into the PIX. Once conduits have been created, nothing more has to be done to enable them. Conduits are not explicitly applied to an interface. However, based on the global_ip used with the command, it could be said that conduits are applied to an interface in reality.
For example, if a Web server with an internal IP address of 172.16.1.10 resides off the DMZ interface of a PIX, the following commands would allow access to the Web server from any foreign IP address:
PIX1(config)# static (dmz, outside) 10.1.5.10 172.16.1.10 netmask 255.255.255.255 0 0 PIX1(config)# conduit permit tcp host 10.1.5.10 eq www any
Since the Web server is using a private IP address, the foreign client would use the public address to access the server. The conduit created would only work between the outside and DMZ interfaces because the static command defines these interfaces in the translation.
Another example of conduit commands is as follows. This command enables domain lookups to occur from anywhere outside the network to the DNS server of 10.1.5.11:
PIX1(config)# static (dmz, outside) 10.1.5.11 172.16.1.11 netmask 255.255.255.255 0 0 PIX1(config)# conduit permit udp host 10.1.5.11 eq domain any PIX1(config)# conduit permit tcp host 10.1.5.11 eq domain any
This command enables an e-mail server (172.16.1.12) to receive e-mail from outside the network as 10.1.5.12:
PIX1(config)# static (dmz, outside) 10.1.5.12 172.16.1.12 netmask 255.255.255.255 0 0 PIX1(config)# conduit permit tcp host 10.1.5.12 eq smtp any
The show conduit command, as illustrated next, can be used to show all the conduits currently configured on the PIX:
PIX1# show conduit conduit permit tcp host 10.1.5.10 eq www any (hitcnt=0) conduit permit udp host 10.1.5.11 eq domain any (hitcnt=0) conduit permit tcp host 10.1.5.11 eq domain any (hitcnt=0) conduit permit tcp host 10.1.5.12 eq smtp any (hitcnt=0)
ICMP
Inbound ICMP traffic to the PIX firewall can be controlled using the icmp command, which only filters ICMP traffic that is terminating on one of the PIX interfaces, not traversing the PIX. The command has the following syntax:
icmp {permit|deny} <ip_address> <netmask> [<icmp_type>] <if_name> The ip_address parameter is the source address of the ICMP packet that will be denied or permitted with this command. The netmask parameter is the network mask associated with the ip_address parameter. The icmp_type parameter specifies the ICMP type that is being denied or permitted. A list of the ICMP type values is presented in Table 9.3. The if_name parameter is the name of the interface to which this ICMP filter will be applied.
For example, the following command permits the DMZ interface to respond to pings from the private network 172.16.0.0 255.255.240.0:
PIX1(config)# icmp permit 172.16.0.0 255.240.0.0 echo dmz
Port Redirection
Port redirection allows one public IP address to serve as the public IP address for more than one server. Port redirection allows you to define a mapping between a port on a public IP address and a port on a private IP address. To enable redirection, an access list or conduit still must be created, since the traffic is traversing from a lower security-level interface to a higher security-level interface.
Because the mapping can be set at the port level, one IP address can serve as the gateway to many servers behind the PIX. For example, Secure Corp. has set up a network at its Toronto site and has been assigned only a single public IP address from the ISP. At this site, Secure Corp. has two Web servers, one Telnet server, and one FTP server. How can it make all these services accessible publicly with a single IP address? This is accomplished using the static command to perform port redirection:
static [(<prenat_if_name>, <postnat_if_name>)] {tcp | udp} {<global_ip> | interface} <global_port> <local_ip> <local_port> [netmask <mask>] [<max_conns> [<em_limit>]] [norandomseq] We discussed the static command earlier in the chapter, so we will not go through all the parameters again. However, we introduce some new parameters here, including global_port and local_port. A protocol (tcp or udp) must also be specified so that the PIX knows the protocol port pair to accept and forward. Instead of using a global_ip, you can use the interface option to specify the IP address of the PIX interface specified in postnat_if_name. This option is important if you do not have any additional usable public IP address.
To configure port redirection for the first Web server using the PIX public IP address as the Web server's public address, the command is as follows:
PIX1(config)# static (dmz, outside) tcp interface 80 172.16.1.1 80
If the company also wanted to host Telnet, FTP, and another Web server, three more static commands would have to be added to map the global ports to the correct servers. Since the Web port is already taken, a high port (8080) is chosen for access to the second Web server. This example is shown in Figure 9.5. The additional commands are as follows:
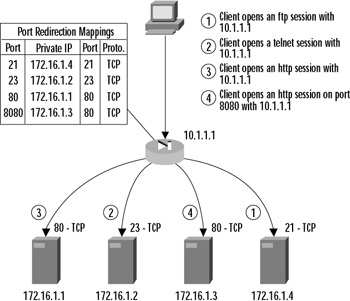
Figure 9.5: A Port Redirection Example
PIX1(config)# static (dmz, outside) tcp interface 23 172.16.1.2 23 PIX1(config)# static (dmz, outside) tcp interface 8080 172.16.1.3 80 PIX1(config)# static (dmz, outside) tcp interface 21 172.16.1.4 21
|
EAN: 2147483647
Pages: 240