Performing the Installation
|
We are now at the point where we can start installing ISA Server. The following walkthrough goes through each step required to install ISA Server as a stand-alone server on a Windows 2000 Advanced Server computer. Later, we will perform the enterprise initialization and upgrade the stand-alone server to an array member.
Installing ISA Server: A Walkthrough
These are the steps for performing a typical installation of a stand-alone ISA server:
-
We begin the installation by placing the installation CD into the CD-ROM drive. The autorun begins and we are presented with the installation options screen (see Figure 23.1). Note that you have six options:
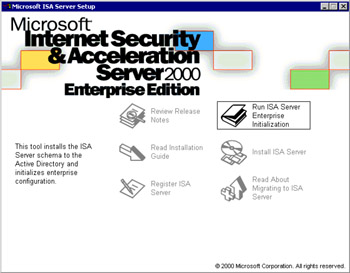
Figure 23.1: The ISA Server Setup Dialog Box-
Review Release Notes (the README file) Select this option to read the latest information about ISA Server that did not make it into the Help files. It is highly recommended that you read these notes before beginning. If you don't want to read the notes right away, you should at least open the file and print it for reference. It contains important information that you must know before beginning the configuration phase of the ISA Server installation.
-
Read Installation Guide The installation guide is a pared-down version of the Help files. This guide focuses on the concepts that are important to planning, installation, and basic configuration of ISA Server. You should also print this file and read it at your leisure.
-
Register ISA Server Use this link to register your server online.
-
Run ISA Server Enterprise Initialization Use this link to prepare Active Directory for configuring an ISA Server array. We cover how to perform the enterprise initialization later in this chapter.
-
Install ISA Server This option begins the installation of ISA Server.
-
Read About Migrating to ISA Server This link opens a document that provides information about how to upgrade from Proxy Server 2.0 and Windows NT 4.0 installations that have Proxy Server 2.0 installed on them. We cover important migration issues in this chapter.
For the purposes of this walkthrough, click the Install ISA Server option.
-
-
After beginning the installation, you will see the information screen shown in Figure 23.2, which informs you that you can install the product on only one server if you have only one license. Be aware of the licensing guidelines for ISA Server Standard Edition and Enterprise Edition.
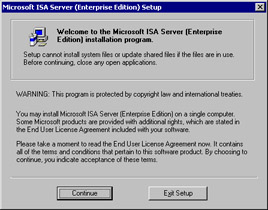
Figure 23.2: The Setup Welcome Screen -
Click Continue.
-
Enter your CD key (see Figure 23.3) and click OK. Notice that ISA Server uses the old CD key format, similar to that used by Proxy Server and different from the format used by other 2000 Series BackOffice server products.
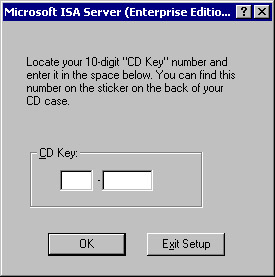
Figure 23.3: CD Key Dialog Box -
After entering the CD key, you will get your product ID number (see Figure 23.4). This is the number that you must provide to Microsoft Product Support Services if you want to get technical assistance from them. Take a screen shot of this dialog box, write down the product ID number, and put it in a safe place. Make multiple copies so that they're always available. The time that you won't be able to find your product ID is when you can't get your ISA server started. Click OK to move to the next step.
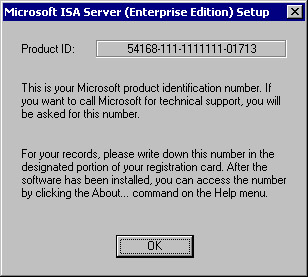
Figure 23.4: The Product ID Dialog Box -
The ISA Server end-user license agreement (EULA) screen comes up (see Figure 23.5). You can scroll thought the license agreement, or you can right-click the body of the license agreement text, click the Select All command, right-click again and select the Copy command, and copy the whole thing to Notepad to read it at your leisure. Click I Agree to continue the installation. (If you were to click I Decline, the installation would stop and you would be returned to the Desktop.)
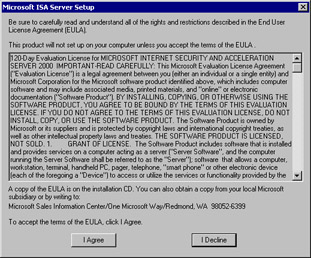
Figure 23.5: The ISA Server End-User License Agreement -
You now get to choose how you want to proceed with the installation (see Figure 23.6):
-
Typical Installation Install all the components on the boot partition. This option does not include the "add-on" products. The add-ons can be installed later if you choose not to install them at this time.
-
Full Installation The full installation includes all core program files and the add-on products. It installs these files to the boot partition.
-
Custom Installation The custom installation allows you to choose which optional components to install.
-
Change Folder The Change Folder button allows you to change the location of the core program files. If you do not want to install the program to the Program Files folder on the boot partition, click this button and change the location of the core program files.
For this walkthrough, click the Custom Installation button.

Figure 23.6: The ISA Server Installation Options Dialog Box -
-
When you select the custom installation, you get the dialog box shown in Figure 23.7, which allows you to choose the components to install. There are three options:
-
ISA Services
-
Add-in Services
-
Administration Tools
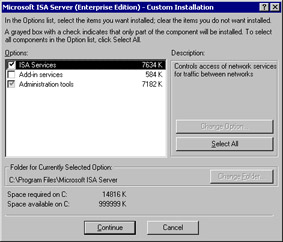
Figure 23.7: The Custom Installation Dialog BoxYou must install the ISA Services. However, you can customize your selections for add-in services and administration tools. If you select Add-in Services and click the Change Option button, you will see the screen that appears in Figure 23.8. You have the choice of installing either or both the H.323 Gatekeeper Service and the Message screener. Now, if you click the Administrative Tools option, you will see the options shown in Figure 23.9.
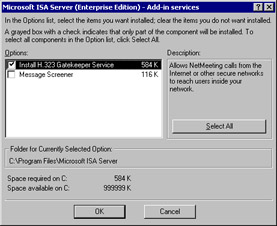
Figure 23.8: Add-in Services Change Option Dialog Box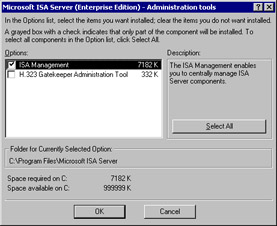
Figure 23.9: The Administrative Tools Options Dialog BoxHere you have the choice of installing the ISA Management and/or the H.323 Gatekeeper administration tool. If you are installing the full product on the server, you will want to install the administrative tools. In addition, you can choose to install only the administrative tools on a Windows 2000 Professional computer and administer any server or array in your organization.
If you choose to install the H.323 Gatekeeper administration tool, it will place a node in your ISA Management console that will allow you to configure the H.323 Gatekeeper service.
In this walkthrough, select all the options and click OK.
-
-
We have not run the enterprise initialization tool yet, so we get the dialog box shown in Figure 23.10. Since the ISA Server Enterprise Initialization tool has not yet updated the schema, we are not able to install this server as a member of an enterprise array. However, we are allowed to install it as a stand-alone server. Click Yes to install a stand-alone ISA server.
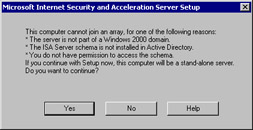
Figure 23.10: Deciding to Join an Array -
Here you choose the server mode from the options shown in Figure 23.11 and reviewed here:
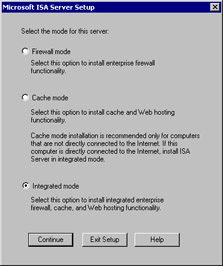
Figure 23.11: Selecting the Server Installation Mode-
Firewall Mode Choose this option if you want to install the server as a firewall only and do not want to use the Web proxy server. Keep in mind that if you do not install the Web Proxy Service, you will not be able to take advantage of either forward or reverse Web caching.
-
Cache Mode Choose this option if you want to use only "Web" protocols. Cache mode supports only HTTP, HTTPS, FTP, and Gopher. If you want to use other protocols such as SMTP for e-mail or NNTP for newsgroups, you need to install either firewall mode or integrated mode. It is also recommended that you do not install a cache-mode-only server on the edge of your network, because the firewall features are especially important at the edge of the network.
-
Integrated Mode Choose this mode if you want to take advantage of all the features of ISA Server. You will be able to support all Winsock applications and take advantage of the Web proxy server's Web caching feature.
-
-
For this walkthrough, select Integrated Mode so that we can examine both the Cache Mode and the Firewall Mode components. After selecting the Integrated Mode option, click Continue to continue with the setup routine.
-
At this point, the ISA Server installation program will stop the IIS WWW service (W3SVC), as shown in Figure 23.12. However, the service will be restarted by the end of installation. It is important to understand the implications of running IIS on the same computer as ISA Server. On a multihomed machine, ISA Server uses TCP port 80 on the external interface to listen for incoming Web requests for servers that have been published using the Web Publishing Wizard. If you have a Web site or sites that are using port 80 on the ISA server's external interface, they will no longer respond to requests. You need to either change the port number for those Web sites or use the Web Publishing Wizard to publish them via the internal interface on an alternate port number.
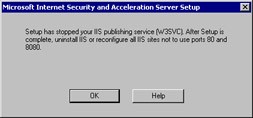
Figure 23.12: Warning Dialog Box about IIS ServicesISA Server listens for Web proxy server requests on port 8080 on the internal interface. This is a departure from the way Web proxy clients accessed the Proxy Server 2.0 Web Proxy Service, which they were able to access by connecting to port 80.
These changes point out an important fact: No component of ISA Server is dependent on IIS. In Proxy Server 2.0, the Web Proxy Service was an ISAPI plug-in to IIS; the management interface for the other services was dependent on IIS as well.
For this walkthrough, click OK to move on to the next step.
-
You now can configure the Web cache settings (see Figure 23.13). You are presented with a list of NTFS drives that can support the Web cache. You must place the cache on an NTFS drive. FAT partitions or volumes do not appear on the list. The default setting is to create a 100MB Web cache file on the partition that has the most free disk space. After you enter the size of the cache, you must click the Set button.
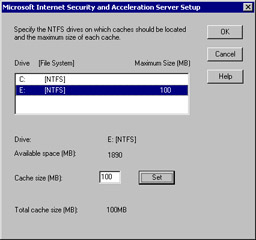
Figure 23.13: Configuring Web Cache SizeFor this walkthrough, configure a 100MB cache on the E: drive. To move to the next step, click the OK button.
-
The LAT configuration dialog box (see Figure 23.14) appears and provides you a chance to configure the LAT during setup. If you choose not to configure the LAT at this time or if you change your mind regarding the configuration of the LAT, you can change the settings via the ISA Management console after the installation is complete. You can approach configuring the LAT in two ways. You can manually enter the start and end addresses in the Edit frame on the left side of the dialog box, or you can use the Table button:
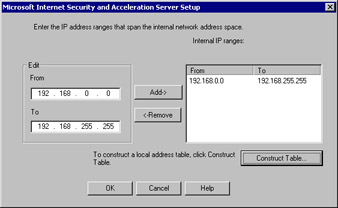
Figure 23.14: Configuring the Local Address Table-
When manually entering the information, you must include the entire range of your network IDs that are part of your internal network. Note that we have entered an illegal address for the start address for the LAT. This is OK and will not impair the functionality of the LAT.
-
If you choose to use the Construct Table button, ISA Server will try to create the LAT for you based on the network ID of your internal interface(s). In addition to the network ID of your internal interface, it will also add the three private network ranges:
192.168.0.0/24
172.16.0.0/12
10.0.0.0/8
-
If you choose to let ISA Server construct the table for you, you must be sure to check it very carefully. If you have a network with multiple logical IP segments, you need to include all these segment IDs in your LAT. Otherwise, requests for those internal network clients will be subjected to the rules created for requests for external network requests.
-
Always make sure that your ISA server can route to all your internal networks properly. The way to accomplish this task is to configure routing table entries that accurately reflect the configuration of your internal network. By configuring the routing table appropriately, you will ensure reliable communications within your network and prevent problems with incorrect LAT entries that can compromise the security of your internal network.
In this walkthrough, we have created an entry for our internal network ID, which falls within one of the private network address ranges. Click OK to continue to the next step.
-
-
The installer copies the files to their target directories. After the file-copy phase is complete, you are offered the opportunity to have the Setup program open the ISA Management console and begin the Getting Started Wizard (see Figure 23.15). The wizard walks you through the configuration steps for ISA Server. We like to be obliging, so we'll click OK to allow the installation routine to start the wizard for us. However, we'll avoid the Getting Started Wizard because we're going to learn how to configure the server ourselves!

Figure 23.15: Launch the ISA Admin Tool Dialog Box -
The Getting Started welcome screen (see Figure 23.16) is presented as the ISA Administration console is opened. You can use the wizard to help walk you through the steps of configuring the server. However, you should have a thorough understanding of ISA Server and all the implications of the settings you create before you work with the Getting Started Wizard. Once you have a firm understanding of ISA Server, the wizard can help you configure your server in an orderly fashion.
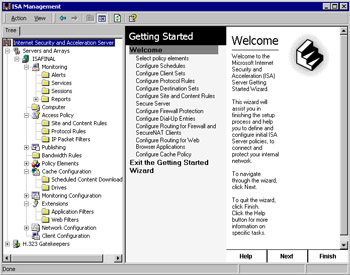
Figure 23.16: The ISA Server Management Console
Upgrading a Stand-Alone Server to an Array Member: A Walkthrough
In the first walkthrough, we installed the ISA server as a stand-alone server. You might want to do this in your test lab while you're learning about the system, or you might like to put ISA Server into a limited production environment in order to get a better feel for how it fits into your organization. The chance is good that you'll like what you see, and later you'll want to take advantage of the additional features provided in an enterprise array configuration. The good news is that you don't have to reinstall ISA Server to make it an enterprise array member; you can promote the stand-alone server instead.
As we discussed earlier, you need to have Windows 2000 deployed and available if you want to make the server a member of an enterprise array. The computer on which you want to perform the upgrade also needs to be a member of the Windows 2000 domain. If the machine is a member of a Windows NT 4.0 domain, the enterprise upgrade will not work, because the Windows NT 4.0 domain controller does not have the Active Directory in which to store the enterprise array configuration information.
| Note | When you install an add-in feature on one server in an array, it is not automatically installed on all the servers in the array. You must install the add-in on each server in the array individually. |
Performing the Enterprise Initialization
Before you promote a stand-alone server to an array member, you need to complete the enterprise initialization. This is the process of updating Active Directory so that it will support the ISA Server array configuration information. There are two ways you can perform the initialization:
-
From the Startup Installation screen
-
From the ISA Server installation files in the i386 directory, run the msisaent.exe file
Both these methods walk you through the same process:
-
When you put the CD-ROM into the drive, the Autorun feature brings up a dialog box. You can also get it to run by clicking the isaautorun.exe file in the root of the installation files hierarchy.
-
To run the enterprise initialization, click the Run ISA Server Enterprise Initialization icon.
-
After starting the initialization process, you'll get a dialog box informing you that the Active Directory schema will be updated and that this is not a reversible process (see Figure 23.17). If you get an error message stating that the "the computer name is unacceptable," click OK to close the dialog box and restart the computer. The enterprise initialization will proceed normally after restarting. Click Yes to continue.
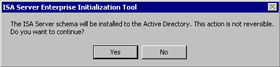
Figure 23.17: Warning about Irreversible Changes to the Active Directory -
At this point, you need to decide how you want to apply enterprise policy (see Figure 23.18). Your choices are:

Figure 23.18: Determining Policy-
Use Array Policy Only When you choose to use Array Policy Only, an enterprise policy is created, but it will not be automatically applied to the array. You will have the opportunity to manually assign enterprise policy to the array after the initialization is completed by configuring it in the ISA Management console.
-
Use This Enterprise Policy When you choose Use This Enterprise Policy, a default policy is created with the name Enterprise Policy 1. You can change the name if you want. If you select this option and do not select the Also Allow Array Policy option, any array policies are replaced by the enterprise policy. If you are thinking of choosing this option, be sure to back up your existing array policy prior to the enterprise initialization in the event that you want to restore the existing array policy (stand-alone policy as well) on the server.
-
Allow Array-Level Access Policy Rules That Restrict Enterprise Policy If you choose this option, both the enterprise policy and the array policies will be applied. However, array policies can only further limit the policies set for the enterprise. What this means is that array policy cannot have any allow rules. The only allow rules are those determined by the enterprise policy.
-
Allow Publishing Rules This option does exactly that. Publishing rules must be created on each server of an array separately, because the IP address(s) listening for requests for published servers will be different for each server. If you do not choose this option now, you can do so later after the enterprise is initialized and you promote the stand-alone server to an array.
-
Force Packet Filtering on the Array This option enforces packet filtering on the array(s) to which this policy is applied. This forces packet filtering on each server in the array and cannot be overridden by array policy.
The default settings are shown in Figure 23.18. We will allow array policy, allow publishing rules to be configured on the array, and force packet filtering. Then, click OK.
The schema is updated and shows the progression with a nice animated icon (see Figure 23.19).
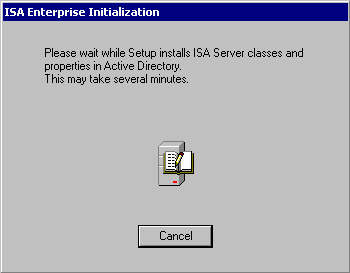
Figure 23.19: Initializing the Active Directory for ISA Server -
-
When the enterprise initialization is completed, you will see a dialog box informing you that everything worked (see Figure 23.20). If there were problems updating Active Directory, you will receive an error dialog box, and you will have to troubleshoot the problems with Active Directory and perhaps with connectivity. Note that if you have multiple domain controllers, you should wait before configuring ISA Server as an array member.
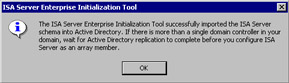
Figure 23.20: ISA Server Enterprise Initialization Tool Dialog BoxWarning We cannot stress too much the importance of the decision you make when deciding which policy or policies will be applied to the array. If you choose to allow enterprise policies, only enterprise policies will be applied and you will not be able to create any array policies. If you do allow for array policies, remember that you cannot create any allow rules in the array policy. Array policies can only restrict the policies you set in the enterprise policy.
Backing Up a Configuration and Promoting a Stand-Alone Server to an Array Member
After updating Active Directory to support your array, you can begin the process of promoting your stand-alone ISA server. Before promoting the server, confirm that you have connectivity with a domain controller in your Windows 2000 domain. You might also want to back up your configuration if you have not yet done so.
It's a good idea to back up your configuration when making changes of this kind. In fact, you should back up your stand-alone server or array configuration prior to making any changes to rules or filters. By backing up, you can easily roll back to a previous configuration that has worked for you. It is much easier, and much less error prone, to restore a backed-up configuration than to try to remember all the rules and configuration settings you made and hope that you enter them correctly a second time.
To back up an array or stand-alone configuration, perform the following steps:
-
Open the ISA Management console and right-click the name of your server or array (see Figure 23.21). Click the Back Up command.
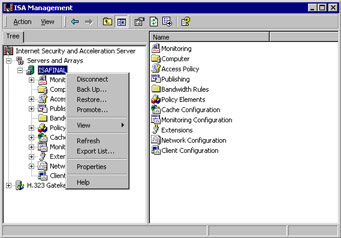
Figure 23.21: Accessing the Back Up Command -
In the Backup Array dialog box, type the path where you can store the configuration backup file (see Figure 23.22). Be sure to include the name of the file to fully qualify the path. Then, click OK.
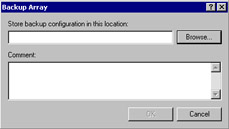
Figure 23.22: The Backup Array Dialog Box -
If the configuration backs up successfully, you will see a dialog box confirming that fact as seen in Figure 23.23. Note the warning in this dialog box. Although you have saved configuration settings specific to this array, it is not a complete backup of all system settings as they relate to ISA Server. This type of backup allows you to recover from errors you make in configuration settings in the ISA Management console, but it will not be enough to recover from a total system crash. For the purposes of disaster recovery, you should use the Windows Backup program or another backup program of your choice to back up the entire system, including the system state data. The system state data includes the Registry, the COM+ Class Registration database, and the system boot files. It also includes the Certificate Services database if the machine is acting as a Certificate server. If the computer is a domain controller, the system state will include the Active Directory database (ntds.dit) and Sysvol directory.
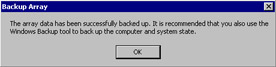
Figure 23.23: Confirmation of a Successful Backup -
You can confirm the location of your backup files by opening Windows Explorer. Figure 23.24 shows these files in the root of the C: drive. Note that these are the names we chose for the backup files. The system does not provide a default name. However, the backup files for stand-alone servers will always have the .BIF file extension.
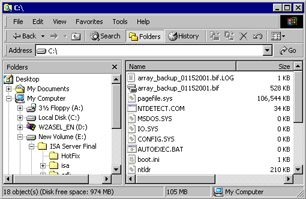
Figure 23.24: Backup Files Identified in the Root of Drive C:Now that we have backed up our stand-alone configuration, the next step is to back up the entire system. This way, we can roll back the system to a stand-alone server after the array promotion has been completed. There is no automatic mechanism for you to use to roll back from an array to a stand-alone server; you must restore from backup. After completing our backup duties, we can get to the process of promoting our server. Before we begin the promotion sequence, right-click the name of the server and click Properties. The Properties show that the server is a stand-alone server in integrated mode (see Figure 23.25). Note the tabs available when the server is a stand-alone server. There will be a new tab by the time we're finished with this walkthrough.
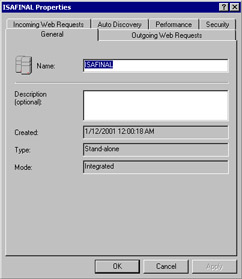
Figure 23.25: The General Tab in the Server's Properties Dialog Box -
To begin the promotion, right-click the array node in the left pane, and then click the Promote command, as shown in Figure 23.26.
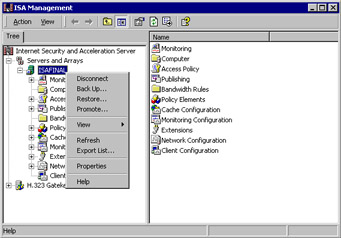
Figure 23.26: Beginning the Promotion Process -
After clicking the Promote command, we get a dialog box that warns us that we can't go back to stand-alone server mode once the promotion to an array is completed (see Figure 23.27). Click Yes to continue the promotion.
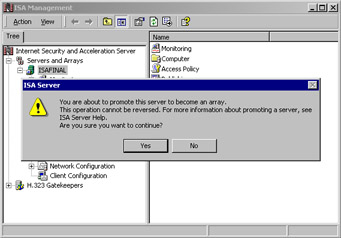
Figure 23.27: Array Warning Dialog Box -
Before the promotion begins, you need to decide on the enterprise policy settings for the array (see Figure 23.28). We discussed the meaning of each of these choices earlier in this chapter. The default setting is Use Default Enterprise Policy Settings. However, for this walkthrough, choose Use Custom Enterprise Policy Settings and Also Allow Array Policy. The Force Packet Filtering on the Array option is also a default selection; select Allow Publishing Rules to Be Created on the Array as well. Then, click OK.
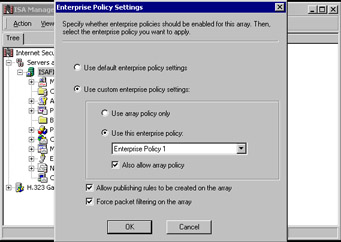
Figure 23.28: Setting Enterprise Policy Settings -
The promotion begins (see Figure 23.29). Several things happen during the promotion, and you'll be informed of these events in the Promoting Array dialog box. The first step is Converting Stand-alone Server to an Array. The subsequent steps are:
-
Storing configuration in the Active Directory
-
Stopping all services
-
Committing changes
-
Restarting all services
-
Refreshing array list
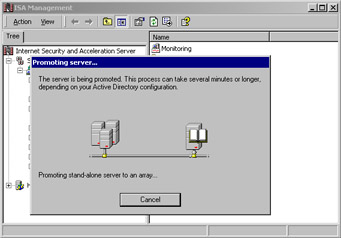
Figure 23.29: The Promotion of the Stand-Alone Server to an Array BeginsIf the promotion proceeds smoothly, note the instructions in the dialog box and click OK.
-
-
After clicking OK, you have to right-click the Internet Security and Acceleration Server node in the left pane of the ISA Management console and click the Connect to command. You then select the Connect to Enterprise and Arrays option button and click OK. Once connected, your console will have changed and look like what appears in Figure 23.30.
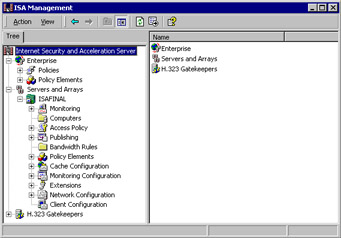
Figure 23.30: ISA Management Reflects After Promotion to Array Status -
Right-click the array name and click Properties, and notice that there is a new tab in the dialog box, the Policies tab (see Figure 23.31). Note the options available.
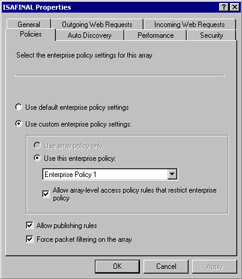
Figure 23.31: ISAFINAL Policies Tab
Changes Made After ISA Server Installation
As part of the installation routine, the ISA Server setup will change the TCP/IP driver's dynamic port range to 65,535. (The effect takes place when the computer is rebooted after installing.)
A number of additions are made in the Registry of the computer running ISA Server. Unfortunately, they are not all grouped together under a single Registry key, so you'll have to hunt around for them. At this time, none of the Registry keys has been documented. However, as with most Microsoft products, this information will be available in the future.
After installing ISA, the ISA-specific counters will be installed. You can access these counters via the System Monitor applet, or you can access a preconfigured ISA System Monitor console via the Start menu. The entry for the ISA Management console is also found in the Microsoft ISA Server entry in the Start menu.
ISA Server has its own management console and does not snap into the Internet Services Manager console the way Proxy Server 2.0 does. You can create your own console that includes the ISA Management stand-alone snap-in along with other snap-ins. In this way, you can streamline management by including snap-ins such as the ISA Management, Internet Services Manager, and other network- and Internet-related snap-ins to provide a central interface for your Internet and intranet-based solutions.
|
EAN: 2147483647
Pages: 240