Using SecuRemote Client Software
|
Once the client software is installed, you can start the SecuRemote GUI by double-clicking in the Envelope icon in your taskbar. Before you can use SecuRemote, you must create a new site by choosing Create New Site from the Sites menu (see Figure 16.19). Enter the IP address or host name of your SecuRemote server (which is the gateway through which you will be connecting, or, in a distributed installation, that gateway's management console), and click OK. The site key information and topology will be downloaded automatically, and will be stored in a file called "userc.C" on the client, in the SecuRemote installation directory.
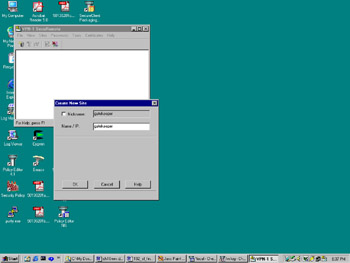
Figure 16.19: Creating a New Site
Once a site has been successfully created, you can attempt a connection to something in your VPN domain. You should see an authentication dialog box pop up (see Figure 16.20); here you would enter one of the previously defined usernames and passwords, after which you will be allowed access. Note that IKE encryption is the default, so if you are using FWZ, the client software needs to be reconfigured. Do this by choosing Encryption Scheme from the Tools menu, and then selecting FWZ instead of IKE.
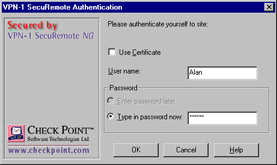
Figure 16.20: SecureRemote Authentication Window
After a topology change, you will need to update the SecuRemote clients so that their topology is in sync with the SecuRemote server. Updating the site can be done manually by right-clicking on the Site icon and choosing Update Site. This works for a small number of clients, but if you have a large number of remote users, you can enable automatic update (in SecuRemote version 4.1 or NG) in one of three ways:
-
Prompt the client to update its topology whenever SecuRemote is started by adding :desktop_update_at_start (true) to the :props section of the objects_5_0.C file on the management station. This can be refused by the client.
-
Prompt for update of all defined site topologies whenever SecuRemote is started by adding :update_topo_at_start (true) to the :props section of the objects_5_0.C file on the management station. This can also be refused by the client.
-
Force updating of the site topology every n seconds by adding :desktop_update_frequency (n) to the :props section of the objects_5_0.C file on the management station.
Making Changes to Objects50.C Stick
Editing the objects_5_0.C file can be tricky—if not done correctly, your changes will be lost. You should follow these recommendations when making changes to the objects_5_0.C file on your management server. Note that this file is called "objects.C" on the firewall module, as it was in past versions of Check Point Firewall-1. Editing this file on the firewall module will have no effect, as it gets overwritten by the objects_5_0.C from the management station during policy installs.
-
Close all GUI clients.
-
Perform fwstop on the management console.
-
Delete or rename the files "objects_5_0.C.sav" and "objects_5_0.C.bak."
-
Back up the original objects_5_0.C.
-
Make the necessary changes to the objects_5_0.C file and save them.
-
Perform fwstart on the management console.
-
Install the security policy to all modules.
Secure Domain Login
Secure Domain Login (SDL) enables users to encrypt traffic to a Windows NT domain controller behind a FireWall-1 firewall. Normally, SecuRemote is activated after domain login, meaning that domain login is not encrypted. To enable SDL after installation, choose Enable SDL from the Passwords menu. This will take effect only after a reboot. Note that SDL over a dial-up connection is only supported when using the Windows 2000 or NT clients—the 98 or ME clients only support SDL over an Ethernet adapter.
In order to successfully log in to an NT domain, you need to make sure you have the following client settings:
-
Your Client for Microsoft Networks has Log on to Windows NT Domain checked.
-
Your dial-up profile is configured with your internal WINS server address OR.
-
You need an LMHOSTS entry that points to your primary or backup domain controllers.
VPN Management
Easy VPN management is directly related to network topology choices. In general, one VPN endpoint with multiple small VPN domains behind it will be easier to manage than multiple distinct gateways, each with one VPN domain. The need for back-end security can be best solved by using gateways as needed, behind the sole VPN endpoint. Each smaller gateway must then be configured to pass encrypted traffic and key exchange traffic through untouched. You can use Table 16.2 to assist in this.
| Encryption Scheme | Ports/Protocols Used |
|---|---|
| FWZ | RDP (UDP port 259), FW1_topo (TCP port 264) |
| IKE | IKE (UDP port 500), ESP (IP protocol 50), AH (IP protocol 51), IKE over TCP (TCP port 500)*, UDP encapsulation (UDP port 2476)*,FW1_topo (TCP port 254) * Not always necessary |
|
EAN: 2147483647
Pages: 240