Section 12.5. The DB2 LOAD Utility
12.5. The DB2 LOAD UtilityThe load utility is another tool you can use to insert data into a table. Note that you cannot run the load tool against a view; the target must be a table that already exists. The major difference between a load and an import is that a load is much faster. Unlike the import tool, data is not written to the database using normal insert operations. Instead, the load utility reads the input data, formats data pages, and writes directly to the database. Database changes are not logged and constraint validations are not performed during a load operation. 12.5.1. The Load ProcessBasically, a complete load process consists of four phases.
12.5.2. The LOAD CommandThe load utility is so powerful that its command can be executed with many different options. Figure 12.16 presents a simplified version of the load command syntax diagram. Figure 12.16. Simplified syntax diagram of the load command.-,--------------. V | >>-LOAD--+--------+--FROM----+-filename---+-+--OF--filetype-----> '-CLIENT-' +-pipename---+ +-device-----+ '-cursorname-' >--+-------------------------+----------------------------------> | .-,--------. | | V | | '-LOBS FROM----lob-path-+-' >--+-------------------------------+----------------------------> | .--------------. | | V | | '-MODIFIED BY----filetype-mod-+-' >--+--------------+--+-------------+--+-----------------+-------> '-SAVECOUNT--n-' '-ROWCOUNT--n-' '-WARNINGCOUNT--n-' >--+------------------------+-----------------------------------> '-MESSAGES--message-file-' >--+-------------------------------+--+-INSERT----+-------------> '-TEMPFILES PATH--temp-pathname-' +-REPLACE---+ +-RESTART---+ '-TERMINATE-' >--INTO--table-name--+-------------------------+----------------> | .-,-------------. | | V | | '-(----insert-column-+--)-' >--+---------------------------+--------------------------------> '-FOR EXCEPTION--table-name-' >--+-----------------------------+------------------------------> '-STATISTICS--+-USE PROFILE-+-' '-NO----------' >--+-----------------------------------------------------------------+--> | .-NO----------------------------------------------------. | +-COPY--+-YES--+-USE TSM--+--------------------------+--------+-+-+ '-NONRECOVERABLE--------------------------------------------------' >--+-------------------+--+--------------------------+----------> '-WITHOUT PROMPTING-' '-DATA BUFFER--buffer-size-' >--+--------------------------+--+--------------------+---------> '-SORT BUFFER--buffer-size-' '-CPU_PARALLELISM--n-' >--+---------------------+--------------------------------------> '-DISK_PARALLELISM--n-' >--+--------------------------------+---------------------------> '-INDEXING MODE--+-AUTOSELECT--+-' +-REBUILD-----+ +-INCREMENTAL-+ '-DEFERRED----' .-ALLOW NO ACCESS-----------------------------. >--+---------------------------------------------+--------------> '-ALLOW READ ACCESS--+----------------------+-' '-USE--tablespace-name-' >--+--------------------------------------+---------------------> '-CHECK PENDING CASCADE--+-IMMEDIATE-+-' '-DEFERRED--' >--+-----------------+------------------------------------------> '-LOCK WITH FORCE-' As you can see, there are many options available to customize your load operation. The following examples illustrate how to use some of them. 12.5.2.1 The MESSAGES, SAVECOUNT, and WARNINGCOUNT OptionsIn Figure 12.17, data in a DEL input file is loaded into a list of columns in table stock. The messages option is used to record warnings and errors encountered during the load operation. This particular load will stop when the threshold of warnings (in this case, 10) is encountered. You can check the output file for warnings and errors. The savecount option establishes consistency points after every 1,000 rows are loaded. Because a message is issued at each consistency point, ensure that the savecount value is sufficiently high to minimize performance impact. Figure 12.17. Example 1: load commandload from stock.del of del savecount 1000 warningcount 10 messages stock.out insert into stock(itemid, itemdesc, cost, inventory) Consistency points are established during the load phase. You can use these to restart a failed or terminated load operation. By specifying the same load command but replacing insert with the restart option, the load operation will automatically continue from the last consistency point. To terminate a load, issue the same load command but use the terminate option in place of insert. For example: load from stock.del of del savecount 1000 warningcount 10 messages stock.out terminate 12.5.2.2 Loading from a CURSORThe load utility supports four file formats: IXF, DEL, ASC, and CURSOR (described in Section 12.2, Data Movement File Formats). When using the CURSOR file type as demonstrated in Figure 12.18, the cursor must be already declared but does not need to be opened. The entire result of the query associated with the specified cursor will be processed by the load utility. You must also ensure that the column types of the SQL query are compatible with the corresponding column types in the target table. Figure 12.18. Example 2: load commanddeclare cur1 cursor as select * from oldstock; load from cur1 of cursor messages curstock.out insert into stock 12.5.2.3 MODIFIED BY dumpfile and Exception TableAs mentioned earlier, the load process goes through four phases. During the load phase, data that does not comply with the column definition will not be loaded. Rejected records can be saved in a dump file by using the modified by dumpfile modifier. If dumpfile is not specified, rejected records will not be saved. Since the load utility will not stop unless it reaches the warning threshold if one is specified, it is not easy to identify the rejected records. Hence, it is always a good practice to use the modifier and validate the message file after a load is completed. Figure 12.19 shows how to use modified by dumpfile. Figure 12.19. Example 3: load commandload from stock.ixf of ixf modified by dumpfile=stockdump.dmp messages stock.out replace into stock for exception stockexp Assume that the input file stock.ixf contains the data in Table 12.3.
The target table stock is defined with three columns using this CREATE TABLE statement: CREATE TABLE stock ( itemid INTEGER NOT NULL , itemdesc VARCHAR(100) , inventory INTEGER NOT NULL , PRIMARY KEY (itemid) ) Notice that the second and fifth records in stock.ixf do not comply with the NOT NULL and numeric definitions. If the load command shown in Figure 12.19 is executed, a dump file (stockdump.dmp) will be created to save rows that are not loaded due to incompatible data type and the nullability attribute. Table 12.4 shows that the dump file stockdump.dmp contains the rows not loaded.
Recall that in the third phase the load process deletes rows that violate any unique constraint defined in the target table. You can save the deleted rows in a table called an exception table using the for exception option. If an exception table is not specified, the rows will be discarded. You need to create an exception table manually before you can use it. The table should have the same number of columns, column types, and nullability attributes as the target table to be loaded. You can create such a table with this command: CREATE TABLE stockexp LIKE stock To log when and why rows are rejected, you can add two other optional columns to the end of the exception table. The first column is defined as a TIMESTAMP data type to record when the record was deleted. The second column is defined as CLOB (32K) or larger and tracks the constraint names that the data violates. To add columns to the table, use the ALTER TABLE statement: ALTER TABLE stockexp ADD COLUMN load_ts TIMESTAMP ADD COLUMN load_msg CLOB(32k) Like the dumpfile modifier, it is a good practice to also use the exception table, especially if unique violations are possible. The exception table illustrated in Table 12.5 contains rows that violated the unique constraints.
Figure 12.20 shows the big picture of the concepts of dumpfile and the exception table.
Figure 12.20. Loading data with dumpfile and an exception table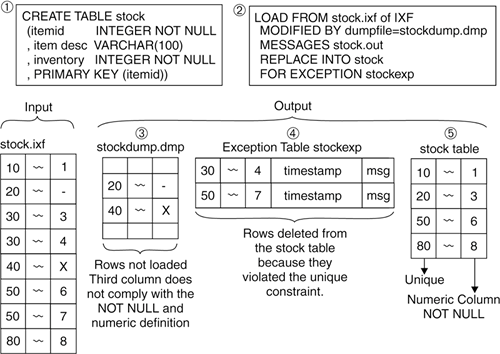 12.5.2.4 Loading from a ClientIn all the examples you have seen so far, the load commands are executed from the database server and the input files are located on the database server. You may sometimes want to invoke a load operation from a remote client as well as using a file that resides at the client. To do so, specify the client keyword in the command as demonstrated in Figure 12.21. Figure 12.21. Example 4: load commandload client from stock.ixf of ixf modified by dumpfile=stockdump.dmp rowcount 5000 messages stock.out tempfiles path c:\loadtemp replace into stock for exception stockexcept lock with force You cannot load a CURSOR file type from a client. The dumpfile and lobsinfile modifiers (discussed in the following sections) refer to files on the server even when the command includes the client keyword. NOTE Use the load client command when the input file resides on the client from which you are issuing the command. Use the dumpfile, tempfile, and lobsinfile modifiers for files located on the DB2 server. The rowcount option works exactly the same as the one supported by the import utility. You can control the number of rows to be loaded with this option. During the load process, the utility uses temporary files. By default, it allocates temporary files from the directory where the load command was issued. To explicitly specify a path for this purpose, use the tempfiles option as shown in Figure 12.21.Notice that the example also uses the replace mode, which replaces the old data in the target table with the new data. 12.5.2.5 Locking Considerations During a LoadThe utility acquires various locks during the load process. If you choose to give the load operation a higher priority then other concurrent applications, you can specify the lock with force option (in Figure 12.21) to immediately terminate other applications that are holding conflicting locks so that the load utility does not have to wait for locks. By default, no other application can access the target table that is being loaded. The utility locks the target table for exclusive access until the load completes. You can set this default behavior with the allow no access option. This is the only valid option for load replace. You can increase concurrency by locking the target table in share mode and allowing read access. In Figure 12.22, the allow read access option is enabled, which lets readers access data that existed before the load. New data will not be available until the load has completed. Figure 12.22. Example 5: load commandload from stock.ixf of ixf modified by dumpfile=stockdump.dmp messages stock.out replace into stock for exception stockexcept allow read access indexing mode incremental 12.5.2.6 The INDEXING MODE OptionThe last option in Figure 12.22, indexing mode, indicates whether the load utility is to rebuild indexes or to extend them incrementally. This is done in the build phase. You can use the options in Table 12.6.
12.5.3. File Type Modifiers Supported in the Load UtilityThe file type modifiers supported in the load utility are as comprehensive as those supported in the export and import utilities. The following section discusses a few of the modifiers. Refer to the DB2 Data Movement Utilities Guide and Reference for a complete list of load utility modifiers. 12.5.3.1 Leaving Free Space in Data and Index PagesWhen you insert data into a table with the insert, import, or load operations, DB2 tries to fit as much of the data into the data and index pages as possible. Consider pages tightly packed as shown in Figure 12.23. Figure 12.23. A tightly packed data or index page
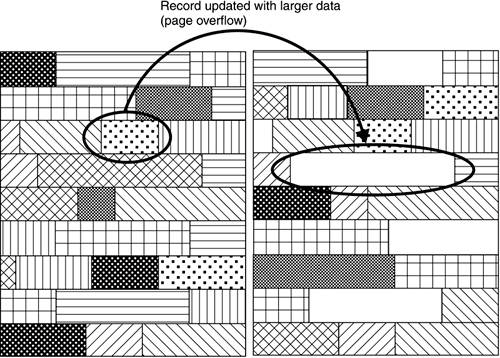
When a certain record is updated with data larger than the original size, new data might not be able to fit into the original data page. DB2 will then search for the next free page to store the updated record. The updated record is referenced from the original page by a pointer. When a request comes in to retrieve the record, DB2 first locates the original data page and then searches for the new data page as referenced by the pointer. This is called page overflow (see Figure 12.24). Figure 12.24. Page overflow
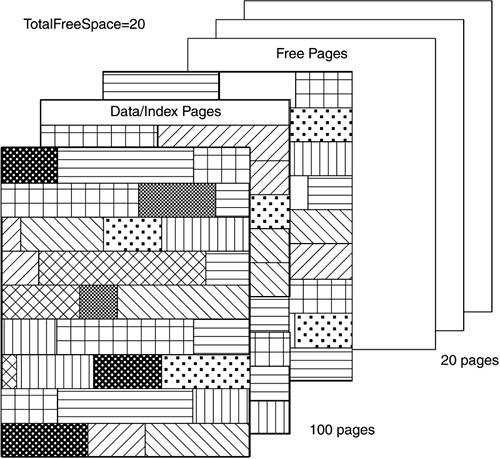
The higher the number of page overflows, the more time DB2 will spend finding the data or index page. Hence, you want to avoid page overflows as much as possible to improve performance. To minimize page overflows, you can customize the table definition so that certain free space is reserved so that the pages are not tightly packed. The CREATE TABLE, ALTER TABLE, and CREATE INDEX statements have options for leaving free space in data and/or index pages. The load command also has options to override the default set for the target table. You can specify this using the file type modifiers: indexfreespace, pagefreespace, and totalfreespace. Modifiers pagefreespace=x and indexfreespace=x can be used to specify the percentage of each data and/or index page that is to be left as free space. For example, Figure 12.25 illustrates leaving 20 percent of free space on each data and index page. Figure 12.25. Leaving free space for the pagefreespace and indexfreespace file modifiers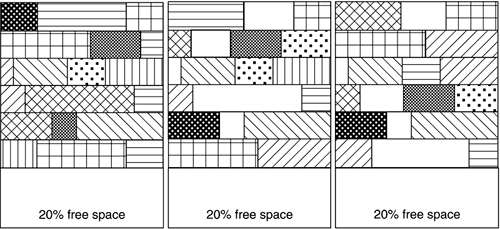 The modifier totalfreespace=x specifies the percentage of the total pages in the table that is to be appended to the end of the table as free space. For example, if x = 20, and the table has 100 data pages after the data has been loaded, 20 additional empty pages will be appended. The total number of data pages for the table will be 120 (see Figure 12.26). Figure 12.26. Using the totalfreespace file modifier
12.5.4. Loading Large ObjectsThe load utility uses the same option and modifier as the import utility to specify the path where LOBs are stored. For example, the following command lists the directories where LOBs are stored with the lobs from option. load from stock.ixf of ixf lobs from c:\lobs1, c:\lobs2, c:\lobs3 modified by dumpfile=stockdump.dmp lobsinfile messages stock.out replace into stock for exception stockexcept 12.5.5. Collecting StatisticsDuring the load phase of the process, the load utility also collects table statistics if you specify statistics. You can either collect statistics using the statistic profile with the statistics use profile option, or specify not to collect statistics with the statistics no option. A statistic profile is a set of options that specify which statistics are to be collected, such as table, index, or distribution statistics. If you choose not to collect statistics during the load, you should always update the statistics at the earliest convenient time. When large amounts of new data are inserted into a table, you should update the statistics to reflect the changes so that the optimizer can determine the most optimal access plan. 12.5.6. The COPY YES/NO and NONRECOVERABLE OptionsRecall that changes made to the target tables during the load are not logged. This is one of the characteristics of the load utility that improves performance. However, it also takes away the ability to perform roll forward recovery for the load operation. DB2 puts the table space where the target table resides in backup pending state when the load operation begins. After the load completes, you must back up the table space or database. This ensures that the table space can be restored to the point where logging is resumed if you ever need to restore the table space restore. This is the behavior of the load option copy no. You can also specify copy yes if archival logging is enabled. With copy yes, a copy of the loaded data will be saved and the table space will not be in backup pending state upon load completion. However, this negatively impacts the performance of the load. Table space status related to load operation will be discussed later in this chapter. When you cannot afford to have a window to perform a table space backup after the load is complete but you also need the load to complete as fast as possible, neither copy yes nor copy no is a good solution. You may want to consider using the option nonrecoverable if the target table can be recreated and data can be reloaded. The nonrecoverable option specifies that the target table is marked as nonrecoverable until the associated table space is backed up. In case of failure, such as disk or database failure, the table space needs to be restored and rolled back. The roll forward utility marks the data being loaded as invalid and skips the subsequent transactions for the target table. After the roll forward operation is completed, the target table is not accessible and it can only be dropped. Note that other tables in the same table space are not affected by this option. 12.5.7. Validating Data Against ConstraintsThe load utility checks for invalid data and unique constraints during the load process. However, other constraints such as referential integrity and check constraints are not validated. DB2 therefore puts target tables defined with these constraints in check pending state. This forces you to manually validate the data before the tables are available for further processing. The set integrity command gives you the ability to do just that. The command can be as simple as the following, which immediately validates data against the constraints for table stock. set integrity for stock immediate checked There are many other options; refer to the DB2 UDB Command Reference for the complete syntax of the command. 12.5.8. Performance ConsiderationsYou can further speed up the load performance by taking advantage of the extra hardware resources you might have on the machine. Table 12.7 lists options and modifiers you can use.
12.5.9. Authorities Required to Perform a LoadTo perform a load, you must have SYSADM, DBADM, or LOAD authority. With the LOAD authority, you also need specific privileges on the target tables depending on the mode used in the load command. For example, you need INSERT privileges on the table when the load utility is invoked in INSERT mode. If you use REPLACE mode, you need INSERT and DELETE privileges on the target table. Note that you also need appropriate access to the exception table if one is specified. In addition, when using the copy yes option, you need SYSADM, SYSCTRL, or SYSMAINT authority because a backup is performed during the load operation. 12.5.10. Loading a Table Using the Control CenterThe Control Center provides a graphical tool to invoke a load operation. Right-click on the target table and select Load to start the Load Wizard (Figure 12.27). The Load Wizard walks you through the process of loading a table. Figure 12.27. Loading a table from the Control Center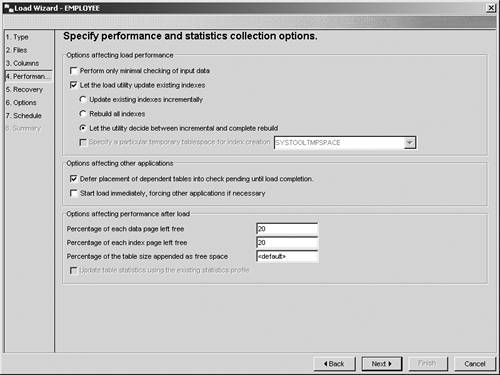 12.5.11. Monitoring a Load OperationDuring the phases of a load, the target table and its associated table spaces are in different states. By checking the state of the table and table space, you can tell which phase the load operation is currently in. Before introducing the tools to obtain this information, let's first discuss the different table and table space states. 12.5.11.1 Table StatesTable 12.8 lists the states in which Tables can be placed by the database manager. You can control some of these; others are caused by the load utility.
12.5.11.2 Table Space StatesTable 12.9 lists the states in which table spaces can be placed by the database manager.
12.5.11.3 Load QueryingDB2 has two utilities that you can use to obtain the table state. Figure 12.28 presents the syntax diagram of one of them, the load query command. Figure 12.28. Syntax diagram of the load query command>>-LOAD QUERY--TABLE--table-name--+------------------------+----> '-TO--local-message-file-' >--+-------------+--+-----------+------------------------------>< +-NOSUMMARY---+ '-SHOWDELTA-' '-SUMMARYONLY-' You can specify the following command to check the status of the load operation: load query table stock to c:/stockstatus.out The output file stockstatus.out might look similar to Figure 12.29. Figure 12.29. Sample output of a load query command[View full width] SQL3501W The table space(s) in which the table resides will not be placed in backup 12.5.11.4 The LIST UTILITIES CommandThe list utilities command displays the list of active utilities on the instance. Use the show detail option to also display detailed progress information. Figure 12.30 illustrates sample output. Figure 12.30. Output of the list utilities command[View full width] list utilities show detail ID = 1 Type = LOAD Database Name = SAMPLE Partition Number = 0 Description = OFFLINE LOAD Unknown file type AUTOMATIC INDEXING INSERT The report generated in Figure 12.30 indicates that a load was performed on the database sample and includes a brief description of the operation. Progress Monitoring tells you the current phase of the load and the number of rows already loaded and to be loaded. The table space in which the load target table resides will be placed in backup pending state if COPY NO (the default) option is specified. The utility places the table space in this state at the beginning of the load operation. The table spaces stays in backup pending mode even when the load is complete until you perform a database or table space level backup. Figure 12.31 shows how to retrieve the table space status. Figure 12.31. Retrieving the table space status list tablespaces show detail Tablespace ID = 2 Name = USERSPACE1 Type = System managed space Contents = Any data State = 0x0000 Detailed explanation: Backup pending Total pages = 527 Useable pages = 527 Used pages = 527 Free pages = Not applicable High water mark (pages) = Not applicable Page size (bytes) = 4096 Extent size (pages) = 32 Prefetch size (pages) = 16 Number of containers = 1 |
EAN: 2147483647
Pages: 313

