Getting Creative with Split Edits
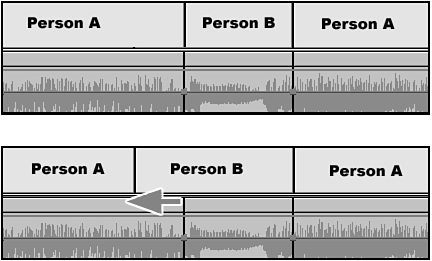
| Split edits are commonly called L-cuts because they look like an L-shaped edit in a timeline. There are many situations in which using a split edit improves the flow of your movie. This generally works very well when you're cutting together straight dialog shots between two people or when you're going from an action shot with natural audio to a talking head (an on-camera interview). You can make these scenes flow better by extending either the audio track or the video track over (or under) the next clip. This avoids the "ping-pong" effect that many beginning editors tend to develop. This means that when Person 1 is speaking, you cut to him on-camera, and when Person 2 begins to speak, you cut to him on-camera. This technique of rapid editing makes the viewer fell like he's watching a ping-pong game. Talented editors know when to use the original source video with its synced sound and when to use a reaction shot while continuing the other clip's audio. note There are many different areas where split edits or L-cuts can be used. They are not used only for dialog scenes. Being able to use split edits during dialog scenes goes back to careful preparation during the shooting of the scenes. If more than one camera is available for a shoot, use one for each person who is speaking (and possibly a wide shot as well, if you have it in your budget). This way, you wind up having synced audio and timing and can easily cut back and forth between cameras without any timing issues. If you have only one camera, always have the other people read their script as if they were being recorded to help the on-camera talent with the pacing and rhythm of their lines. This way, you get a chance to record the person's reaction shot to the lines being read off-camera. Try to avoid constantly changing the talent's lines, the speed at which each person reads, or their reactions when not on-camera. Playing it smart during the production (shooting) time gives you more freedom and fewer headaches when you're trying to be creative with split edits during your postproduction session. Let's take a look at how to build a split edit:
tip You might want to have the audio waveform visible to help make the timing of the split edit more effective and flow better. See Chapter 8 for more details on working with audio. |