| OK, let's get down to business. Now that you've typed your text, I'm sure there are a few things you would like to do to improve how your text appears on screen. Depending on what type of project you are editing and what style appeals to you, you probably want to change the font, color, size, or other text attributes. The Adobe Title Designer interface has controls to adjust your text in every way, shape, and form. The majority of these controls work in one of two ways: You can either enter the exact numeric value or use the Hot Text Controls. The Hot Text Controls are sliders that allow you to change the value of the particular property by simply dragging the slider back and forth, as shown in Figure 9.3. Depending on your settings, you can view the changes happening in real time or after you have stopped adjusting the slider. Personally, I prefer to see the text and graphics changing in real time. Figure 9.3. The new Hot Text Controls allow you to quickly and easily adjust text attributes by moving the slider back and forth.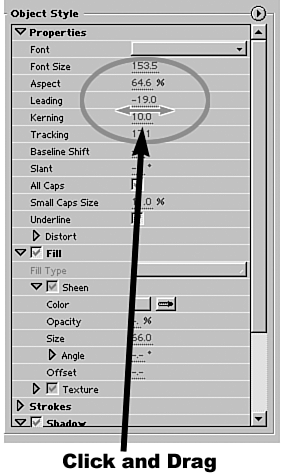
The following are brief descriptions of how these properties alter your text within the Object Styles area of the Adobe Title Designer interface: Font displays all the font choices available for use in the Adobe Title Designer based on the fonts installed on your computer. You can purchase and install other fonts for use within Premiere. Font Size adjusts the Hot Text Control to increase or decrease the size of your text. This adjusts the text within the right proportion (height- and width-wise). You can also change this directly in the work area by dragging one of the corners of the bounding box around the text, but this method does not maintain equal proportions. Height and width can be manipulated independently. Aspect adjusts how tight or widespread your text becomes. You can scrunch it all together or space it out using the Aspect controls. Leading changes the amount of space between lines of text. Moving the leading slider in a positive direction increases the spacing between lines, whereas a negative direction decreases the spacing between lines of text (see Figure 9.4). Figure 9.4. Leading increases the spacing between each line of text.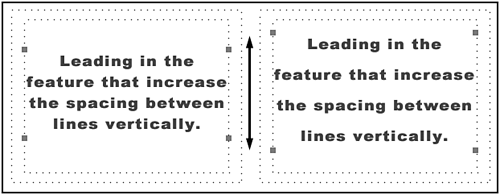
Kerning changes the amount of space between letters in a word or the amount of space between words. You can control the amount of space between all the text equally or between selected text. Moving the kerning slider in a positive direction increases the spacing between the text, whereas a negative direction decreases the spacing between the text. Tracking adjusts text in a similar manner as kerning. Baseline Shift allows you to move selected (highlighted) text in increments above or below the baseline of the rest of the same text line. This can come in handy for adding subscript and superscript text, as shown in Figure 9.5. Figure 9.5. Baseline Shift allows you to offset individual letters or complete words for subscript and superscript text.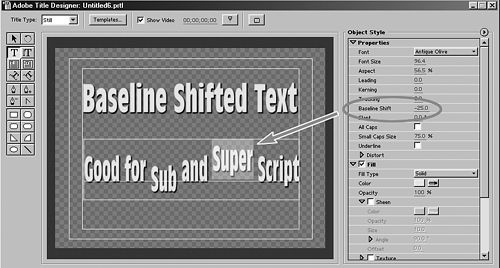
Slant allows you to control the angle at which text is displayed. Adjusting the sliders in a positive direction shifts text in a forward-leaning position (similar to italic text), whereas adjusting the slider in a negative direction shifts the text to make it appear as if it is leaning backwards. All Caps allows you to turn all selected uppercase and lowercase text into all-uppercase text. Small Caps Size works in conjunction with the All Caps option. If uppercase and lowercase text was switched to All Caps, you can adjust the height or size of what was originally lowercase text to help differentiate this text from what was originally uppercase text (see Figure 9.6). Figure 9.6. Turn Small Caps on and off for a creative twist. It's uppercase and lowercase at the same time.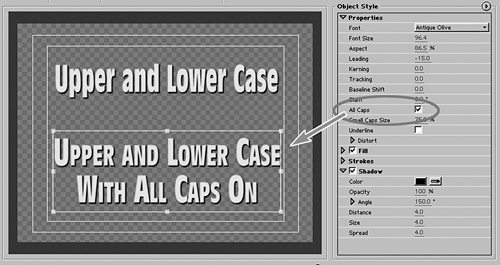
Underline places an underline under the selected text. Distort (X or Y) changes the perspective of each font within the selected area, creating unusual shapes for the individual fonts, as shown in Figure 9.7. Figure 9.7. The Distort attribute gives normal font styles an interesting new shape.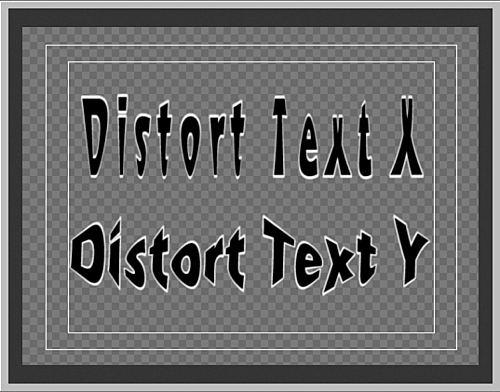
Fill offers an entirely new set of controls. Here you can select the color of your text and whether you want it applied in a solid fashion, various gradients, or bevels (see Figure 9.8). Depending on the fill type, the additional parameters adjust accordingly. Figure 9.8. Use the Fill attributes to add style, color, and texture to the body of your text. You can import your own surfaces for a truly customized look.
Sheen provides a light hit across your text. You can control the color, opacity, size, angle, and offset of the light hit. Texture allows you to apply different textures to your text. Premiere comes with a number of default textures you can apply to the surface of your text, or you can create and apply your own custom textures. Strokes allows you to add an outline around your text. You can choose to add these outlines on the inside portions of your text or the outside. Using the stroke feature helps text appear more crisp and clean, especially over detailed video clips. Click Add to increase the outline's thickness. Shadow allows you to add, control, and customize shadows on your text. You can control the shadow's color, opacity, angle, distance, size, and spread (soft edge). In the Transform area of the Adobe Title Designer, you can control the text's Opacity X and Y positions Width Height Rotation |