| I like looking for resources that go beyond the "how to use a certain feature" in the program and apply a more creative approach. This example should help spur some ideas that you can use in your everyday projects. For this particular example, I wanted the viewer to focus on the product in the center of the screen. The desired effect was to keep the product in its natural color while applying a dark-colored tint to the moving footage around the product (see Figure 7.17). Fortunately, the main image was not moving, so applying a single still matte key would work. Figure 7.17. Use matte keys to make your main image stand out from the rest of the image.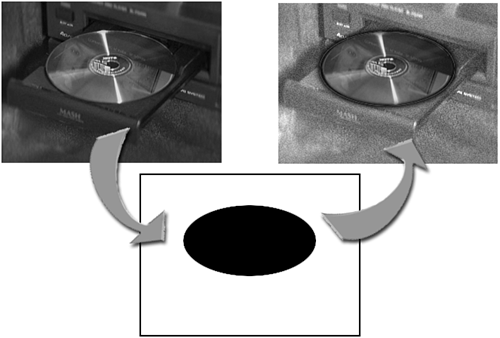
To create this effect, do the following: Export from Premiere a single frame from the clip of the image you want to use. Import that still graphic (of the video clip) into Photoshop. Paint the entire object white, paying very close attention to the edges for accuracy. Cover the rest of the image with black. (Remember the tip from the preceding section about leaving a slight soft edge around the object to help blend the images more naturally.) Save the new black-and-white image. I tend to name my files to describe the image. For matte key images, I put the word "matte" in the filename to help identify the appropriate file. (For example, if the original filename is box.tga, the new matte key image is named boxmatte.tga.) In Premiere, edit the video clip onto Video Track 1. Edit the same clip with the same exact starting point onto Video Track 2. Select the clip on Video Track 2 by clicking it. Click Setup next to Transparency in the Effect Controls window. or Select Clip > Video Options. Select Transparency from the pop-up menu, or use the keyboard shortcut Ctrl-G (Windows) or Command-G (Macintosh). Select Image Matte from the Key Type pull-down menu. Click Choose in the Matte section in the Transparency Settings window, as shown in Figure 7.18. Figure 7.18. Apply matte keys using the Matte section of the Transparency Settings window.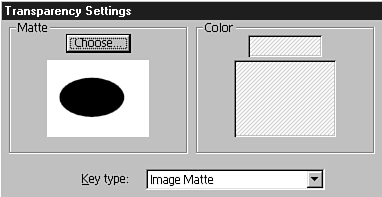
Find the file you just created for your matte key, and select it in the Load Matte window. Click Open. Now your matte key is in place, although it doesn't appear to be doing anything, because the two layers of video are identical. Now you must alter the video clip on the first layer to get the desired results. Drag filters from the Image Control folder of the Effect Controls window onto the clip in Video Track 1. (You can use any filter to alter the image.) Click Setup in the Effect Controls window next to the name of the image control effect you just applied. Make the appropriate filter adjustments. Click OK. When you render the video segment or drag through the clip while holding down the Alt key (Windows) or the Option key (Macintosh), you see the image you selected remain in full color while the rest of the clip plays with whichever filter effects you applied to track 1. This technique can be used in many different applications. I encourage you to experiment and come up with your own useful applications. (If you come up with something cool, let me know.) note Add filters to background portions of matte key effects for more image distinction.
|