Testing the Financial Calculator
| Now that we have completed the HTML and source code portions of our ASP.NET web page, it's time to test the financial calculator. To view the ASP.NET web page through your browser, begin by marking FinancialCalculator.aspx as the start page. To accomplish this, run the page by going to the Debug menu and choosing Start Without Debugging (or by pressing Ctrl+F5 on your keyboard). This will compile your ASP.NET source code portion and launch a web browser pointed to FinancialCalculator.aspx.
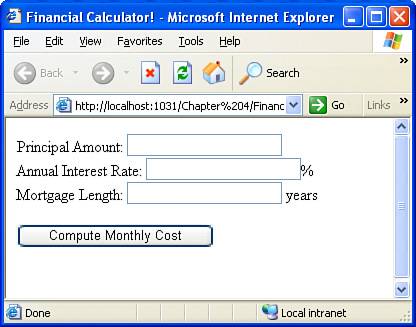
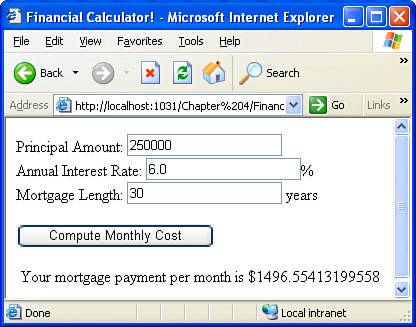
When first visiting the page, you should see three empty TextBoxes and the Compute Monthly Cost button, as shown in Figure 4.8. Figure 4.8. When the ASP.NET page is first visited, three TextBoxes await user input. Now, go ahead and enter some valid values into the TextBoxes and then click the Compute Monthly Cost button. When this button is clicked, the monthly cost is displayed beneath the TextBoxes and Button, as shown in Figure 4.9. Figure 4.9. The output of the financial calculator is displayed when the Button is clicked. Viewing the Rendered Source CodeWhen an ASP.NET page is requested by a browser, the ASP.NET engine on the web server renders the ASP.NET page and returns the resulting HTML markup to the browser. The Web controls are transformed into standard HTML elements, and the applicable event handlers in the source code portion are executed, potentially tweaking the resulting output further. (For example, in FinancialCalculator.aspx the performCalc Button control's Click event handler updates the results Label Web control's Text property, which affects the resulting HTML markup for the page.) You can see precisely the page's rendered markup by viewing the page's source through the browser. All browsers allow you to view the markup they received; for Internet Explorer, go to the View menu and choose the Source option. Viewing the resulting HTML markup can, at times, help with diagnosing a problem. Even if there are no problems, I encourage you to view the source often as you're learning ASP.NET to see how Web controls are rendered as HTML. Let's take a moment to examine the HTML output generated by FinancialCalculator.aspx, both when the page is first visited as well as after the user has input values and clicked the Compute Monthly Cost button. Listing 4.2 contains the HTML received when first visiting the ASP.NET page. Listing 4.2. The HTML Markup Received by the Browser When First Visiting the Page
The HTML received by the browser looks pretty similar to the HTML content in the ASP.NET page's HTML portion, save for a few exceptions. First, the @Page directive that is found at the top of the ASP.NET page's HTML portion is not rendered and sent to the requesting browser. Second, the Web Formthat <form runat="server">is converted into a more detailed <form> tag (see line 8) and also includes some hidden form fields (see lines 10 and 29). The TextBox, Button, and Label Web controls have also been transformed from their Web control syntax<asp:WebControlName runat="server" ... />to standard HTML elements. The TextBox Web controls have been converted into <input type="text"> elements (lines 15, 18, and 21), the Label Web control into a <span> (line 25), and the Button Web control into <input type="submit"> (line 23). Notice that the properties of the Web controls are translated into attributes in the controls' corresponding HTML elements. For example, the ID properties of the Web controls are rendered as id attributes in the resulting HTML elements. After a user enters particular values into the three text boxes in his browser and clicks the Compute Monthly Cost button, the browser re-requests FinancialCalculator.aspx, but this time sends this user-entered information back to the web server with the request. Submitting user-entered values back to the same web page is referred to as a postback and is the most common way user-entered information is relayed back to the web server for the server-side code to process. On postback, the ASP.NET engine can determine that the postback was caused by the Compute Monthly Cost button being clicked and therefore raises the performCalc Button control's Click event, which in turn causes the associated event handler to run. In addition, the Text properties of the three TextBox Web controls are updated to reflect the values entered by the user. The event handler for the Button's Click event runs (see Listing 4.1), computing the monthly cost for the mortgage based on the user's inputs. The results Label Web control's Text property is updated with this computed cost. Finally, the page is rendered, generating the HTML markup that is sent back to the client. The resulting markup from the postback has changed slightly from the first time the page was requested because now the TextBox Web controls' Text properties have values (based on the user's inputs), and the results Label Web control's Text property is set to the monthly cost. Listing 4.3 shows the HTML received by the browser after the inputs have been entered and the Compute Monthly Cost button has been clicked. Listing 4.3. The HTML Markup Received by the Browser After the User Has Clicked the Button
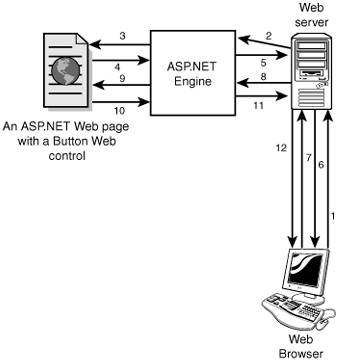
The HTML markup in Listing 4.3 has some very important differences from the HTML in Listing 4.2. The Text property of the three TextBox Web controls is now reflected in the corresponding <input type="text"> HTML elements. Specifically, the value of the TextBox Web control's Text property has been emitted as a value attribute (lines 15, 18, and 21). Additionally, the Label Web control's Text property has been emitted as the inner content of the corresponding <span> tag (line 25). The key points in this interaction are highlighted in Figure 4.10. Figure 4.10. Server-side code is executed only when the client makes a request to the server.SEQUENCE OF STEPS:
It's important to understand that the only way the code in an ASP.NET page's source code portion can run is when a request is made from the end user's browser to the web server. For pages on which the user is prompted to supply the inputs, the server-side code does not execute until the user submits the form, which typically involves clicking a submit button (which is rendered by using a Button Web control). This process will be discussed in greater detail in Hour 9.
Testing Erroneous InputPart of testing is testing not only expected inputs, but also unexpected ones. For example, what will happen if the user enters into the Mortgage Length TextBox a value of "Jisun"? Obviously, this is not a valid number of years. Entering such an erroneous value will cause a runtime error, as shown in Figure 4.11. Figure 4.11. A runtime error will occur if the input is not in proper format.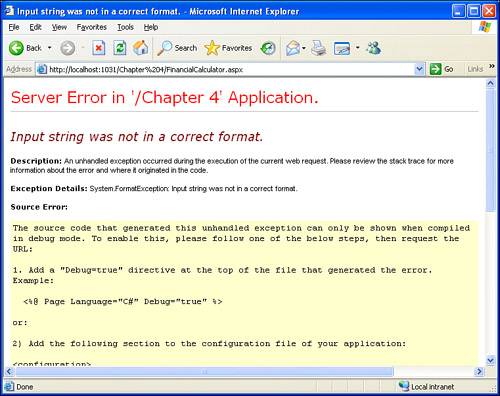 Errors such as those shown in Figure 4.11 are an eyesore. Rather than displaying such error messages when the user enters erroneous input, it would be better to display a simple error message next to the TextBox(es) with erroneous input, explaining that the input is not in the right form. The process of ensuring that user input is in the correct format is known as input validation. Fortunately, input validation is incredibly easy with ASP.NET. We'll examine ASP.NET's input validation features in Hour 12, "Validating User Input with Validation Controls."
|
EAN: 2147483647
Pages: 233