An Overview of User Accounts in ASP.NET
| When you make a purchase from an online retailer for the first time, you are prompted to create a user account. When creating a user account, you are prompted to enter information that uniquely identifies you, along with some bit of information known only to you. This identification information is referred to as credentials. Typically, the credentials for a site are your username and password, although some websites use an email address and password, or require not only a password, but also a personal identification number (PIN). In addition to credentials a user account can also store additional user-specific information. An online retailer would likely collect billing information and a shipping address, while an online banking site might require that you provide your account numbers, Social Security number, and so on. After a user account has been created, you can log in to the site by providing your credentials. A site that supports user accounts must store the user account information somewhere; most often, this information is stored in a database. Commonly, websites that need to provide such support will add a database table called Users (or something similar) that has one record for each user account in the system. The columns for this table would have names like Username, Password, Email, and so on. Once this database table has been defined, the process of creating a user account becomes trivial because it simply involves creating an ASP.NET page that prompts the user for the required inputsusername, password, and so onand stores this information in a database. (We saw how to insert records into a database table in Hour 16, "Deleting, Inserting, and Editing Data.") Fortunately, with ASP.NET version 2.0, you do not need to create your own user account database tables because ASP.NET now provides built-in support for user accounts through a feature called membership. To take advantage of this feature, we first must configure our website to support membership. Configuring an ASP.NET Website to Support MembershipTo configure our website to support membership, we must launch the ASP.NET Website Administration Tool. To accomplish this, either click the ASP.NET Configuration icon at the top of the Solution Explorer or click the Website menu's ASP.NET Configuration option. Either way will open a web browser pointed to a page through which the ASP.NET site can be configured. Figure 20.1 shows the ASP.NET Website Administration Tool. Figure 20.1. Configure your website through the ASP.NET Website Administration Tool.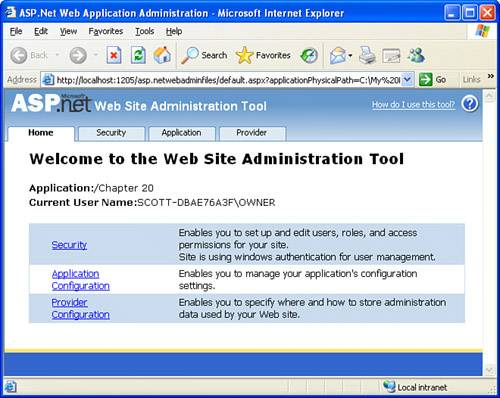
To add user account support, click the Security link. This will take you to the Security screen shown in Figure 20.2. From this screen, you can specify the user accounts in your system, what roles for users exist, and the access rules for users. Figure 20.2. Configure your website's security-related settings from the Security screen.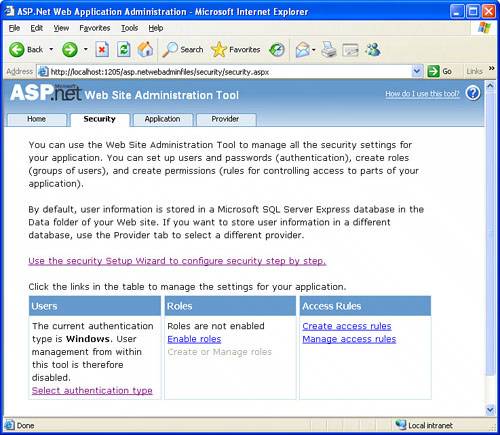 By default, an ASP.NET website is set up to use Windows authentication. Authentication is the process of identifying the authenticity of a user. For Internet sites that support user accounts, typically authentication is achieved by prompting users for their credentials in a logon page. This style of authentication is commonly referred to as forms-based authentication because users are prompted for their credentials through a form. Windows authentication, on the other hand, is useful if you are building a website that is used on an intranet. An intranet is a local, private network within a company or organization. In such a setting, users typically log on to the network from their desktop computers. They can then visit the intranet and, because they've already logged on to their workstations, this logon information can be detected automatically by the intranet web server.
To change the current authentication model from Windows authentication to forms-based authentication, click on the link titled Select authentication type at the bottom of the Users box. This will load the screen shown in Figure 20.3, where you can select how users will access your site:
Figure 20.3. Indicate that users will connect to your site from the Internet. Select the From the Internet radio button and click the Done button. Doing so will not only configure your application to use forms-based authentication, but will also automatically create a SQL Server 2005 Express Edition database named ASPNETDB with predesigned tables to support user accounts. When you return to the Security screen, the Users box should now list the number of existing users0along with links titled Create user and Manage users. Let's examine the ASPNETDB database that was created for us. Close the ASP.NET Website Administration Tool, returning to Visual Web Developer. From the Solution Explorer, right-click on the App_Data folder and choose Refresh Folder. You should now see the ASPNETDB.MDF file listed in this folder. Go to the Database Explorer and drill down into the tables of the ASPNETDB database. There are 11 tables in total, providing functionality that extends beyond simple user accounts. For now, concentrate on just the aspnet_Users and aspnet_Membership tables. These database tables store user account information. That is, for each user account in the website, there will be a corresponding record in these two tables. The aspnet_Users table contains the base set of columns to identify a user, essentially his username. The aspnet_Membership table has columns that provide information required for a user account, such as his email address, password, last login date, date the account was created, security question and answer (in case the user forgets his password), and so on.
Creating and Managing UsersTo accompany the user account database, ASP.NET ships with a number of login Web controls, one of which allows a user to create a new account. However, as the site administrator, you can also add new users through the ASP.NET Website Administration Tool. In addition to creating new user accounts, you can also manage existing user accounts. To create a new user account through the ASP.NET Website Administration Tool, go to the Security screen and click on the Create user link in the Users box. This will bring up the screen shown in Figure 20.4, which is very similar to the screen users will see when creating a new account themselves. Figure 20.4. Create a new user account. To create a new user account, simply provide the username, password, email, and security question for the new user and then click the Create User button. The security question is asked if the user forgets her password and wants to be reminded. The security answer is the answer the user must provide to be able to see her password. When we're creating a new user accounteither here, through the ASP.NET Website Administration Tool, or through the website using the CreateUserWizard control as we'll see in the "Allowing Visitors to Create New User Accounts" sectiona number of validation checks are automatically made. You must provide values for the username, password, confirm password, and security question and answer text boxes. Furthermore, the username must be unique, the password must meet a certain password "strength" (by default, be seven characters long with at least one nonalphanumeric character), and the email address must in the proper format. If you enter invalid data when creating a new user, a validation error message will be displayed, prohibiting the new user account from being created until the errors are corrected. To manage the set of existing users, click on the Manage users link in the Security screen. This will take you to the screen shown in Figure 20.5, which lists all user accounts in the system. You can edit or delete users, or mark them as active or inactive. Figure 20.5. Edit and delete users from the "Manage users" screen.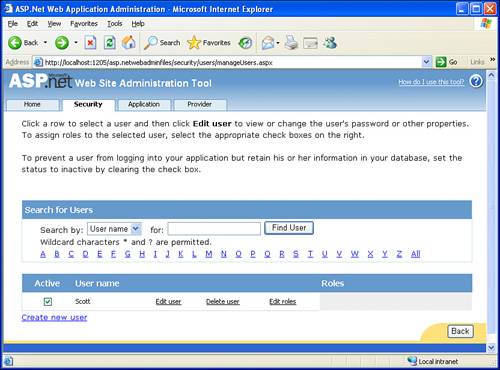 Classifying Users by RoleYou may have noticed the Roles functionality from the Security screen and the screens for managing and creating users. With roles, you can categorize users and then allow or deny functionality based on users' roles. For example, you may have a site that requires user accounts, with users divided into two groups: administrators and nonadministrators. Those users added to the administrator role might be able to access web pages in a certain folder that were off-limits to nonadministrators. If you need to classify users by roles, click the Enable roles link in the Roles box of the Security screen. This will turn on role support, after which you can create and manage the roles in the system by clicking the Create or Manage roles link. Figure 20.6 shows the Create or Manage Roles screen, into which I've added two roles: Administrator and Non-Administrator. Figure 20.6. Two roles have been added to the system: Administrators and Non-Administrators.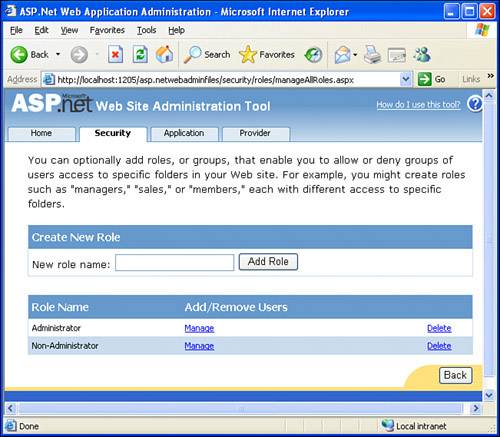 After the roles are created, you need to assign users to the appropriate roles. Clicking the Manage link shows a listing of the users who belong to the selected role. You can add new users to the role by searching for them and then checking the User Is in Role check box (see Figure 20.7). Figure 20.7. User Scott has been added to the Administrators role.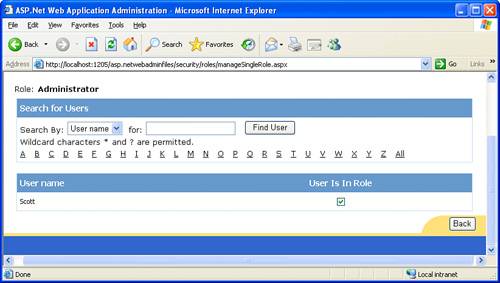 Rather than adding users to a role, you can assign roles to a user through the Manage Users screen (see Figure 20.5). Simply click the Edit roles link for the particular user. A check box list of available roles will be displayed, and you can select which roles, if any, the user belongs to.
Creating and Managing Access RulesOnce you have users or roles defined in the system, you can, optionally, specify access rules. Access rules dictate what rights particular users or roles have to particular folders in the website. As discussed earlier, you might want to allow only users in the Administrators role to access web pages in a particular folder. Or you might want to require that only logged-in users can visit a certain folder in the website. To create an access rule, go to the Security screen and click on the Create access rules link in the Access Rules box in the lower-right corner. This will take you to the screen shown in Figure 20.8. From here, you can select what folder the access rule applies to; whether the access rule applies to a role, a particular user, all users, or anonymous users; and whether the rule is to allow or deny access. Figure 20.8. Define the access rules for the folders of your website.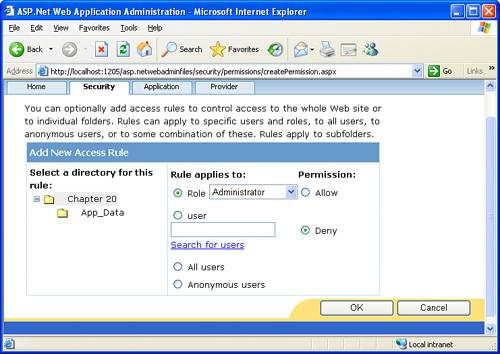
Because our website currently lacks any folders other than the default App_Data folder, we really can't define meaningful access rules unless we want them to apply to the whole site. Take a minute to add two folders to the project: Admin and Users. Don't bother adding any ASP.NET pages to either of these folders, we'll do that later in this hour. For now, understand that those web pages in the Admin folder are meant to be accessed only by users in the Administrators role, while those pages in the Users folder are meant to be accessed only by logged-on users. To achieve these access rights, we would add the following rights via this screen:
Notice that for the Admin folder we first allowed access for Administrators, but then denied access to all users. This might seem a bit confusing at first. Why not just allow access for Administrators and be done at that? If you do not explicitly deny access to a particular role or user type, then those particular users can access that resource. So simply allowing Administrators to access the Admin folder would also permit others to view this folder because we did not explicitly deny access to these users who do not belong to the Non-Administrators role. At this point you may be wondering why we did not just simply deny access to the Non-Administrators role. This logic falls short because not every user must be in the Administrators or Non-Administrators role; users could be in no role. Therefore, we needed to both allow Administrators to access this folder and deny all users.
To delete existing access rules or reorder the rules for a particular folder, click on the Manage access rules link from the Security screen. This will take you to a screen that lists the access rules for a selected folder. From here, you can remove any access rules or reorder the existing access rules.
At this point we have seen how to configure an ASP.NET website to support user accounts. Doing so automatically creates the needed database (ASPNETDB) and database tables (aspnet_Users, aspnet_Membership, aspnet_Roles, and aspnet_UsersInRoles). With the user account system set up, we can use ASP.NET's login Web controls in our website to allow visitors to create a new account and log in and out of the site. We'll examine these login controls throughout the remainder of this hour. Configuring a Website's SMTP SettingsAs we will see later in this hour, a number of the login Web controls provide built-in email features. For example, the CreateUserWizard control can be configured such that when a user creates a new account, he is automatically sent an email that includes his username, password, and other information. For the login Web controls to be able to send emails, the website must be configured to support sending email. This can be accomplished through the ASP.NET Website Administration Tool. When you launch the ASP.NET Website Administration Tool, the start page lists three options:
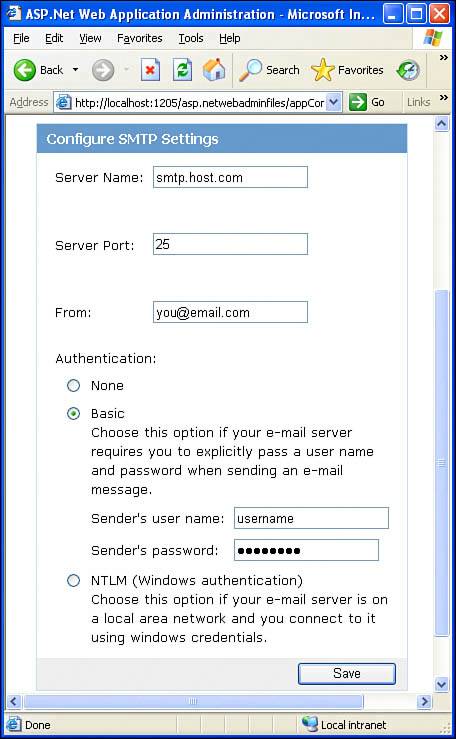
In the preceding sections we examined the Security option. To configure the website to send email, choose the Application Configuration option. From the Application Configuration screen, click the Configure SMTP e-mail settings link; this will display the screen shown in Figure 20.9. From here, you can provide the email server name, port, and authentication information (if required), along with the address that the email messages will be sent from. Figure 20.9. Configure your website's e-mail settings.
After you have provided the appropriate values for the SMTP server through which emails will be sent, click the Save button. The settings specified in this screen are saved in the website's web.config file, in the <mailSettings> element; you can edit these values either directly through web.config or from the ASP.NET Website Administration Tool. |
EAN: 2147483647
Pages: 233