An Examination of Data Binding
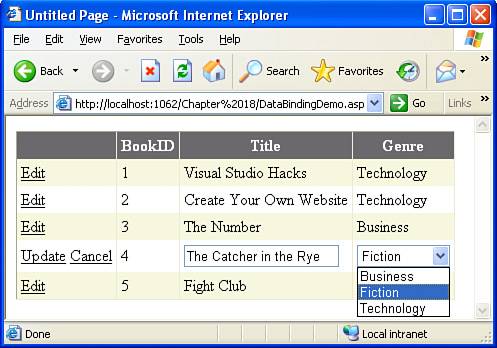
| Data binding is the process of tying a property of a Web control to the value of a database column; this process happens automatically all the time with the data Web controls. When we're using BoundFields, CheckBoxFields, or ImageFields, the GridView or DetailsView control handles all of the data binding for us. For example, the BoundField uses a Label Web control and automatically binds the Label's Text property to the corresponding database column; with a CheckBoxField, a CheckBox Web control is used, and its Checked property is data-bound to the corresponding database column. In Hour 16 we saw how, when creating an editable GridView or DetailsView, the BoundFields defaulted to a TextBox Web control with the TextBox's Text property set to the value of the field's corresponding database column. However, sometimes we may want to customize the editing interface. This may include adding validation controls, changing the properties of the TextBox Web control, or replacing the TextBox control with other Web controls altogether. To accomplish this, we need to use a TemplateField, which we can do in one of two ways: by adding a new TemplateField to the GridView or DetailsView, just like we added a HyperLinkField and an ImageField earlier in this hour; or by converting an existing BoundField into a TemplateField. I encourage you to convert an existing BoundField into a TemplateField rather than adding a new TemplateField because the conversion process automatically does a number of steps for you. Specifically, it creates the ItemTemplate and EditItemTemplates for the TemplateField, with a data-bound Label control in the ItemTemplate and a data-bound TextBox control in the EditItemTemplate. If you add a TemplateField manually, you'll need to add the Label and TextBox controls and configure the data binding. The Difference Between One-Way and Two-Way Data BindingASP.NET supports two flavors of data binding: one-way and two-way. One-way data binding simply takes a specified database column's value and binds it to a specified Web control property. Two-way data binding can not only assign a database column's value to a Web control property, but can also do the inverse: It can take the value of a property and assign it to the value of a data source control parameter. One-way data binding is used when working with a nonmodifiable data Web control. When we're using a data Web control that supports editing, inserting, or deleting, two-way data binding is used instead. When working with BoundFields, CheckBoxFields, HyperLinkFields, or ImageFields, you do not need to concern yourself with the differences between one-way and two-way data binding; all the intricacies are automatically handled by the various fields. However, when adding data-bound Web controls to a TemplateField, you need to specify whether the data binding should be one-way or two-way. If the Web control is used to just display the information, use one-way data binding; if the Web control is also used to collect user input and save those values back to the database, use two-way data binding. Specifying the Data Bindings for a Web ControlIf you add a TemplateField manually or want to replace a converted TemplateField's Label or TextBox Web control with a different control, you'll need to specify the data bindings for the new controls you add to the TemplateField (including whether the data bindings are one-way or two-way). The data binding simply ties a particular property of the Web control to the field's corresponding database column. To practice working with data bindings and custom TemplateColumns, let's create an editable GridView with a customized editing interface. Specifically, we'll create a GridView that lists the BookID, Title, and Genre columns from the database. By default, the BookID field will be read-only, and the Title and Genre fields will have a TextBox Web control for their editing interface. However, when editing a GridView row, we might want to instead have the Genre field displayed as a DropDownList with all of the existing genres. To accomplish this, we'll need to convert the Genre BoundField into a TemplateField and replace the TextBox Web control in the EditItemTemplate with SqlDataSource and DropDownList controls. In doing so, we'll need to use data binding to tie the DropDownList control's SelectedValue property to the value of the edited book's Genre column. Let's not get too far ahead of ourselves here. Before we worry about creating a customized, data-bound editing interface for the Genre field, let's first just create an editable GridView that uses the default editing interface. Recall from Hour 16 that this involves first adding a SqlDataSource control configured to support updating. Because we want to allow the user to edit only the Title and Genre fields, in the SqlDataSource's wizard, be sure to bring back only the BookID, Title, and Genre columns, as shown in Figure 18.13. Also, be sure to click the Advanced button and check the Generate INSERT, UPDATE, and DELETE Statements check box. Figure 18.13. From the Configure the Select Statement screen, check the BookID, Title, and Genre columns.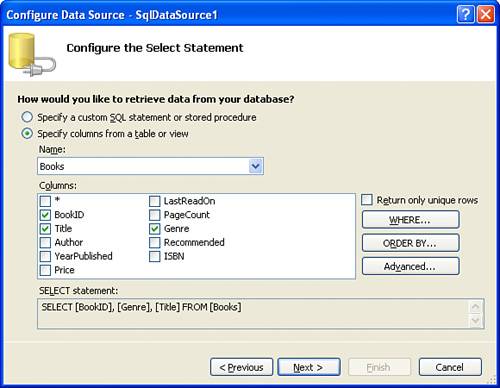 Next, add a GridView to the page and bind it to the SqlDataSource control. Also, check the Enable Editing check box in the GridView's smart tag. Take a moment to view the page through a browser, editing the value for a particular book. Note that when you click the Edit button, the editing interface shows a text box for both the Title and Genre fields (see Figure 18.14). Figure 18.14. Both the Title and Genre fields use the default editing interface.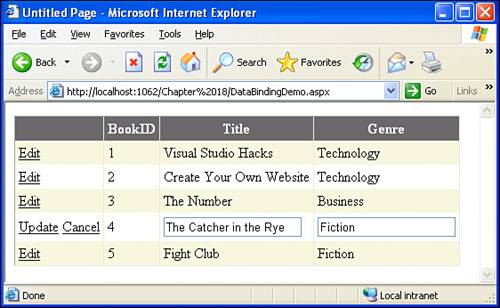 Let's now look at how to customize the Genre field so that it displays a DropDownList of the current genre values in the table, rather than using a TextBox control. To start, go to the Fields dialog box and convert the Genre BoundField into a TemplateField. This will automatically create an ItemTemplate with a data-bound Label Web control and an EditItemTemplate with a data-bound TextBox. In fact, if at this point you retest your page through a browser, there will be no discernable difference from the editable interface in Figure 18.14. To change the Genre field's EditItemTemplate, go to the GridView's smart tag and click the Edit Templates link. This will take you to the template editing view of the GridView, with the smart tag listing the available templates. Choose the EditItemTemplate. You should see a TextBox Web control in the EditItemTemplate; this is the data-bound TextBox control that was added automatically when we converted the Genre BoundField to a TemplateField. Because we no longer want to use a TextBox in the editing interface, delete this Web control. We now need to add a DropDownList to the EditItemTemplate that lists the genres in the Books table. To accomplish this, we need to first create a SqlDataSource control that retrieves the unique list of genres. This can be added directly to the Genre field's EditItemTemplate. After adding the SqlDataSource to the EditItemTemplate, set its ID property to genreDataSource. Next, run through the wizard, returning just the Genre column and checking the Return Only Unique Rows check box, just like we did in the preceding hour when using a DropDownList to filter the GridView results by genre. After configuring the genreDataSource SqlDataSource control, add a DropDownList to the EditItemTemplate. Click the Choose Data Source link in the DropDownList's smart tag and bind it to the genreDataSource control, with the Genre column serving as both the field to display and the value field. After you've added both the SqlDataSource control and the DropDownList to the EditItemTemplate, and configured both, your screen should look similar to Figure 18.15. Figure 18.15. A SqlDataSource and DropDownList have been added to the Genre TemplateField's EditItemTemplate.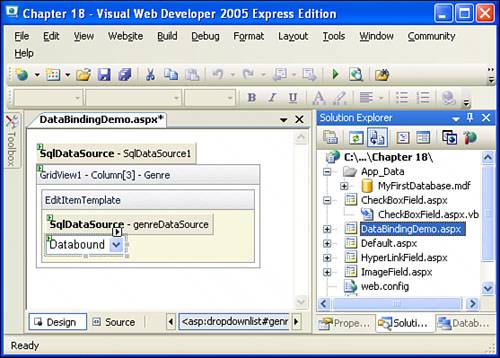 At this point, test the ASP.NET page through a web browser. When you edit a particular row, the Genre field is displayed as a drop-down list with the various genre values in the Books table (Business, Fiction, and Technology), as shown in Figure 18.17. However, notice that the first item of the DropDownList is selected, regardless of the edited book's actual Genre value. That is, if you edit Visual Studio Hacks, which has the genre Technology, the drop-down list has the Business genre selected. Furthermore, if you save the edits, by clicking the Update button, a value of Null is saved for the book's genre, regardless of what option you've selected from the drop-down list. What's going on here? What we've yet to do is implement data binding on the DropDownList control in the EditItemTemplate. Right now the DropDownList doesn't know the value of the row's Genre column, nor does it provide its selected value to the GridView's SqlDataSource control when the data is updated. We need to have the DropDownList properly data-bound to have this interaction occur correctly. Return to Visual Web Developer and go back to the Genre field's EditItemTemplate. Open the DropDownList's smart tag and click on the Edit DataBindings link. This will display the genres DataBindings dialog box, from which you can tie together the DropDownList's properties and the column values returned by the GridView's SqlDataSource control. Because we want the DropDownList's selection to be based on the Genre column value, select the SelectedValue property from the list on the left and pick the Genre field from the drop-down list on the right, as shown in Figure 18.16. Since the SelectedValue value also dictates the value of the edited book's Genre value, make sure that the Two-way Databinding check box is checked. Figure 18.16. Bind the SelectedValue property to the Genre column value using two-way data binding.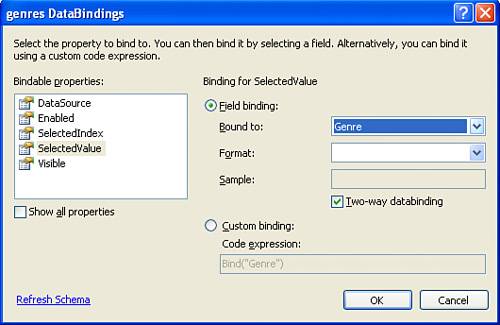 After binding the SelectedValue property to the Genre column, revisit the page in the browser. This time the item in the DropDownList is properly set to the book's Genre value, and when you save the edits, the selected DropDownList value is saved. Figure 18.17 shows the ASP.NET page in action. Figure 18.17. The Genre field provides a customized, data-bound editing interface.
A Look at the Declarative MarkupVisual Web Developer makes it very easy to specify the data bindings for a Web control. As Figure 18.16 showed, the DataBindings dialog box allows us to simply pick one of the Web control's properties, specify the database column to bind it to, and indicate whether to use one-way or two-way data binding. These steps, while done through the Design view, can also be performed through the Source view. It's always worthwhile to see how actions in the Design view affect the underlying Source view, so let's take a moment to peruse the Source view. Listing 18.1 shows the GridView's declarative markup. Listing 18.1. The GridView's HTML Markup
Lines 818 show the Genre TemplateField. The ItemTemplate is defined on lines 15 through 17; the EditItemTemplate, on lines 9 through 14. The EditItemTemplate contains two Web controls: a SqlDataSource with ID genreDataSource on lines 10 and 11 and a DropDownList control on lines 12 and 13. The effects of the data binding performed in Figure 18.16 are shown on line 12: The DropDownList's SelectedValue property has been bound to the Genre column using SelectedValue='<%# Bind("Genre") %>'. I find it a lot quicker and easier to use the Design view to specify the data bindings for controls in TemplateFields, but do realize that these data bindings can be expressed through the Source view if you prefer.
|
EAN: 2147483647
Pages: 233