An Overview of the List Web Controls
| ASP.NET includes a bevy of Web controls designed for collecting user input, many of which we examined in Hours 10 and 11. The list Web controls, a special class of input collection Web controls, present the user with a list of options. The DropDownList, which we examined in Hour 11, falls into this category of Web controls because it presents users with a series of options from which they must pick one. While the CheckBox and RadioButton controls represent a single check box or radio button and, therefore, aren't list controls, often multiple radio buttons or check boxes are used in tandem to provide users with a list of check boxes or radio buttons to select among. ASP.NET does provide two Web controls designed to present a list of check boxes or radio buttons. These two Web controlsthe CheckBoxList and RadioButtonListare list Web controls. The list Web controls share a number of features. Conceptually, they are all a collection of items of one sort or another. The DropDownList is a collection of drop-down list items; the CheckBoxList, a collection of check boxes; and the RadioButtonList, a collection of radio buttons. More concretely, they share a number of programmatic traits, such as
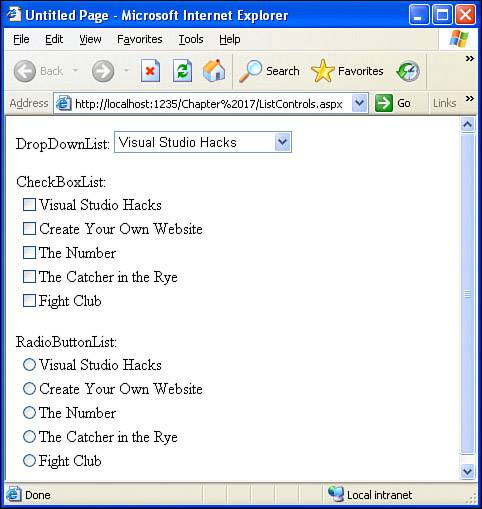
In Hour 11 we saw how to assign the items of a DropDownList control statically. Recall that the DropDownList's smart tag has an Edit Items link that, when clicked, displays the ListItem Collection Editor dialog box. This dialog box permits us to statically specify the items of a list control. The CheckBoxList and RadioButtonList also have a smart tag with an Edit Items option that likewise brings up the ListItem Collection Editor dialog box. In addition to specifying a list Web control's items statically, we can also assign the values through a data source control. That is, we can add a SqlDataSource control to our page, configure it to grab a set of records from a database table, and then bind that data to the list Web control. For each record returned by the SqlDataSource, the list Web control adds an item to its list. Binding Data to a List Web ControlBinding data to a list Web control is very similar to binding data to a GridView or DetailsView. The only difference is that while a GridView or DetailsView can be bound to a variable number of database table columns, list Web controls can be bound to, at most, two columns. The reason is that each item in a list control has two properties, Text and Value. The Text property is the value displayed onscreenthe text shown in the drop-down list item or the text of the radio button or check boxwhereas the Value property is not displayed, but provides an additional bit of information about each item. Let's not get bogged down with the differences between the Text and Value properties at this point; if the distinction is not clear now, it will be as we work through some examples. For now, let's practice binding database results to the various list Web controls. Start by creating a new ASP.NET page named ListControls.aspx. Next, add a SqlDataSource control to the page and configure it to return all columns and all rows of the Books table. You don't need to configure the SqlDataSource control to include the INSERT, UPDATE, and DELETE statements. After you have finished this, drag a DropDownList, CheckBoxList, and RadioButtonList onto the page, preceding each with text that shows the name of the control. After you have added the SqlDataSource control and the three list Web controls, your screen should look similar to Figure 17.1. Figure 17.1. A SqlDataSource and the three list Web controls have been added to the page. Each of these list Web controls has a smart tag with a Choose Data Source link. Clicking this link displays the Data Source Configuration Wizard, which prompts for the data source control to use and the column(s) to bind to the Text and Value properties of each list Web control. Take a moment to configure the data source for each of the three list Web controls, having each one display the Title column and use the BookID column as the value. Figure 17.2 shows this dialog box when configuring the DropDownList control's data source. Figure 17.2. Choose the data source control and the columns to bind to the list Web control.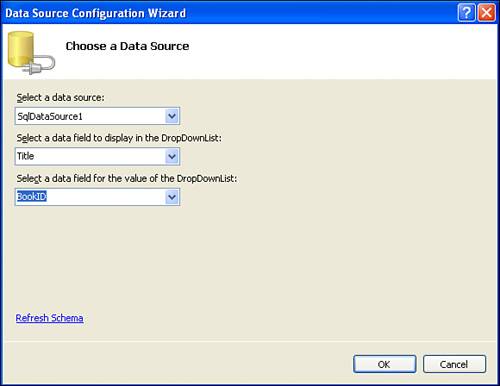 After you specify a data source for the list Web control, the Design view in Visual Web Developer will change slightly; instead of using the word "Unbound" for the DropDownList, RadioButtonList, or CheckBoxList (see Figure 17.1), the word "Databound" will be used instead. To see the actual values displayed in the drop-down list, check boxes, or radio buttons, you'll need to view the ASP.NET page through a browser. Take a moment to do this and ensure that your screen looks similar to Figure 17.3. Figure 17.3. The list Web controls have five items, one for each book in the Books table. Note that each list Web control has five items, one for each record returned by its SqlDataSource. The difference among the three list Web controls is the way they render their items. The Benefits of Dynamically Populating a List ControlIn Hour 11 we looked at how to populate the items in a DropDownList control statically, using the ListItem Collection Editor dialog box. Both the CheckBoxList and RadioButtonList can have their list items specified statically in this manner. Simply click the Edit Items link in their smart tags. While the list Web controls do support having their items set statically, it's often advantageous to do so dynamically, through binding the control to a data source. The problem with statically assigning the items to a list control is that if there are changes to the items to be displayed in the future, you must visit each and every page that uses this data and update the list control appropriately. If you dynamically bind your items, though, if there are any changes, you can just update the database table from which the items are retrieved and you're done! For example, in Hour 11 we looked at using a DropDownList that was statically populated with a list of ice cream flavors, from which we asked visitors to choose their favorite. These values were entered statically but could have been entered dynamically. That is, we could have created a table in our database called IceCreamFlavors that had two columns:
Then, in our ASP.NET page, we could use a SqlDataSource control to grab the contents of this table and bind it to the DropDownList. This may sound like a lot of work to just display some ice cream flavors, and this approach obviously isn't as quick as just typing in a handful of flavors in the DropDownList's ListItem Collection Editor dialog box. However, it will save you time if you need to replicate this functionality on other pages, if you expect the list of ice cream flavors to change in the future, or if you need to provide some association in the database between, say, users and their favorite ice cream flavors. I encourage you to use dynamic list Web controls for all but the most trivial scenarios that are guaranteed not to change in the future, such as a drop-down list with gender options, Yes/No options, hours of the day, and so on.
Programmatically Responding to a Changed SelectionWhen using list Web controls on a web page, we are often interested in knowing when a list control's selected item has changed. Each of the list controls contains a SelectedIndexChanged event that fires upon postback if the list control's selection has changed. Returning to our earlier example, ListControls.aspx, let's add a Button Web control and a Label Web control to the page. Set the Button's Text property to "Click Me" and the Label's ID and Text properties to status and a blank string, respectively. Next, create a SelectedIndexChanged event handler for the DropDownList. You can accomplish this by simply double-clicking the DropDownList in the Design view, or by going to the code view and choosing the DropDownList's ID and the SelectedIndexChanged event from the drop-down lists at the top of the screen. After you have added this event handler, your ASP.NET page's source code portion should look like this:
This event handlerDropDownList1_SelectedIndexChangedwill execute whenever the page is posted back and there's been a change in the selected item of the DropDownList. To test this, add the following line of code in the event handler: status.Text = "The drop-down list value is now " & DropDownList1.SelectedValue Set a breakpoint at this line by positioning your cursor on the line and pressing F9, or by clicking in the margin; next, start the debugger by going to the Debug menu and choosing Start. This will load the ASP.NET page in a browser. Notice that on the initial page load, the SelectedIndexChanged event doesn't fire because there's been no change to the selected state of the DropDownList. At this point your screen should look similar to Figure 17.3, except with the addition of a button.
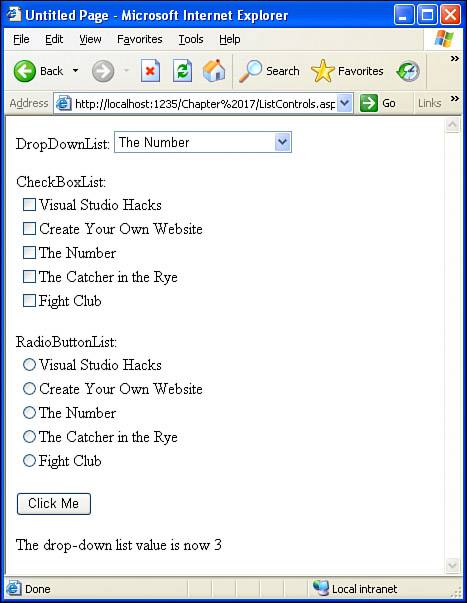
Without changing the value of the DropDownList, click the button, posting back the ASP.NET page. Again, the SelectedIndexChanged event does not fire because the selected DropDownList itemVisual Studio Hackshas yet to change. This time, however, select a different book from the DropDownList and click the button. Upon postback, the SelectedIndexChanged event will fire, and the debugger will break on the breakpoint we set. Continue debugging by pressing F5. The browser window should now refresh, displaying a message in the status Label indicating the BookID value of the selected book (see Figure 17.4). Figure 17.4. The Label displays the BookID of the last selected book. Note that if you click the button again without changing the book selection, the SelectedIndexChanged event does not fire. As we've seen, it fires only on the postback immediately following a change in the list Web control's selection state. As we discussed in Hour 9, "Web Form Basics," server-side events and code, such as a list control's SelectedIndexChanged event and its associated event handler, can fire and execute on the web server only when the browser explicitly re-requests the page (a postback). By default, changing the selection of a list control does not cause a postback. Therefore, the control's SelectedIndexChanged event does not fire immediately after the user changes the selection state of a list control, but only when a postback ensues. For instance, in our previous example, you can change the drop-down list from The Number to Visual Studio Hacks, but the DropDownList Web control's SelectedIndexChanged event doesn't fire until the Click Me button is clicked, thereby causing a postback. If the drop-down list's selection was changed from The Number to Visual Studio Hacks to Fight Club, and then the Click Me button was clicked, the SelectedIndexChanged event would fire only once, because from the web server's perspective, the drop-down list's selection has only changed once, from The Number to Fight Club. Similarly, if the drop-down list is changed from The Number to Visual Studio Hacks, and then back to The Number, and then the Click Me button is clicked, the SelectedIndexChanged event won't fire, because from the web server's perspective, no selection change has been made. That is, when the web server initially rendered the page, the DropDownList Web control's initial selection was The Number and on postback the selection was still The Number.
Automatically Posting Back When a List Web Control ChangesIn the smart tags for the list Web controls, you may have noticed a check box labeled Enable AutoPostBack. This check box indicates the value of the control's AutoPostBack property, which indicates whether the list Web control induces a postback upon having its selected state changed. As we've seen, by default the list controls don't cause postbacks on their own; rather, a postback is typically caused by the user clicking a Button Web control. Therefore, when working with list Web controls, the end user can make any sort of change to the list controlchecking or unchecking the check boxes of a CheckBoxList, selecting different radio buttons from the RadioButtonList, or choosing different options in the DropDownListand our server-side code won't know of these changes until the form is posted back. However, we might want to be immediately alerted whenever a user changes the selection state of a list Web control. That is, if the user chooses a different DropDownList item, checks or unchecks a check box in a CheckBoxList, or picks a different radio button in a RadioButtonList, we might want to be notified right away, rather than having to wait for the user to click a button. We can implement this behavior by checking the Enable AutoPostBack check box in the list Web control's smart tag. With this check box checked, the list control is rendered with additional client-side JavaScript that causes a postback as soon as the user alters the selection state. On postback the list control's SelectedIndexChanged event fires. The remainder of this hour focuses on using these three list Web controls in real-world situations. In the next section we'll see an example of using a DropDownList to filter the results displayed in a GridView. In this example, the DropDownList's AutoPostBack property will be set to true so that the data is automatically refreshed as soon as the DropDownList is changed. We'll also examine using the RadioButtonList and CheckBoxList to collect and process user input. |
EAN: 2147483647
Pages: 233