A Brief Tour of Visual Web Developer
| When the installation process completes, take a moment to poke through Visual Web Developer. To launch Visual Web Developer, go to the Start menu, choose Programs, and click on Microsoft Visual Web Developer 2005 Express Edition. Figure 1.8 shows Visual Web Developer when it loads. Figure 1.8. The Start Page is shown when Visual Web Developer is loaded. When you open Visual Web Developer, the Start Page is initially shown. This Start Page includes a list of Recent Projects in the upper-left corner, a Getting Started section with some links for accomplishing common tasks in the bottom-left corner, and a list of recent articles on Microsoft's MSDN site in the right column. On the left you'll find the Toolbox. In the Start Page the Toolbox is empty, but when you're working with an ASP.NET page, the Toolbox contains the plethora of ASP.NET Web controls that can be added to the page. (We'll discuss what Web controls are and their purpose in the next hour.) To the right of the screen, you'll find the Solution Explorer. Again, on the Start Page this is empty, but when you load or create an ASP.NET website, the Solution Explorer will list the website's files. These files include database files, HTML pages, ASP.NET pages, image files, CSS files, configuration files, and so on. In addition to the Solution Explorer, the right portion of the screen is also home to the Database Explorer. The Database Explorer lists the databases associated with the project and provides functionality for creating, editing, and deleting the structure and contents of databases. Creating a New ASP.NET WebsiteTo create and work with an ASP.NET page, we must first create an ASP.NET website. There are several ways to create a new ASP.NET website from Visual Web Developer. You can go to the File menu and choose the New Web Site option, you can click on the New Website icon in the Toolbar, or you can click the Create Web Site link in the Recent Projects pane of the Start Page. All of these approaches bring up the New Web Site dialog box, as shown in Figure 1.9. Let's take a moment to create a website. For now, don't worry about all the options available or what they mean because we'll discuss them in detail in Hour 3, "Using Visual Web Developer." Leave the Templates selection as ASP.NET Web Site, the Location drop-down list as File System, and the Language drop-down list as Visual Basic. The only thing you should change is the actual location of the website. Place the website in a folder named MyFirstWebsite on your Desktop. Figure 1.9. Create a new ASP.NET website in a folder on your Desktop.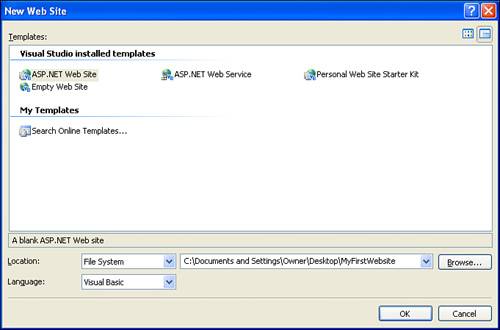
After you create the new website, your screen should look similar to Figure 1.10. When creating the new website, Visual Web Developer automatically created an App_Data folder, an ASP.NET page named Default.aspx, and a web configuration file (web.config). This folder and these two files are shown in the Solution Explorer. Figure 1.10. A new website has been created with an ASP.NET page, Default.aspx.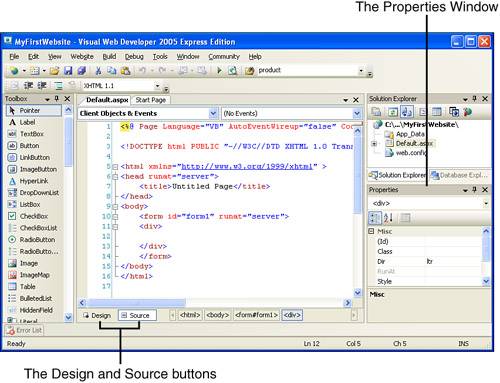 The Default.aspx page that was automatically created is opened, its contents being shown in the main window. Right now this ASP.NET page consists of just HTML. As we will see in future hours, in addition to HTML, ASP.NET pages can also contain Web controls and server-side source code. Typically, these portions of an ASP.NET page are broken up into two files: one that contains the HTML markup and Web control syntax, and another that contains just the source code. In fact, if you click on the plus icon in Default.aspx in the Solution Explorer, you'll see that there's another, nested file, Default.aspx.vb. This is the source code file for Default.aspx.
When you're working with the HTML and Web controls in an ASP.NET web page, there are two views. The first view is the Source view, which shows the HTML page's underlying HTML markup and Web control syntax. The second view, called the Design view, provides a simpler alternative to specifying the page's content. Rather than having to manually enter the page's HTML by hand, as in the Source view, you can drag and drop HTML elements and Web controls from the Toolbox in the Design view. You can toggle between the Source and Design view for an ASP.NET page by using the Design and Source buttons at the bottom of the main window. Beneath the Solution Explorer, you'll find the Properties window. This window displays the configurable properties for the page or whatever HTML element or Web control is currently selected. This particular window will be used quite often when we start creating ASP.NET web pages.
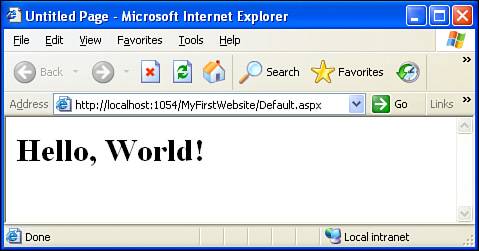
Creating and Testing a Simple ASP.NET Web PageIf we want to test an ASP.NET web page, a browser needs to make a request to the web server for the particular ASP.NET page. Let's test Default.aspx. Before we do, though, we need to add some content to the page, because right now the HTML markup will not display anything when viewed through a browser. From the Source view, place your cursor between the <div> and </div> tags of Default.aspx and add the following text: <h1>Hello, World!</h1> This will display the text "Hello, World!" in a large font. After entering this text, go to the Debug menu and choose the Start Without Debugging menu option. This will start the ASP.NET Development Web Server and launch your computer's default browser, directing it to http://localhost:portNumber/MyFirstWebsite/Default.aspx (see Figure 1.11). The portNumber portion in the URL will depend on the port selected by the ASP.NET Development Web Server. Figure 1.11. Default.aspx, when viewed through a browser. This ASP.NET page isn't very interesting because its content is static in nature. It does, however, illustrate that to be able to view the contents of an ASP.NET page, you must start the ASP.NET Development Web Server and request the page through a browser. You can accomplish this automatically by going to the Debug menu and choosing Start Without Debugging.
|
EAN: 2147483647
Pages: 233
- Chapter Seven Diagnose Before You Prescribe
- Chapter Eight Creating Visions Biased to Your Solution
- Chapter Eleven Gaining Access to People with Power
- Chapter Fifteen Sales Management System: Managers Managing Pipelines and Salespeople
- Chapter Sixteen Creating and Sustaining High-Performance Sales Cultures