Editing and Deleting Data with the GridView
| In addition to just displaying data, the GridView can be used to edit and delete the displayed data as well. To edit or delete data, the GridView must be bound to a data source control that has an UpdateCommand and DeleteCommand. Fortunately, these command statements can be automatically generated for us by the SqlDataSource control's wizard when retrieving data from a database table with a primary key. Like adding sorting and paging support to a GridView, enabling a user to delete or edit the GridView's underlying data is as simple as checking a check box in the GridView's smart tag. With deleting, it really is as simple as checking a check box. With editing, however, the GridView leaves a bit to be desired in how to render the row being edited. As we'll see, if you have anything but the most trivial data entry requirements, you'll likely need to instruct the GridView on how to create the editable row. We'll see how to accomplish this in the "Customizing the Editing Interface and Updating Rules" section later in this hour. In this hour we are going to examine editing and deleting as two separate tasks. However, there's no reason why you can't create a GridView whose data can both be edited and deleted. Just follow the steps from the editing and deleting sections on a single GridView. Allowing Users to Delete DataThe GridView can be configured to provide the user with the ability to delete the GridView's underlying data, one record at a time. A deletable GridView adds a field of Delete buttons or links; to delete a particular row, the user visiting the page simply clicks the applicable row's Delete button. After the Delete button is clicked, the ASP.NET page is posted back. The GridView then populates the appropriate data source control parameters with the appropriate values and invokes its data source control's DeleteCommand. After it issues this command, the GridView re-retrieves and redisplays its data from its data source control. From the user's perspective, he clicks a particular row's Delete button and that row disappears. This interaction that occurs automatically is not trivial and deserves a bit of exploration. Before we worry about the intricacies, however, let's first create a working, deletable GridView. Start by creating a new ASP.NET page called DeleteBook.aspx. As you may have guessed, this page will list all of the books in the Books table, providing a Delete button for each. The visitor to this page can then delete a book from the table by clicking the book's corresponding Delete button. After the page is created, go to the Design view and drag on a SqlDataSource control. Configure the data source so that the query returns all records and all columns from the Books table, and have the wizard generate the INSERT, UPDATE, and DELETE statements (but don't check the Use Optimistic Concurrency check box). After the data source has been configured, add a GridView to the page and specify its data source as the SqlDataSource you just added. If you configured the data source control correctly, in the GridView's smart tag there will be an Enable Deleting check box. Check this. Checking the Enable Deleting check box will update the Design view to show a field of Delete links (see Figure 16.2). Congratulations, you've created a deletable GridView! Take a moment to test your page by going to the Debug menu and choosing Start Without Debugging. In the browser, if you click a particular row's Delete linkpoof!that record disappears because it has been deleted. Figure 16.2. The GridView has been configured to support deleting. Customizing the Delete FieldBy default, the Delete field displays as a column of links with the word "Delete" as the text for each link. You can customize this field if needed, changing the link text or having the link displayed as a button or image. To accomplish this, go to the GridView's smart tag and click the Edit Columns link, which will display the Fields dialog box (see Figure 16.3). Figure 16.3. A CommandField named Delete was added when the Enable Deleting check box was checked.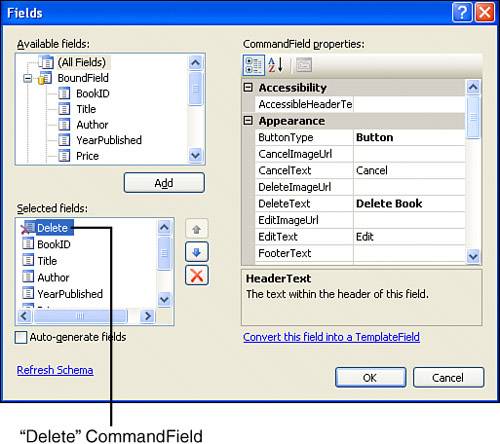 In the bottom-left corner are the fields displayed in the GridView. In addition to the BoundFields for displaying the BookID, Title, Author, and other columns, there's also a CommandField called Delete. This CommandField was automatically added when the Enable Deleting check box was checked in the GridView's smart tag. Selecting the Delete CommandField in the lower-left corner displays its properties on the right. The first property in the Appearance section is ButtonType, which dictates how the Delete field is displayed. Currently, it is set to its default value, Link, which causes the Delete field to render as a series of links. You can change the field's appearance by setting this property to Button or Image. If you have ButtonType set to Link or Button, you can customize the text displayed in the button or link using the DeleteText property. If you are using a ButtonType value of Image, set the DeleteImageUrl property to the URL of the image you want displayed. Figure 16.4 shows the GridView in the Visual Web Developer Design tab after the Delete field has been customized to render as a button with the DeleteText "Delete Book". Figure 16.4. Each row in the GridView includes a Delete Book button.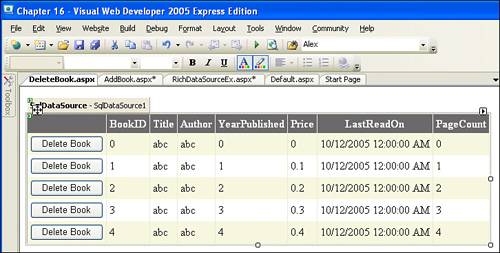
Looking at the Inner Workings of DeletingWhat, exactly, happens when the end user clicks a Delete button? From the end user's perspective, the page flashes and the record whose Delete button she clicked vanishes. But what happens behind the scenes? When a user clicks the Delete button, a postback ensues. On postback, the GridView notes that a particular row's Delete button has been clicked and in response raises its RowDeleting event. The GridView then takes the value that uniquely identifies the row (the BookID value), assigns that to its data source control's <DeleteParameters> @BookID parameter, and invokes the DeleteCommand. The data source control, then, issues the DELETE statement to the database, substituting in the value of the @BookID parameter. After it deletes the record via its data source control, the GridView raises its RowDeleted event.
For example, imagine that the user visits DeleteBook.aspx and clicks the Delete button for the book The Number. This causes a postback, and the GridView control is notified that the Delete button was clicked for its third row. The GridView then determines that the BookID value for the third row is 3, assigns this to the @BookID parameter of its data source control, and invokes the DeleteCommand. The data source control substitutes in the value 3 for the @BookID in the DELETE statement, sending the following statement to the underlying database: DELETE FROM [Books] WHERE [BookID] = 3 This, of course, would delete The Number from the database. After this statement is executed, the GridView re-retrieves its data from its data source control. Because there are now only four books, the GridView is rendered with only four rows. The result is that the user visiting the page now sees the four remaining books in the Books table. At this point you may be wondering how, exactly, the GridView knows that the third row is uniquely identified with the value 3. This GridView has a property called DataKeyNames that can be set to the name(s) of the primary key columns(s) of the data being bound to the GridView. If this property is set, the GridView automatically keeps track of each of the primary key column value(s) of each of its rows. When you bind a data source control to a GridView, this property is automatically set to the primary key column(s) returned by the data source control. (Take a moment to check out the Properties window for the GridView; you'll see that the DataKeyNames property is set to BookID.)
Creating an Editable GridViewIn addition to providing deleting support, the GridView also offers functionality that allows the end user to edit the GridView's underlying data. Specifically, when the GridView is configured to support editing, an Edit button is added to each row. When the end user clicks the Edit button, the row becomes editable, which means, by default, that its various editable fields turn into text boxes. Also, the Edit button is replaced by two new buttons: Update and Cancel. The user can then enter the new values for the record into these text boxes and click the Update button to save his changes, or he can click the Cancel button to return to the pre-editing GridView without saving any changes. Figure 16.6 shows a browser displaying an editable GridView where the user has clicked on the second row's Edit button. The steps for creating an editable GridView are quite similar to those for creating a GridView that supports deleting:
In other words, the only difference is that instead of checking the Enable Deleting check box, you check the Enable Editing check box instead. (Actually, you can check both check boxes to create an editable GridView that supports deleting.) Although enabling editing support is fairly straightforward, often we'll want to tailor the GridView's default editing interface. Fortunately, this is relatively easy and, like many of the other GridView's features, can typically be accomplished without having to write any code. Before we delve into customizing the GridView's editing interface, let's first practice creating an editable GridView. Start by creating a new page named EditBooks.aspx and follow the three steps outlined at the beginning of this section. After you check the Enable Editing check box in the GridView's smart tag, the Visual Web Developer Design view should display an Edit field, as shown in Figure 16.5. Figure 16.5. A CommandField named Edit was added when the Enable Editing check box was checked.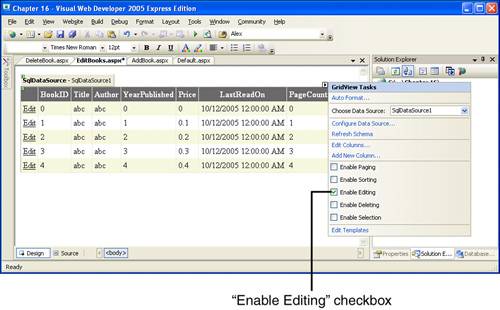 At this point you have created an editable GridView. Take a moment to try out this GridView in a browser. Each GridView row has an Edit link that, when clicked, makes the row editable. The end user can enter new values for the editable fields and click the Update link to save his changes (see Figure 16.6). Figure 16.6. The user has opted to edit the second row of this editable GridView.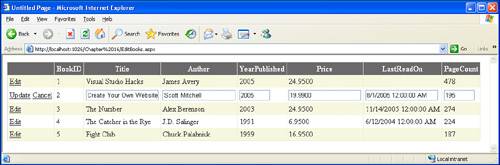
Customizing the Editing Interface and Updating RulesTake a moment to try out the editable GridView. Try entering different values for different fields or omitting values and see what happens. As you likely will discover, it is fairly easy to end up with an exception when saving an editable GridView. Simply omit the value for a required field (like Title or Author) or put in a improperly formatted value (such as "Long" for the PageCount field). Figure 16.7 shows the resulting page in Internet Explorer when attempting to update the book Visual Studio Hacks with the LastReadOn value of "Yesterday". Figure 16.7. Attempting to input an improperly formatted string into the LastReadOn field results in an exception.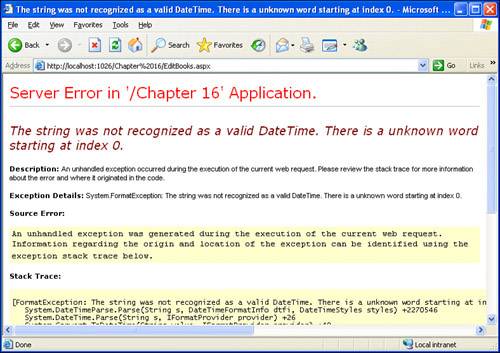 These exceptions arise because the GridView blindly passes back to its data source control whatever values the end user provides. When the data source control attempts to issue an UPDATE statement to the database with improperly formatted or missing values, the database raises an exception, which is what you see in Figure 16.7. To prevent these types of errors, we want to customize the editing interface generated by the GridView. The GridView allows you to customize the markup used for each field. For example, for the Title, Author, YearPublished, Price, and PageCount fields, we want to include a RequiredFieldValidator control, to ensure that the user has entered a value. For Price, LastReadOn, YearPublished, and PageCount, we want to use a CompareValidator to ensure that the values are of the proper data type and, perhaps, bounded by some value or values. (We might want to ensure that the value entered for Price is always greater than or equal to 0, for example.) In addition to customizing the interface for an editable field, we might want to indicate that a particular field should not be editable. When the GridView row in Figure 16.6 is edited, notice that the BookID field remains as text, disallowing the end user from modifying the value of a row's BookID. The GridView automatically makes the primary key column or columns read-only because those columns uniquely identify the row that's being edited. We can easily indicate that other fields should be read-only as well. For example, we might not want to let a user change the title of a book. Finally, the GridView provides options that can be set to indicate how the user-entered data should be sent to the database. If the user omits entering a value for a string data type (like Title, Author, and so on), should the database record be updated using Null or a blank string? These settings can be managed through the Fields dialog box. Over the next few sections we'll examine each of these methods of customizing the editing interface and specifying database-related update rules. Marking Fields as Read-OnlyBy default, any fields in the GridView that map to primary key columns in the underlying database table are made read-only. When the visitor clicks the Edit button for a GridView row, the read-only fields are simply displayed as text. See the BookID field in Figure 16.6 for an example of how a read-only field is rendered. You can optionally mark additional fields as read-only. Go to the Fields dialog box and select the field you want to make read-only, loading its properties on the right. One of the properties in the Behavior section is named ReadOnly. Set this property to true to make the field uneditable (see Figure 16.8). Figure 16.8. Set the ReadOnly property to true to make a field uneditable.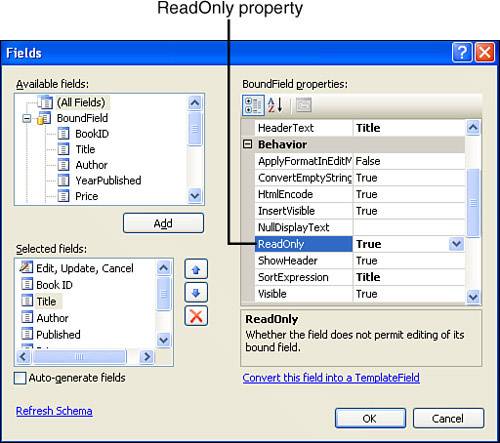 That's all there is to it. When we mark a field as read-only, it will be displayed as text when a row's Edit button is clicked. Editing and Formatted FieldsIn the preceding hour we looked at how to format the values of the GridView fields, such as formatting the Price field as a currency and the LastReadOn field to display just the date and omit the time. By default, the formatting applied to a GridView field is not carried over to the default editing interface. To highlight this, take a moment to format the Price and LastReadOn fields using the currency and date-only format strings. To accomplish this, perform the following steps:
After you make these settings, the Design view in Visual Web Developer should show the fields formatted as specified. Next, view the page in a browser and click on the Edit button for a row (see Figure 16.9). As you can see, the values for the Price and LastReadOn fields are properly formatted for the noneditable rows. For the row being edited, however, the text box shows the values in their unformatted state. Figure 16.9. The formatting for the Price and LastReadOn columns isn't applied to the editable row.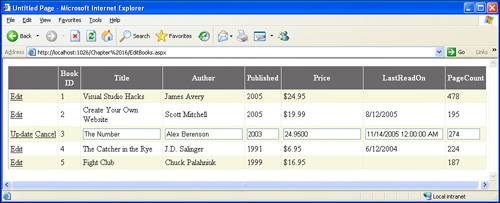 You can indicate that the formatted values should apply for the editable view through the field's ApplyFormatInEditMode property, which is accessible through the Fields dialog box. By default, this value is False; if you set it to true, however, the formatting will apply to the row being edited. Because we are interested only in the date of the LastReadOn date field and not the time, it makes sense to set the ApplyFormatInEditMode property of the LastReadOn field to true. Before you blindly set the ApplyFormatInEditMode property of the Price field to true, realize that doing so will cause problems because the currency formatting introduces illegal characters. The Price field is tied to a database table column of type money, which expects a numeric value. If you apply the currency formatting, however, the formatted expression includes a currency symbol (such as a dollar sign). If the user edits a row and doesn't remove the currency symbol from the Price text box, when she saves the changes, the ASP.NET page will raise an exception. (There's no problem with formatting the LastReadOn field because the database will happily work with a date value that lacks a time portion.) Using Nulls or Blank StringsSome fields in the GridView map to database table columns that allow Nulls. For example, the LastReadOn column does not require a value; if we've yet to read the book, we can simply put a Null in this column. By default, if the user omits a value for a field, the GridView will attempt to place a Null value in the corresponding database table column. To illustrate this concept, edit a row that has a LastReadOn date value and clear out this value from the text box. After saving this change, check out the database table's data; you'll see that a Null value has been placed in the book's LastReadOn column. Sometimes, however, you may want to have the GridView use a blank string as opposed to a Null value. For example, imagine that you had a GridView field that mapped to a database table column that was of type nvarchar that did not allow Nulls. (Recall that nvarchar fields hold strings.) Now, if a user editing a GridView leaves off the value for this field, the GridView will use a Null value; this will cause an exception, however, because the database table column was configured to not allow Nulls. To remedy this, you would need to have the GridView's field opt to use a blank string instead of a Null value. (A blank string is a string with no characters.) To accomplish this, set the field's ConvertEmptyStringToNull property to False tHRough the Fields dialog box. Replacing the Auto-Generated TextBox with a Custom Editing InterfaceWhen you click the Edit button in a GridView, by default all of the editable fields are converted into text boxes. Sometimes, though, you might not want to use a text box as the editing interface, or you might want to augment the editing interface by tweaking the text box's aesthetic appearance or including validation controls. For example, it would be prudent to include RequiredFieldValidators for those GridView fields that map to database columns that do not allow Nulls and for which we do not want to allow a blank string to be present. Furthermore, we should add CompareValidators to the numeric and date/time fields to ensure that the data format entered by the user conforms to the corresponding data type. To customize the editing interface for a field, we'll need to convert it from a BoundField into a TemplateField. The BoundFieldwhich is added by default after associating a GridView with a data source controldisplays the associated data source control column values as text for the noneditable rows and as a text box for the editable row. A TemplateField, on the other hand, allows us, the page developers, to specify precisely the Web controls that will be used in displaying the column values for both the editable and noneditable rows. A TemplateField is defined as a collection of templates, where a template is a mix of Web controls and static HTML markup. There are five possible templates, all of which are optional:
As the GridView is rendered row-by-row, a TemplateField is rendered depending on the row's type and the templates available. For example, if the TemplateField has a HeaderTemplate specified, when the field's header row is rendered, the HeaderTemplates markup is used. For noneditable items, the ItemTemplates or AlternatingItemTemplates are used, depending on whether the AlternatingItemTemplate is defined and, if so, if the row is a normal row or alternating row. For the editable row, the EditItemTemplate is used, if provided. This may, understandably, sound a bit confusing at this point. I hope things will become clearer after you see an example. To illustrate using a TemplateField, we first need to create one. You can add a brand new TemplateField to the GridView if you like, but because we want to customize the editing interface of an existing BoundField template, we can simply turn those BoundFields into TemplateFields. To accomplish this, simply open the Fields dialog box, select the BoundField to turn into a TemplateField, and click the Convert this field into a TemplateField link at the bottom of the properties on the right (see Figure 16.10). Figure 16.10. To customize the editing interface, turn the BoundField into a TemplateField.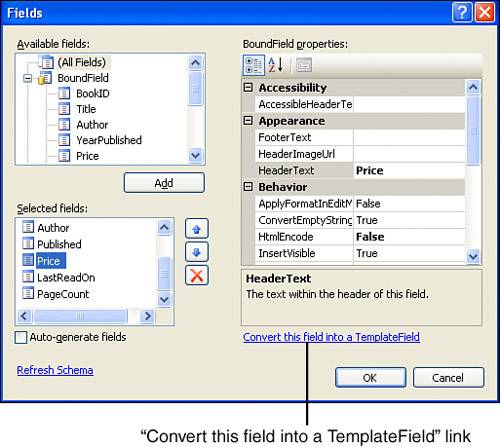 Take a moment to convert the Price field into a TemplateField and then close the Fields dialog box by clicking the OK button. You won't notice anything different in the Design view. In fact, if you test the page through a browser, it will behave just as it did before converting the field to a TemplateField. The reason is that converting the BoundField into a TemplateField creates a TemplateField with two templates: an ItemTemplate that contains a Label Web control and an EditItemTemplate that contains a TextBox Web control. Listing 16.2 shows the GridView's declarative markup after converting the Price field into a TemplateField (pay particular attention to lines 10 through 17). Listing 16.2. The TemplateField Has an ItemTemplate and EditItemTemplate
Note that the <EditItemTemplate> (lines 1113) and <ItemTemplate> (lines 1416) sections contain a single Web control. Furthermore, the Web control's Text property is assigned a value using data binding syntax. Data binding syntax has the form <%# Bind(columnName, optionalFormatSpecifier) %> and grabs a particular column value from the data source control. In the <ItemTemplate> a Label Web control is configured to display the value of the Price column formatted as a currency ({0:c}); in the <EditItemTemplate>, a TextBox Web control's Text property is assigned the value of the Price column. A TemplateField's templates can also be edited through the Design view. From the GridView's smart tag, click on the Edit Templates link. This will show the ItemTemplate for the Price field. You can click to edit other templates from the drop-down list. Figure 16.11 shows the Design view when editing the ItemTemplate of the Price field. Figure 16.11. A TemplateField's templates can also be edited through the Design view.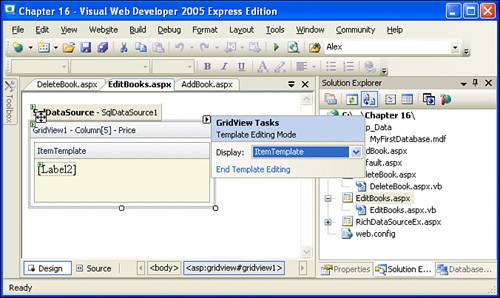
Note that the ItemTemplate contains a Label Web control with ID Label2. This is the Label control whose declarative markup appeared on line 15 of Listing 16.2. Click on the Label Web control and examine the Properties window. Note that the Text property has a little disc icon next to it; this indicates that the Text property is assigned using a data binding expression.
Next, change the template being viewed from the ItemTemplate to the EditItemTemplate. You should now see a TextBox Web control whose Text property in the Properties window also has a disc icon. To customize the Price field's editing interface, make whatever modifications necessary to the EditItemTemplate. For our page, let's do the following:
After you have completed these four steps, view the page through a browser and attempt to edit the Price field. Note that if you omit the price or attempt to enter a noncurrency value or a currency value less than zero, you will receive a descriptive error message, and the value will not be saved to the database (see Figures 16.12 and 16.13). Figure 16.12. An error message is displayed if the Price field value is omitted.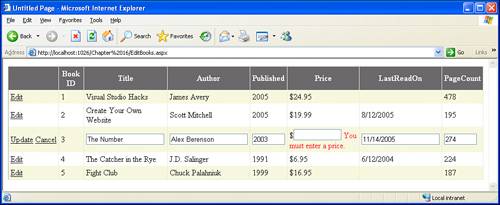 Figure 16.13. The GridView won't post back until a valid currency value is provided for the Price field.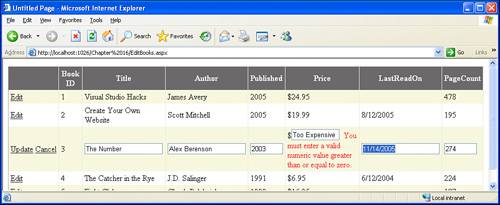 In addition to being able to add validation controls and tweak the TextBox Web control's aesthetic properties, when customizing the editing interface, you can replace the TextBox Web control with a more appropriate Web control, if needed. For example, if a GridView field displayed the gender of the book's author, we might want to have a drop-down list of genders rather than requiring the user to type in Male or Female. The exercises in this chapter include a task that involves customizing the editing interface by replacing the TextBox with an alternate input Web control.
Understanding Optimistic ConcurrencyWhen configuring a SqlDataSource to support INSERT, UPDATE, and DELETE commands, we are given the option of whether to use optimistic concurrency. This applies specifically to editing and deleting data, so let's examine this concept briefly before moving on to inserting data with the DetailsView control. With web applications there may be many users visiting the website at the same time. If you have a web page that allows users to edit or delete the same database data, some concurrency issues can arise due to the fact that there is a physical and temporal disconnect between the web server and the client (the web browsers visiting the site). In English, if you let multiple users visit a page and edit or delete data from the same database table, there's a chance that two people may be trying to edit or delete the same data at the same time. There's no technological problem with allowing multiple people to work with the same database data concurrently, but there can be confusion among those working with the data because they would not know that someone else is also working with that data simultaneously. For example, we have built an ASP.NET page that allows users to edit the contents of the books in the Books table. Imagine that two usersJisun and Samboth visit this page at about the same time. When they visit this page, both Jisun and Sam will be sent the same data, so they both see that the book Visual Studio Hacks was authored by James Avery in 2005. Now, imagine that Jisun wants to change the data, instead recording that the book was authored by Dave Yates, so she clicks the Edit button and the values are displayed in text boxes; at the same time, Sam wants to change the year the book was published from 2005 to 2002, so she clicks the Edit button as well, loading the values into the text boxes. Now, Jisun makes her change of the author and clicks the Update button. The Books table is updated successfully, changing the author of Visual Studio Hacks to Dave Yates. A few moments later Sam clicks the Update button. Because Sam clicked the Edit button before Jisun's change to the author, the author for Visual Studio Hacks in Sam's screen still says James Avery, so when Sam commits her changes, Jisun's change to the author will be overwritten. Figure 16.14 illustrates this problem graphically. Figure 16.14. Two users working with the same data around the same time can lead to overwriting one another's changes.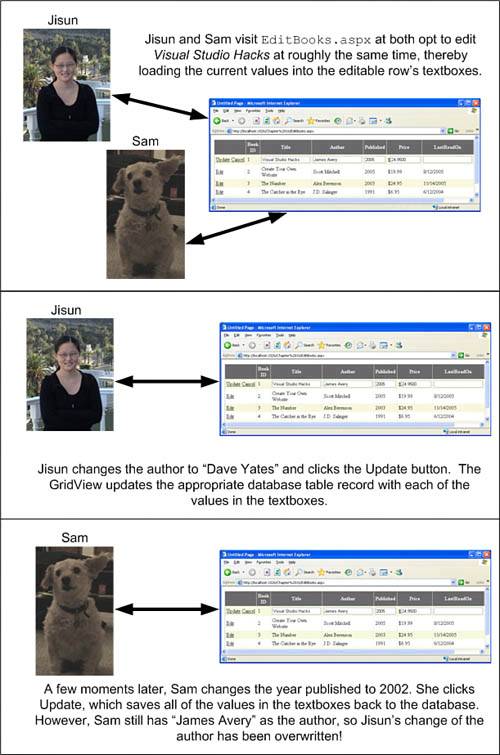 To avoid this problem, you can check the Use Optimistic Concurrency check box in the SqlDataSource control's wizard. Without optimistic concurrency, the WHERE clause in the DELETE and UPDATE statements is based solely on the primary key column(s)BookID in our example. However, with optimistic concurrency, the WHERE clause is updated to include all of the columns and their original values. That is, with optimistic concurrency the SqlDataSource control's UPDATE statement looks something like UPDATE [Books] SET [Title] = @Title, ... WHERE [BookID] = @BookID AND [Title] = @orig_Title AND [Author] = @orig_Author AND ... where @orig_ColumnName is a parameter that holds the value of the column when the user clicks the Edit button. That way, an UPDATE is saved only if there have been no changes in any of the other columns in the table since the user clicked the UPDATE button. With optimistic concurrency enabled, when Sam updates Visual Studio Hacks with the new YearPublished value, the UPDATE would apply to any rows because the WHERE clause would be looking for a row that, among other things, had an Author value of "James Avery"however, that was changed by Jisun's edit moments before. Optimistic concurrency is a nice feature, but it is really useful only if you expect to have multiple, concurrent users potentially updating or deleting the same data. If you do expect this, go ahead and check the Use Optimistic Concurrency check box. |
EAN: 2147483647
Pages: 233
- Challenging the Unpredictable: Changeable Order Management Systems
- ERP System Acquisition: A Process Model and Results From an Austrian Survey
- Data Mining for Business Process Reengineering
- Healthcare Information: From Administrative to Practice Databases
- Development of Interactive Web Sites to Enhance Police/Community Relations