Using the Color Picker to Choose Colors
Setting Your PreferencesThe System Preferences application is an important tool you use to control how your Mac OS X system works and looks. If you have read through other parts of this book, you have already used some of the panes it contains to work with various parts of the system. Table 8.1 provides a summary of each pane and tells you where in this book you can learn more about it.
NOTE You might see more or fewer panes in the System Preferences application than are listed in Table 8.1 depending on the hardware and software you have installed. For example, if your Mac doesn't support Bluetooth hardware, you won't see the Bluetooth pane. If you have installed additional hardware or software that is configurable, such as a keyboard, you might see additional panes in the Other category. TIP Remember that you can customize the System Preferences application's toolbar by dragging icons from the lower pane of the window to the toolbar. You can remove icons from the toolbar by dragging them off the toolbar. Setting Appearance PreferencesUse the Appearance pane of the System Preferences application to control several basic settings for your system. Use the Appearance pop-up menu to select Blue if you want color in the buttons, menus, and windows. Select Graphite if you want to mute the color so the color elements are gray instead. Use the Highlight pop-up menu to select the highlight color. Use the radio buttons to set scrolling behavior. You can place the scroll arrows together or choose to have a scroll arrow placed at each end of the scrollbar. You can select "Scroll to here" to cause a window to jump to the relative position on which you click or "Jump to next page" to scroll a page at a time when you click above or below the scroll box. Set the number of recent items tracked on the Apple menu for applications and documents using the Number of Recent Items pop-up menus. You can track as few as none or as many as 50 recent items. The lower part of the pane provides the controls you use to configure how font smoothing is enabled on your Mac. Font smoothing (known as antialiasing for graphics) reduces the jaggies that occur when you view certain fonts onscreen; this is most noticeable when you use larger sizes or thick fonts or when you apply bold or other formatting. Font smoothing is always turned on, but you can configure it specifically for your system:
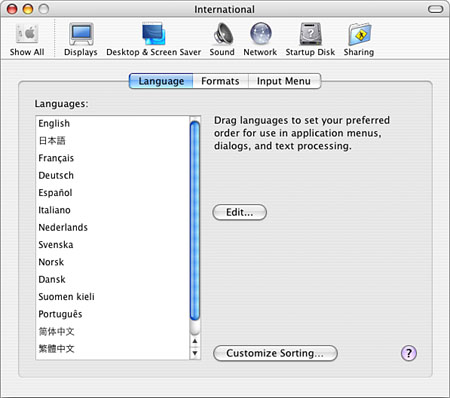
Setting International PreferencesMac OS X includes support for a large number of languages; language behaviors; and date, time, and number formats. You control these properties through the International pane of the System Preferences application (see Figure 8.1). Figure 8.1. You can use the International pane of the System Preferences application to control various language and format properties based on a language and the conventions of particular nations.
Use the Language tab to configure the languages you want to use. The Languages list shows the languages that are currently active. You can drag these languages up and down in the list to set the preferred order in which you want to use them on menus and in dialog boxes. If you click the Edit button, you can choose the languages that appear in the Languages list by unchecking the check boxes for the languages you don't want to use. If you click the Customize Sorting button, you can choose the set of behaviors for each script. For example, to configure the Roman script for English, select it on the list of scripts and select the English option on the Behaviors pop-up menu. You can configure behaviors for other languages using similar steps to match the language you use. Use the Formats tab to configure the format of the dates, times, and numbers used on your Mac. When you open this tab, you see a section for each of these areas along with the Region pop-up menu (see Figure 8.2). Figure 8.2. Use the Formats tab of the International pane to set the format of dates, times, and numbers for your system.
Select the region setting for your Mac on the Region pop-up menu. By default, you see region choices that relate to the languages you have installed. If you want to see all possible region options, check the "Show all regions" check box. When you make a selection, default formats for the region you selected are applied to each setting area (dates, times, and numbers). After you have set general format preferences via the Region pop-up menu, you can customize the format in each area. NOTE The options described in the following paragraphs are for the United States region. If you choose a different region, different options might be available to you, but they can be set using similar steps. In the Dates section, click the Customize button. The Customize Dates sheet appears. Use these controls to set the date formats displayed in Finder windows and other locations. There are two general date formats: Long Date and Short Date. Use the pop-up menus, check boxes, and text fields to set the format for each type of date. For the Long Date format, you choose a prefix as well as separators for the day of the week, month, day, and year. If you want to use a leading zero for single digit dates, check the "Leading zero for day" check box. For the Short Date format, you select the format option you want on the pop-up menu, input a separator, choose to use a leading zero for day or month, and choose to show the century. At the bottom of the sheet is an example of dates as you have configured them. Click OK to close the sheet. In the Times section, click the Customize button. The Customize Times sheet appears. Use the radio buttons to select a 12- or 24-hour clock and whether noon and midnight are shown as 0:00 or 12:00. Use the Before Noon and After Noon boxes to select how your Mac indicates these relative times, such as AM or PM. Use the Separator box to input the separator you want to use. Finally, use the check box to determine whether a leading zero is used for the hour. Click OK when you are done making changes. NOTE The settings you make in the Dates and Times sheets affect the format of these values in the Finder and other locations. They do not affect the clock display; you control the format of the clock using the Time & Date pane. In the Numbers section, click the Customize button. The Customize Numbers sheet appears, which you can use to set the format for numbers displayed on your Mac. You can use the pop-up menus to select the separators in numbers (for the decimal and thousands), and you can select a currency symbol and where that currency symbol is located (before or after the amount). Click OK when you are done. Use the Measurement Units pop-up menu to select the default measurement units used (U.S. [aka English] or Metric). Use the Input Menu tab to control and configure the Input menu that appears on the menu bar.
Using the Mac OS X Screen SaverMac OS X was the first version of the Mac OS that included a built-in screen saver. Many Mac users enjoy having a screen saver, and Mac OS X's version provides the features you would expect. However, the quality and style with which the screen saver displays images are quite nice, especially when you use your own images.
You use the Screen Saver tab of the Desktop & Screen Saver pane of the System Preferences application to configure a screen saver for your machine (see Figure 8.3). Figure 8.3. You can use one of Mac OS X's built-in screen saver modules, create your own screen saver, or add a screen saver that someone else created (such as by using one that has been posted to a user's .Mac account).
You have three general choices: Use one of Mac OS X's default modules, use a module from images you have created or downloaded, or use a module that someone else has created and published via his .Mac account. Using a Built-in Screen Saver ModuleUsing one of Mac OS X's built-in modules is straightforward. The general steps are the following:
NOTE If the display sleep time set on the Energy Saver pane is less than the time you set in step 6, you will never see the screen saver because the display will sleep before the screen saver is activated. If this is the case, a warning appears on the Energy Saver pane and a button enables you to jump to the Screen Saver tab. However, you don't see any warning on the Screen Saver tab. If you want to see a screen saver, check the display sleep setting on the Energy Saver pane to ensure that the display sleep time is greater than the screen saver activation time. Creating a Custom Screen Saver ModuleSome of the built-in modules are pretty cool (I especially like Cosmos), but you can have even more fun by creating or using a custom module. There are several ways to do this:
To create a screen saver from your own images, use the following steps:
You can choose to use the images within your Pictures folder by selecting it on the list of Screen Savers. Only the images located in the root folder (not within folders that are inside the Pictures folder) are used. You configure the screen saver using the same steps you use for other options. Similarly, you can choose any images with your iPhoto Photo Library as a screen saver by selecting Photo Library. You can also select a photo album you have created in iPhoto as a screen saver by selecting it on the list that appears under the Photo Library on the screen saver list.
Using .Mac Screen Saver ModulesUsing the .Mac service, people can make their screen savers available to you and you can make your screen savers available to other people.
To use a module available via .Mac, perform the following steps:
TIP If you have people who are interested in you (such as relatives), you can create a .Mac public slideshow and inform those people who are interested that it is available. As you update your slideshow, people who subscribe to and use it see the images you add to the collection.
Using Screen Savers Acquired from the Internet and Other SourcesYou can also download and use other screen savers from the Internet or other sources. Screen saver modules have the .saver filename extension. To do this, follow these steps:
Using the Universal Access Pane to Make Your Mac More AccessibleYou can use the Universal Access pane to make your Mac more accessible to those with various physical or mental challenges. You configure special access to the system by using the Universal Access pane of the System Preferences application. This pane includes the following four tabs:
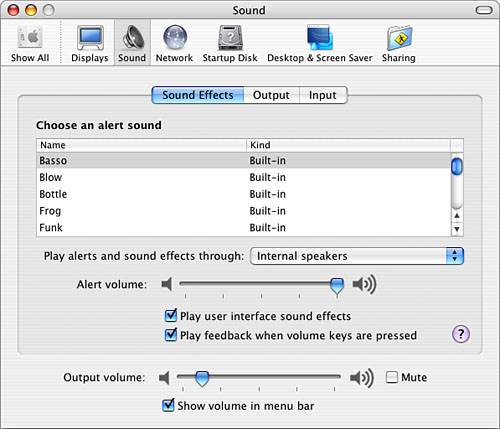
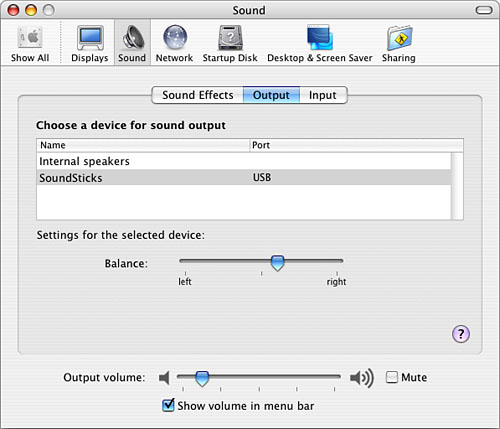
The two check boxes at the bottom of the Universal Access pane enable you to configure general aspects of the universal access functionality. If you check the "Enable access for assistive devices" check box, you can control the system with specific assisting devices. If the "Enable text-to-speech for Universal Access preferences" check box is selected, the Mac speaks various options as you move the pointer over them. TIP You can click the ? button that appears on some panes to jump to specific topics in the Help system relating to the controls you are viewing. Controlling Your System's SoundYou use the Sound pane of the System Preferences application to control the volume, sound effects, and input sources for your system (see Figure 8.4). The Sound pane has three tabs: Sound Effects, Output, and Input. You use the Sound Effects tab to configure your system alert sounds and various audio feedback. You use the Output tab to control the sound output of your Mac and use the Input tab to configure sound input devices attached to your Mac, such as USB microphones. Figure 8.4. You use the sliders, list, pop-up menu, and check boxes on the Sound pane of the System Preferences application to control various sound properties of your system.
You can control your system's volume using the "Output volume" slider at the bottom of the pane. Use the Mute check box to mute all system sound. Check the "Show volume in menu bar" check box to show the Volume menu in the menu bar. You can control your main system volume by clicking this icon and using the pop-up slider to set the volume level. TIP If you use an Apple Pro keyboard, an iBook, or a PowerBook, you can also control the volume level using the mute and volume keys located just above the numeric keypad. When you press one of these keys, a sound level indicator appears onscreen so you can visually tell what the relative volume level is. (This also appears when you use another device to control the volume, such as a keyboard with a volume wheel.) You also hear the alert sound each time you press one of the volume keys. You can disable this audio feedback by unchecking the "Play feedback when volume keys are pressed" check box. To configure your system alert sound, carry out the following steps:
TIP If you have external USB speakers, it is usually a good idea to play the alert sound through the Mac's built-in speakers, especially if you like to listen to music or watch movies with high sound volume. This prevents the alert sound from knocking you out of your chair (if this has ever happened to you, you know exactly what I mean). If you set things this way, you probably need to set the alert volume high because the Mac's built-in speaker will be overwhelmed by your external speakers. If you have analog speakers plugged in to the Mac's speaker jack, you won't be able to do this because the Mac's built-in audio controller controls the output to those speakers. You must be using USB speakers or those connected to another interface such as the digital audio port on a Power Mac G5. Mac OS X can play various sound effects when you perform specific actions or when something specific happens (such as when you send an item to the Trash). This feature is enabled by default. To disable it, uncheck the "Play user interface sound effects" check box. To configure the sound output for your system, use the following steps:
Although these sound options satisfy most Mac users, there are more sound options you can choose to implement. Installing Additional Alert SoundsUnder Mac OS X, system alert sounds are in the Audio Interchange File Format (AIFF). This is a good thing because you can use many sounds as your alert sound, and using QuickTime Pro, you can convert almost any sound into the AIFF format.
NOTE Under Mac OS X, AIFF files have the .aiff filename extension. By default, QuickTime Player Pro appends the .aif filename extension to files when you export them in the AIFF format. Be sure to add the second f to the filename extension for the sound you want to add as an alert sound. If you don't, the file will not be recognized as a valid alert sound. There are two basic ways in which you can add alert sounds. You can add them to specific user accounts or to the system so they are accessible to everyone who uses your Mac. To add an alert sound to a specific user account, perform the following steps:
NOTE If the System Preferences application is open when you install a new alert sound, you must quit and restart it to see the new sound on the list. When you install your own system alert sounds in the alert sound list, the type for the sounds you add is Custom instead of Built-in. Built-in sounds are stored in the Sound folder in the System Library folder instead of the user's Library folder. You can also add alert sounds to the system so they are available to all the user accounts on your machine. However, to do this, you must log in under the root account. CAUTION You can't modify files or directories that are within the Mac OS X system directory without being logged in under the root account. Be careful when you are logged in under the root account because you can change anything on your system, including changing vital system files in such a way that your Mac fails to work. You can also delete any files on the machine while you are logged in as root.
To add alert sounds to your system, do these steps:
NOTE The kind of alert sounds you add to the system are Built-in, just as the alert sounds that are preinstalled. Working with the Date and TimeThe Date & Time pane of the System Preferences application enables you to set and maintain your system's time and date (see Figure 8.6). You can set the time and date manually, or you can use a network timeserver to set and maintain your system's time and date for you. Figure 8.6. Mac OS X's time and date features are similar to those in previous versions of the OS.
To set your system's date and time, do the following:
NOTE
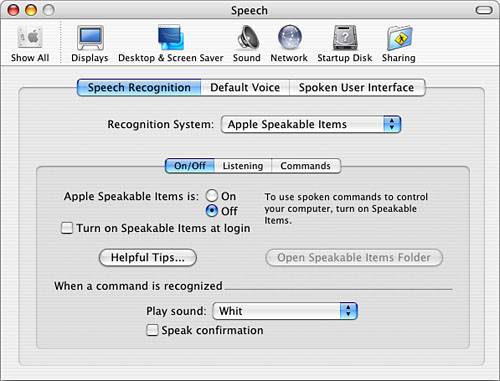
Controlling Your Mac's SpeechYou can use the Speech pane of the System Preferences application to control two aspects of how your Mac uses speech (see Figure 8.7). Speech Recognition enables you to speak commands to your Mac; Spoken User Interface controls how your Mac reads the text in windows and dialog boxes or in documents from applications that speak text. Figure 8.7. The Speech pane of the System Preferences application enables you to communicate with your Mac by speaking and listening.
To configure speech recognition on your Mac, click the Speech Recognition tab and use the controls to configure how speech recognition works. On the On/Off tab, turn on speech recognition and then use the Listening tab to configure how your Mac listens to commands. Use the Commands tab to select the commands that are available when Speakable Items is turned on. Additional information about this feature is beyond the scope of this chapter. However, you might want to explore it to see whether it is useful to you. TIP To see which commands you can speak, turn on Speech Recognition. The feedback window appears after speech recognition is on. Click the arrow at the bottom of that window and select Open Speech Commands window. In the Speech Commands window is the list of commands you can speak. When you open an application that supports speech recognition, that application appears in the Speech Commands window and the list of spoken commands it supports is shown. If you double-click the feedback window, it moves to the Dock. If you use applications that support Text-to-Speech, those applications can read text to you. To configure the voice they use, open the Default Voice tab of the Speech pane of the System Preferences application. Select the voice from the Voice list and then set the rate at which the voice speaks using the slider. You can click the Play button to hear a sample. Use the Spoken User Interface tab to configure spoken feedback from the system. You can use the Talking Alerts controls to configure specific phrases spoken to you and the voice used to speak those phrases. You can also choose to have a voice speak to you when any of the following events occurs:
|

 To learn how to configure a keyboard for different languages,
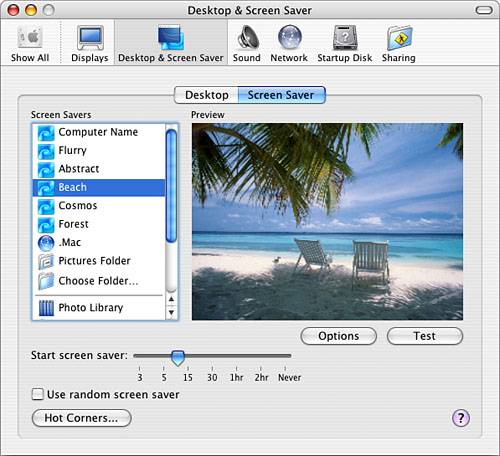

EAN: 2147483647
Pages: 273