Using Mac OS X on a Mobile Computer Using Mac OS X on a laptop Mac, such as an iBook or a PowerBook, isn't much different from using it on a desk-bound machine. The two primary tasks unique to mobile Macs are the following: Although managing locations isn't unique to mobile Macs, you are more likely to need to switch among network configurations when using a PowerBook or an iBook, so you should also understand how to use the Location Manager to make reconfiguring your Mac's network connections fast and easy. Also not unique to a mobile Mac but more likely to be used with one than with a stationary Mac is synchronizing the files on multiple machines. Using iSync, you can ensure that the files on a mobile Mac are the same as those on a stationary Mac, and vice versa. Managing Your Mobile Mac's Power The factor that makes a mobile Mac mobile is the capability to run using battery power. This is obviously an advantage, but it also adds another task for you, which is managing that power so you maximize your battery life and thus your working time while on the move. When you run Mac OS X on a mobile Mac, by default you see the power management icon (see Figure B.1). If you click this icon, the power management menu appears. At the top of this menu is an icon that keeps you informed about the power state of your Mac. When the battery is fully charged and you are running on the AC adapter, you see the plug icon. When the battery is charging, you see the lightning bolt icon and an estimate of either the time or the percent until the battery is fully charged. If you open the menu, you see the percentage until charged if you are displaying the time (or vice versa), a menu you can use to change the displayed value, and the Open Energy Saver command to open the Energy Saver pane of the System Preferences utility. Figure B.1. The power management icon and menu on the menu bar keep you informed of the power state of your mobile Mac. 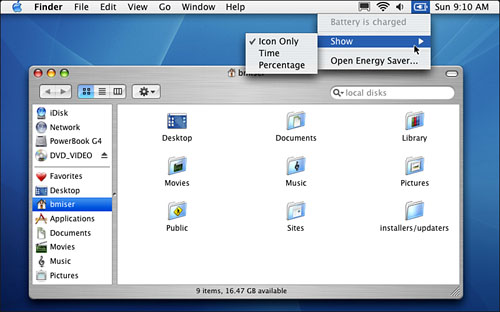
NOTE The first item on the power management menu is always the opposite of what you have selected to display. For example, when you choose to display time on the icon, the percentage is shown on the menu, and vice versa. If you don't show time or percentage in the icon, you see time on the menu.
When you are running on battery power, the icon changes to a battery. The battery icon is filled proportionally to the amount of power you have left (see Figure B.2). At the top of the power management menu, you see the time or percentage remaining until you are out of power (you can also choose to show neither). Figure B.2. This Mac is running on battery power and has 3 hours and 33 minutes of running time left at current power usage levels. 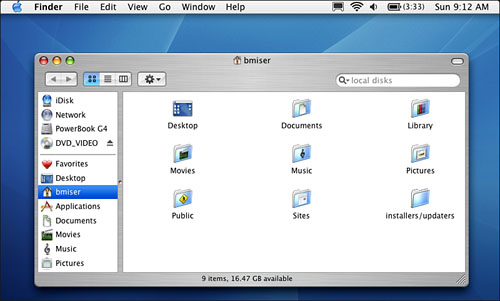
When you plug the power adapter back in to the Mac, the icon changes to a battery with a lightning bolt to indicate that the battery is charging. NOTE The battery icon takes a few seconds to update. For example, if you unplug the AC adapter and then immediately point to the icon, you still see the charging status information. While your Mac is calculating how much time you have left, you see the word Calculating next to the icon; just wait a few moments and the information shown is updated.
You can configure the power management icon on the menu bar in the following ways: Open the menu and select Show, Time to show the time remaining for the battery or for the charging process next to the icon. Open the menu and select Show, Percentage to show the percent of power/time remaining for the battery or for the charging process next to the icon. Return to the battery icon alone by selecting Show, Icon Only. Open the Energy Saver pane of the System Preferences utility by selecting Show, Open Energy Saver.
TIP To remove the power management icon and menu from the menu bar, open the Energy Saver pane of the System Preferences utility and uncheck the "Show battery status in the menu bar" check box.
You should consider the following steps to maximize your battery life: Dim your screen Your Mac's screen is a major source of power consumption. If you dim the screen, it requires less power and thus extends your battery life. To dim your screen, use the Brightness slider on the Displays pane of the System Preferences utility. Dim the display as much as you can while still being able to see it comfortably. For example, when you are traveling on a darkened airplane, you can set your display brightness to a lower level than when you are using it in a well-lit room. TIP Some PowerBooks and iBooks have dedicated function keys to control screen brightness. When you press one of these, an onscreen level indicator pops up to show you the relative brightness level. Configure the Energy Saver pane for the work you are doing while you are on the move Use the Energy Saver pane to configure your mobile Mac's power usage to maximize battery life. You'll learn how a bit later in this appendix. Avoid applications that constantly read from a CD or DVD The CD or DVD drive is another major source of power use. If you can copy files you need onto your hard drive and use them from there, you will use power at a lower rate than if your Mac is constantly accessing its removable media drive. In some cases, such as when you are watching a DVD movie, this isn't possible. At other times, you can store the files you need on the hard drive. For example, when you want to listen to music, you can add the songs to your iTunes Music Library so you don't need to use the CD or DVD drive. Put your Mac to sleep whenever you aren't actively using it You can put your Mac to sleep by selecting Apple menu, Sleep or by closing your mobile Mac's lid. Because Mac OS X manages sleep much better than previous versions of the Mac OS did, this isn't nearly as intrusive as it was. When you open your Mac or press a key, the Mac instantly wakes up as compared to 30 seconds or more of wake-up time for a Mac under previous versions of the OS.
One of the most important power management tasks is to actively use the Mac's Energy Saver pane of the System Preferences utility. This enables you to customize your Mac's energy settings to maximize battery life for the type of work you are doing.  | You can do this in two ways. One is to use the pane's standard energy setting configurations. The other is to configure the details yourself. |
To use the standard configurations, perform the following steps: Open the System Preferences utility and click Energy Saver, or click the power management icon to open the power management menu and select Open Energy Saver. You will see the Energy Saver pane. At the top of this pane is the Optimize Energy Settings pop-up menu. This enables you to configure your Mac to use power settings appropriate for specific tasks. Open the Optimize Energy Settings pop-up menu and select the settings you want to use. When you do so, a summary of those settings appears below the menu (see Figure B.3). Figure B.3. You can use the Optimize Energy Settings pop-up menu to quickly configure your Mac's energy use. 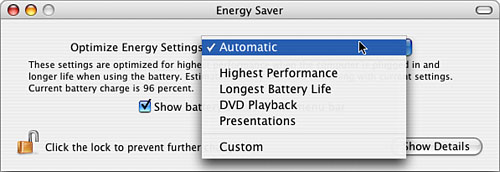
Quit or hide the System Preferences utility.
CAUTION When your battery power starts getting low (about 10% remaining), you will start to see low-power warning dialog boxes. If you continue to use your Mac to lower power levels, eventually the screen dims. When your Mac is on its last electron, it goes to sleep. The only way to revive it is to connect it to the power adapter or change to a fresh battery. This (hopefully) prevents you from losing data because the Mac shuts off unexpectedly. Even in sleep mode, your Mac uses some power, so if it enters the sleep mode because of low battery power and you don't do anything about it, eventually, your Mac turns off. And poof, there goes any data you have left unsaved.
The default energy settings are the following: Automatic These settings are optimized for performance when your Mac is plugged in and battery life when it isn't. Highest Performance These settings are optimized for performance at all times. Longest Battery Life These settings are optimized for battery life at all times. DVD Playback These settings are optimized for DVD playback. For example, sleep is set for 3 hours so you can make it through most movies without your Mac going to sleep (if you have ever had the screen go dark during a movie, you know what a benefit this is). Presentations These settings are optimized for presentations; your Mac never goes to sleep. Custom These settings are those you configure.
If you prefer a more hands-on approach, you can use the Detail mode to customize the energy-saving settings yourself. Do the following: Open the System Preferences utility and click Energy Saver, or open the power management menu and select Open Energy Saver. Click the Show Details button. The pane expands and you see controls you can use to configure the energy-saving settings in detail (see Figure B.4). By default, the Sleep tab is selected; you use the controls on this tab to configure the sleep settings for your system. Figure B.4. When you show details, you can adjust several aspects of the energy-saving settings independently. 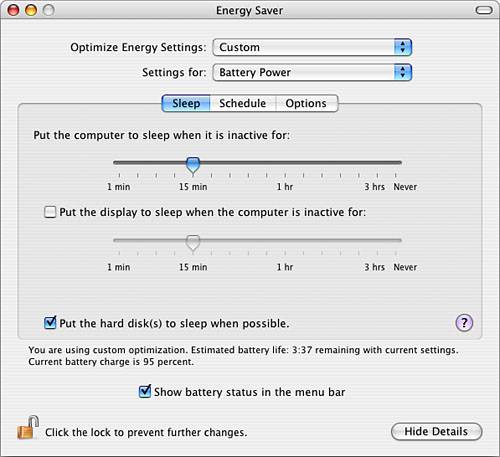
Select Custom on the Optimize Energy Settings pop-up menu. TIP If you select one of the standard settings on the Optimize Energy Settings pop-up menu with the Details shown, you can see the details of that configuration. For example, select DVD Playback and you see that the sleep timer is set for 3 hours, display sleep is off, and hard disk sleep is on. Choose the power source for which you want to configure energy savings on the Settings for pop-up menu; your choices are Power Adapter or Battery Power. You can have a separate configuration for each power mode. (The mode in which you are operating is selected by default.) Use the top slider to control the amount of inactive time before the entire system goes to sleep. Check the "Put the display to sleep when the computer is inactive for" check box and drag the slider to set the amount of inactive time before the screen goes dark. Because the screen is such a major consumer of power, you should have the display sleep after only a few minutes of inactivity when you configure your mobile Mac for operating in battery power. This also protects the flat-panel display in your mobile Mac from damage and early failure. NOTE If you set the display sleep time to be less than the time at which your screen effects (such as the screensaver) activate, you will see a warning saying so and the Screen Effects button will appear. You can click this button to change your screen effects settings. Normally, when you are running on battery power at least, you want the screen to go dark rather than using the screensaver because the screensaver consumes battery power for processing and screen display. Unless you have a very good reason not to, leave the "Put the hard disk(s) to sleep when possible" check box checked. The hard disk is another major consumer of power, and putting it to sleep saves significant amounts of energy. Review the settings summary that appears just below the controls area to ensure that the settings are what you desire. If you are running on battery power, you will see an estimate of the time remaining. Click the Schedule tab. You use this tab to set an automatic startup or shutdown/sleep time for the computer. To set an automatic startup time, check the "Start up the computer" check box and choose the day (using the pop-up menu) and time (by typing a time or using the Up and Down arrow buttons) at which the machine should start. For example, you can set your Mac to start at a specific time everyday, on weekdays or weekends, or on a specific day only. To set an automatic shutdown or sleep time, check the lower check box on the pane and select Shut Down or Sleep on the pop-up menu. Then select the day and time you want this action to happen on the Day pop-up menu and using the time box and arrow buttons. Click the Options tab. Use the check boxes on this tab to further configure Energy Saver. Using the two Wake check boxes, you can set wake options so that your Mac will wake up when it detects a call on its modem or when the network needs to access your machine. Use the "Restart automatically after a power failure" check box if you want your Mac to restart after the power fails. Because your iBook or PowerBook has a battery, this option isn't as meaningful as it is for a desktop Mac. Set the processor performance setting on the Processor Performance pop-up menu. Your choices are Highest and Reduced. Highest provides maximum performance and requires more power; Reduced lowers performance but also lowers power requirements. If you are configuring for battery operation, select Reduced and use your Mac for a while. If you don't notice performance problems, leave the setting as is. If you notice slow operation, increase the processor performance setting again. Select the other power mode on the Settings for pop-up menu, and configure the Sleep and Options tabs for that mode. (The Schedule settings are the same for both modes.) If you don't want it to appear, turn off the battery icon on the menu bar by unchecking the "Show battery status in menu bar" check box. You should usually leave this displayed because it provides important information when you are running on battery power. Quit the System Preferences utility. Your energy settings will take effect.
Energy Saver settings are global, meaning they are the same for all user accounts on your Mac. TIP If you operate your mobile Mac on battery power frequently, consider getting a second battery. This effectively doubles your working time because you can swap out batteries without shutting down your Mac. Just put it to sleep and change the battery. As long as you are fairly quick about it, you can change the battery and go back to where you were.
Using and Configuring the Trackpad Configuring and using the trackpad is straightforward. You use the Keyboard & Mouse pane of the System Preferences utility to control how your trackpad works. When you are using a mobile Mac, the Trackpad tab becomes available. Follow these steps: Open the Keyboard & Mouse pane of the System Preferences utility and click the Trackpad tab (see Figure B.5). Figure B.5. When you are running Mac OS X on a mobile Mac, you can set the trackpad options using the Trackpad tab on the Keyboard & Mouse pane. 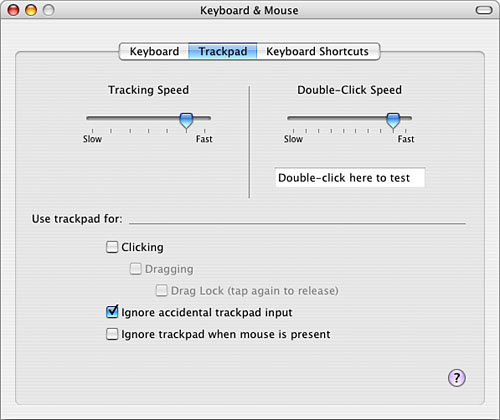
Use the Tracking Speed slider to set the speed at which the pointer moves relative to your finger speed on the pad. Use the Double-Click Speed slider to control how fast you have to click the trackpad button or the trackpad itself to register a double-click. If you want to be able to "click" the trackpad button by tapping on the trackpad, check the Clicking check box. Use the Dragging and Drag Lock check boxes to control how you can drag items with the trackpad. If you turn on the clicking option and then check the Dragging check box, you can drag an item by touching your finger to the trackpad and dragging your finger across it. If you check the Drag Lock check box, the item continues to be locked to the cursor until you release it by tapping the trackpad again. To disable the trackpad while you are typing, check the "Ignore accidental trackpad input" check box. This option prevents unwanted interference from the unintentional taps on the trackpad while you are typing or just moving your hand across the pad. When you stop typing, the trackpad becomes active again. If you want the trackpad to be disabled when you connect an external mouse to your mobile Mac, check the "Ignore trackpad when mouse is present" check box. Quit the System Preferences utility.
Configuring and Using Locations As you move your mobile Mac around, you will probably want to connect to different networks from different locations. For example, you might use an AirPort network to connect to the Internet at home, an Ethernet network to connect when you are at work, and a dial-up connection when you are on the road. The Mac OS X Location Manager feature enables you to configure multiple network configurations on your Mac. You can then switch among these configurations easily (rather than having to manually reconfigure your Mac each time you change locations). NOTE You can have more than one active port on the same machine, meaning you can have different means of connecting to a network active at the same time (such as AirPort and Ethernet). You don't need to have a location for each active port. You should use locations when you want to have different sets of active ports that you want to be able to switch among easily.
To configure a new network location, use the following steps: Open the Network pane of the System Preferences utility (see Figure B.6). Figure B.6. If you regularly change networks, configure a location for each network you use so you can easily switch between them. 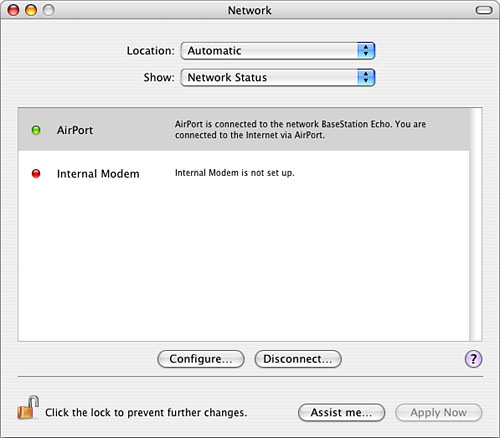
From the Location pop-up menu, select New Location. Name the location and click OK. You return to the Network pane and the location you created appears in the Location pop-up menu. On the Show pop-up menu, select Network Port Configurations. Check the check box for each connection method you want to be active for the location you are configuring. Uncheck the check box for those connetion methods that you won't be using under this location. Arrange the order of the connection methods in the list to be the order in which you want your Mac to try to connect to the network. Put the first method you want to be tried at the top of the list, the second one in the second spot, and so on. For example, if you want to use Built-in Ethernet first and then AirPort, drag Built-in Ethernet to the top of the list and place AirPort underneath it. When your Mac connects to the network, it will try these connections in the order in which they are listed. Use the Show pop-up menu to choose the first connection method you want to configure for this location for example, Internal Modem to configure a dial-up connection. Use the tabs in the Network pane to configure that connection method.  For help configuring an Internet connection, p. 263. For help configuring an Internet connection, p. 263.
For help configuring an AirPort connection, p. 297.
For help configuring a network connection, p. 821.
Repeat steps 7 and 8 for each connection method you made active in steps 4 6. Quit the System Preferences utility. The network configuration you configured will be used.
The default location for your Mac is called Automatic. If you don't use any other locations, this might be okay, but you might want to rename it to be more meaningful. You can also remove locations from the machine by editing the location. Follow these steps: Open the Network pane of the System Preferences utility. TIP You can quickly jump to the Network pane by selecting Apple menu, Location, Network Preferences. Select Edit Locations from the Location pop-up menu. Select the location you want to change. Rename the location by clicking the Rename button, entering the new name, and pressing Return. Delete a location you no longer use by selecting it and clicking Delete. To duplicate a location, select it and click Duplicate; you can then rename it and modify it as needed. Click Done. Make any other changes to the location selected in the Location pop-up menu and click Apply Now. Close the System Preferences utility.
Changing your network settings is as easy as selecting Apple menu, Location, and then the location you want to use (see Figure B.7). Your changes take effect immediately you don't need to restart your Mac or even log out. Figure B.7. The locations you configure will be available to all the users of your Mac. 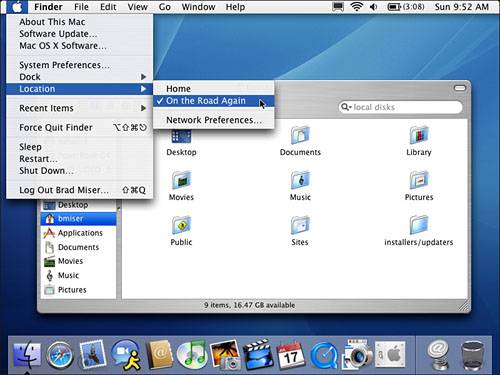
Changing locations does not necessarily immediately disable configuration settings for other locations. For example, if you have a dial-up configuration for one location and an AirPort configuration for another location, switching from the location with the AirPort configuration to the location with the dial-up configuration does not disrupt your AirPort connection unless the dial-up location also has a different AirPort configuration. In other words, settings under one location do not affect all the configuration settings for other locations. Only when you configure a specific network connection differently under one location does it affect that connection under the other location. However, if you log out or restart your Mac, you lose access to the services you were using under a previous location. TIP To protect your mobile Mac's data in the event someone swipes it, use Mac OS X's FileVault feature to encrypt your data so any rat who takes your mobile Mac won't be able to use its data.
To learn how to use FileVault, p. 897.
Keeping Your Mobile Mac in Sync Most mobile Mac users also have a desktop Mac with which they share files. Keeping the files on each machine in sync can be a challenge. Fortunately, the iSync application is designed to help you do just that. Although iSync works for any two or more Macs, it is especially useful to keep a mobile Mac and a desktop cousin in total harmony. To learn how to use iSync, p. 689.
|