Securing Your Mac An important preventive maintenance task is to protect your Mac from other people who use it or from those who access its files from a network. You can also use the security pane of the System Preferences application, the secure delete trash function, and keychains to help you protect your Mac's security. Securing Your Mac with User Accounts You should create user accounts for everyone who uses your Mac. In addition to the features user accounts provide, such as a Web site and well-organized file storage, user accounts prevent unauthorized users from changing the system configuration of your machine.  To learn how to create and configure user accounts, p. 24. To learn how to create and configure user accounts, p. 24.
Securing Your Mac with Privileges For those who access your Mac over a network and for those who share your machine, you can control the access to specific items by setting privileges for those items. You can control access in several levels of privilege from not being able to even see the item to being able to read and write to it. To learn how to configure privileges, p. 821.
Securing Your Mac with the Security Pane  | The new Security pane of the System Preferences application enables you to protect your Mac in a couple of ways. One is by using the FileVault feature that encrypts all the files in your Home folder; these files can't be used unless you input your login password or the master password for your Mac. The other way is by configuring various security settings for your Mac. |
Securing Your Mac with FileVault | Mac OS X's FileVault feature encrypts all the files in your Home folder with 128-bit encryption. Such files can't be opened unless one of two passwords is entered. One password is the one you use to log in to your account. The other is a master password you set for your Mac; with this password, you can decrypt any encrypted files on your Mac, regardless of the user account with which those files are associated. |
Once configured, FileVault works in the background and you won't notice it doing its job. CAUTION According to Apple, FileVault can interfere with backups because it makes your Home folder appear as a single file to the backup system. This can make the individual files impossible to restore. When using FileVault, be sure you test your backup system to ensure that you can still recover files if you need to.
The following steps demonstrate how to configure FileVault: Open the System Preferences application and click the Security icon. The Security pane appears (see Figure 28.6). Figure 28.6. Use the FileVault feature if you want to encrypt the files in your Home folder so they can't be used without a valid password. 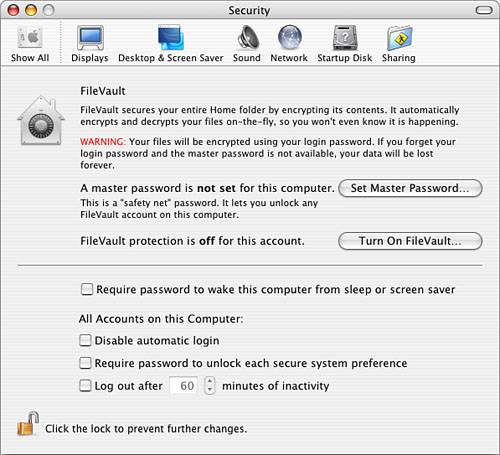
Click the Set Master Password button. The master password sheet appears. Generally, you should use this feature if there is some chance that any user of your Mac will forget his password; the master password enables you to decrypt encrypted files. However, you don't have to set a master password if you prefer not to. If not, skip the next three steps. Enter the master password in the Master Password field and enter it again in the Verify field. Enter a hint for the master password in the Hint field. Click OK to return to the Security pane. Click the Turn On FileVault button. The service starts up and you are prompted to enter your password. Enter your user account's login password and click OK. You will see a warning sheet that explains what you are doing and that activating this service can take a while (you can't log out of your account until the service has been turned on). Click the Turn On FileVault button. The FileVault window appears; you can't do anything else on your Mac until FileVault has started up. This window shows you the progress of the encryption process. If you have a lot of data in your Home folder, this process can take quite some time. When the process is complete, you see the Login window. NOTE If you want this feature to be active for multiple user accounts, you must log in under each account and turn on FileVault. Log back in to your account. You shouldn't notice any difference, but all your Home folder files will be encrypted and won't be accessible unless a valid encryption password has been entered.
CAUTION FileVault applies only to each user account in which it is activated. And it works only on the files in each user's Home folder. Files stored outside the Home folders for which it is activated are not protected.
When you log in to your account, the files in your Home folder are decrypted automatically so you won't need to do anything else to access them. The value of FileVault is for those times when you aren't logged in to your account and someone else has access to your machine. For example, suppose someone steals your PowerBook. Although she can't access your user account without your login password, she could connect the machine to a FireWire drive with Mac OS X installed and start up from that volume. Because the files on your PowerBook's startup volume are not protected anymore (the OS on the FireWire drive is active), they are accessible. If FileVault is not on, these files are not encrypted and can be used, but if FileVault is on, these files are encrypted and are useless. You can turn off FileVault again by clicking the Turn Off FileVault button and entering your login password. If another user on your Mac turns on FileVault and subsequently forgets her password, you can use your Mac's master password (assuming you set one) to decrypt the files in that user's Home folder. You can provide the master password to the other user so they can decrypt their files. Then, change the master password to make sure only the "right" people have it. Securing Your Mac with Security Settings Several other security settings are available on the Security pane (refer to Figure 28.6). These features are described in the following list: Require password to wake this computer from sleep or screen saver If you enable this feature, a user account's login password is required to stop the screensaver or wake up the Mac from sleep. Disable automatic login Check this box and the automatic login feature is turned off. This means that someone will have to log in into your Mac manually to be able to use it. Require password to unlock each secure system preference When you check this box, a login password must be entered to make any changes that affect system security. Log out after _ minutes of activity This feature logs out the current user account after the specified amount of inactivity has occurred. To use it, check the box and set the amount of time using the box. When the amount of inactive time passes, the current user is logged out automatically.
Securing Your Mac by Removing Trash Securely | Normally, when you delete files they are deleted from the system, but the data for those files might or might not be overwritten by other data. If not, files can sometimes be recovered by software restoration tools. If you want the files you delete to be overwritten with garbage so they can't be recovered, use the Secure Empty Trash command on the Finder's File menu instead of the normal Empty Trash command. This causes the files you delete to be overwritten so they can't be recovered. |
Securing Your Mac with Keychains For security and other reasons (such as making online shopping more convenient), you need usernames and passwords to access network resources, whether those resources are on a local network or the Internet. After using even a few of these, you will have a large collection of usernames and passwords. Remembering these can be a challenge. Fortunately, your Mac lets you store all your usernames and passwords in a keychain. You can then apply your keychain to whatever resource you want, to use and the appropriate information is provided so you can access what you need. All you need to remember is the password that unlocks your keychain. By default, this is the same as your login password so that your keychain is used automatically. After you have added a password to your keychain, you can access the related resources without entering your keychain's password (because it is entered when you log in). NOTE | The keychain functionality has been greatly improved for Mac OS X version 10.3, especially for Web resources you access via Safari. Although keychains worked unreliably under previous versions using Internet Explorer, they work very well under Safari. When you access a secured Web site, Safari prompts to see whether you want to add that site's username and password to your keychain. If you choose to do so, you don't have to enter this information again. When you return to the Web site, your username and password are entered automatically. This might very well be the most convenient feature of Mac OS X, version 10.3. |
For more information about Safari and keychains, p. 388.
You can configure other keychains so that you can gain automatic access to secured resources during each working session. To secure those resources again, you can lock your keychain, which means the password must be entered for that keychain to be applied. Before you can use a keychain, one has to be created. A keychain is created automatically for each user account you create. However, you can create additional keychains for specific purposes if you need to. To use a keychain, it must be unlocked. To unlock a keychain, you enter its password when you are prompted to do so. When you log in to your user account, the default keychain for that account is unlocked automatically. NOTE You can store information that you want to secure using notes. For example, if you want to store your credit card information so it can't be accessed unless you are logged in to your user account, you can add it to your keychain. When you need that information, you can open the secured note in your keychain.
Many types of resources can be added to your keychain to enable you to access them, including the following: AirPort network password When you add an Airport network password to your keychain, you can join the network by selecting it via the AirPort controls. The network's password is added automatically. Application password Some applications require passwords to perform specific tasks. One notable example is the iTunes Music Store function. When you have your Music Store password added to your keychain, you can purchase songs with a single click of the mouse button (which can be a dangerous thing!). AppleShare password Any passwords you use to access network volumes can also be added to your keychain. Internet password When you need to enter passwords for Internet services, such as email accounts, adding them to your keychain makes accessing those services much more convenient because you never have to enter the password manually. .Mac password When you enter your .Mac password in the .Mac pane of the System Preferences application, it is added to your keychain so you can work with your iDisk from the desktop without having to log in to your .Mac account. Secure note These enable you to store information securely. Web form password When you access your account on secure Web sites, you can add your usernames and passwords to your keychain. When you visit those sites again (via Safari), you can log in just by clicking the Login button because your username and password are entered automatically.
Viewing and Configuring Your Keychains and Keychain Items You access your keychains through the Keychain Access application by doing the following: Open the Keychain Access application (Applications/Utilities folder). When the application opens, two panes appear (see Figure 28.7). In the right pane (the drawer) is a list of all the keychains that are installed. By default, you will see two of them. The login keychain is the default keychain for your user account. The System keychain is available to administrators and the root account (by default, it is empty). The contents of the selected keychain are shown in the upper-left pane of the application's window. In Figure 28.7, you can see the contents of my login keychain. Figure 28.7. This keychain can access the items listed in the upper pane of the window including email accounts and AppleShare volumes. 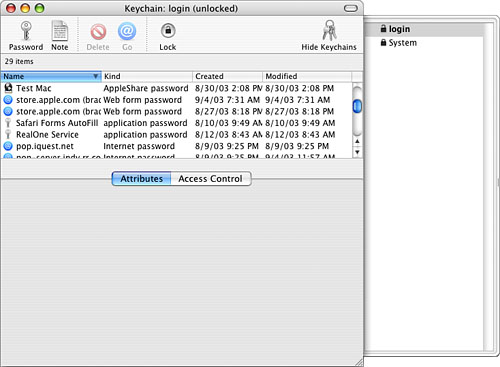
Select a keychain in the drawer and then a keychain item about which you want information and click the Attributes tab (see Figure 28.8). You will see information related to that keychain item, such as its name, its kind, the account to which it relates, address information, and comments you have entered about it, if any. Figure 28.8. You can use the Attributes tab to see information about an item installed in your keychain. 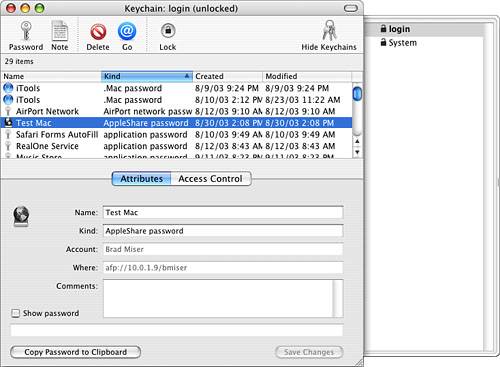
To see the item's password, check the Show Password check box. You are then prompted to confirm the keychain's password (you'll learn more about this in the next section). Confirm the password by entering it at the prompt and choosing to allow access to the item (the options you see are explained in the next section). When you return to the Attributes tab, you will see the item's password. TIP You can copy the password to the Clipboard by clicking the Copy Password to Clipboard button. This lets you easily paste the password where you need to use it. Click the Access Control tab. You will see a list of the applications that have access to the keychain item. Use the access controls in the window to control which applications can access this item. In Figure 28.9, you can see that the Finder has access to the selected keychain item. Figure 28.9. You can determine which applications can access a keychain item by using the Access Control tab. 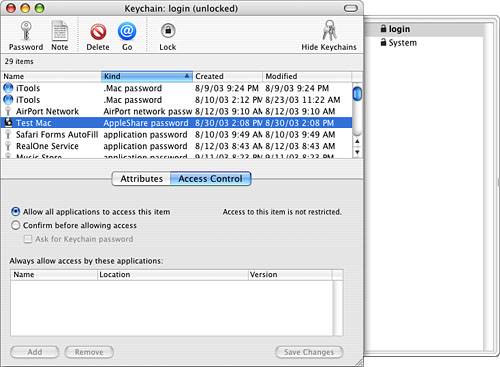
To allow access to the item without warning, check the "Allow all applications to access this item" radio button. You will see a warning that access to the item is not restricted. To allow access but require confirmation, click the "Confirm before allowing access" radio button, and check the "Ask for Keychain password" check box if you want to be prompted for your keychain's password before access is allowed. To enable an application to access the keychain item, click the Add button and select the application to which you want to provide access. Then use the preceding two steps to configure the access the application has to that item. To remove an application's access to the item, select the application and click Remove. Click Save Changes to save the changes to the keychain and its items.
Adding Items to a Keychain You can add items to a keychain in several ways, including the following: When you access a resource that can provide access to a keychain, such as a file server, look for the "Add to Keychain" check box. When you check this, an item for that resource is added to your keychain. This is the most common and easiest way to add items to a keychain. NOTE Sometimes you have to click the Options button to be able to add an item to your keychain. For example, when you mount a network volume, click Options to reveal the Add Password to Keychain check box.
Drag a network server onto the Keychain Access window. Drag the Internet Resource Locator file for a Web page onto the Keychain Access window. Manually create an item.
CAUTION Not all applications support keychain access. If a particular application or resource doesn't support keychains, you won't be able to access that resource automatically. However, you can still use Keychain Access to store such an item's username and password for you, thus enabling you to recall that information easily. This also stores it more securely than writing it down on a piece of paper.
To manually add a password item to your keychain, perform the following steps: Open Keychain Access (Applications/Utilities). In the drawer, select the keychain to which you want to add the item (your default keychain is selected automatically). TIP You can show or hide the drawer by clicking the Show Keychains or Hide Keychains button on the toolbar, respectively. Select File, New Password Item; click the Password button on the toolbar; or press  -N to see the New Password Item dialog box. -N to see the New Password Item dialog box. Enter the name of the item in the Name box. If you are adding an Internet resource, such as a Web page, enter its URL. Enter the account name or username for the item in the Account box. Enter the password for the item in the Password box. TIP If you want to see the password as you type it, check the Show Typing check box. This helps you confirm you are entering the correct password. Otherwise, you see only bullets as you type. Click Add to return to the keychain's window and see the new item you added. You will be able to access that item using your keychain. You can view and configure the new item using the steps in the previous section.
TIP You can set the default keychain for your user account by opening the keychain you want to make the default one and selecting File, Make Keychain keychainname Default, where keychainname is the name of the keychain you have selected.
To add a secure note to a keychain, use the following steps: Open Keychain Access. In the drawer, select the keychain to which you want to add the note (your default keychain is selected automatically). Select File, New Secure Note Item or click the Note button on the toolbar to see the New Secure Note Item dialog box. Enter the name of the note in the Name box. Enter the information you want to store in the Note box. This a freeform text field so you can enter anything you want. Click Add to return to the keychain's window and see the new note you added. To view the note, select it, click the Attributes tab, and click the "Show note" check box. You will see the note in the window.
TIP Click the Copy Note to Clipboard button to copy the note to the Clipboard so you can paste it elsewhere.
Adding a Keychain You might want to add a keychain to your current account, which you can do using the following steps: NOTE You might want to move a keychain between user accounts so you don't have to re-create the items it contains.
Open Keychain Access (Applications/Utilities). To add a keychain, select File, New Keychain or press Option--N. You will see the New Keychain dialog box. Move to the location in which you want to save the keychain, name it, and click Create. (By default, keychains are stored in the Keychains folder in the Library folder in your Home folder. In most cases, you should store new keychains in this folder.) You are prompted to create the password for the keychain. TIP An exception to where you keep your keychains might be when you want to enable others to import your new keychain into their accounts, in which case you should store it in a location accessible to others, such as your Public folder. For example, you might want to create a keychain with Web site items on it. You could provide this to other users who would then be able to access the items contained in the keychains you install. Enter the password for the keychain in the Password and Verify fields; then click OK. The new keychain is added to the list of available keychains, and you can work with it just like those already on this list.
Using Keychains When you have a keychain configured for an account and it is unlocked, you can access the items it contains without entering your username or password. For example, when you open a server, it opens for you immediately. NOTE By the way, this is how Mac OS X can access your .Mac account without you having to log in each time. When you create a .Mac account, it is added to the keychain for the Mac OS X user account related to it. Mac OS X can use this keychain to access the .Mac account without requiring that you log in manually.
To prevent a keychain from being accessed, lock it. Do so by opening the Keychain Access application, selecting the keychain, and selecting File, Lock Keychain keychainname, where keychainname is the name of the keychain. You can also do so by pressing -L or clicking the Lock button on the toolbar. To unlock a keychain again, select it, click the Unlock button on the toolbar, and enter the password for that keychain. When an application must access a keychain item and is not configured to always allow access, the Confirm Access to Keychain dialog box opens and prompts you to enter a keychain's password and choose one of these three access options: Deny If you click this, access to the item is prevented. Allow Once A single access to the item is allowed. The next time you attempt to access it, you see the prompt again. Always Allow Access to the item is always allowed.
NOTE The first time you access keychain items after the OS has been updated, such as through the Software Update application, you see the Confirm Access to Keychain prompt, even for those items for which you have selected the "always allow access" option (such as the first time you check your email after upgrading the OS). This is normal behavior. Just select the Always Allow option to reenable that behavior.
Going Further with Keychains Keychain Access is actually a fairly complex application that can do more than just what I have room to show you in this section. Following are some pointers in case you are interested in exploring on your own: Your keychains are stored in the Library/Keychains folder in your Home directory. You can add a keychain from one account to another account by exporting the keychain file (use the File, Export command) to a location that can be accessed by the second account. (For example, you can copy your keychain into the Public folder of your Home directory to enable other users to add that keychain to their own accounts.) To add a keychain to a user account, open Keychain Access under that account and use the File, Import command. This is useful if you want to use the same keychain from several accounts. Delete a keychain either by selecting it and selecting File, Delete Keychain keychainname, where keychainname is the name of the keychain or by clicking the Delete button on the toolbar. If you select Edit, Change Settings for Keychain keychainname, where keychainname is the name of the keychain, you can set a keychain to lock after a specified period of time or lock when the Mac is asleep. If you select Edit, Change Password for Keychain keychainname, where keychainname is the name of the keychain, you can change a keychain's password. Select View, Show Status in Menu Bar to add a Keychain Access menu to the Finder toolbar. From this menu, you can lock or unlock keychains and access security preferences and the Keychain Access application. If you select Window, Keychain List or press Option--L, you see the Configure Keychain dialog box. You can use this to configure keychains for a user account or the system. If you select Window, Keychain First Aid or press Option--A, you see the Keychain First Aid dialog box. You can use this to verify keychains or repair a damaged keychain. You can access a keychain item for an Internet or network location by selecting the keychain item and clicking the Go button in the Keychain Access toolbar. In the keychain access prompt, you can click the Show Details button to expose the details of the keychain access being requested.
|