Finding, Installing, and Using Printers If you want to get your work out on paper, you can use many types of printers to get the job done. Under Mac OS X, you install and manage printers using the Printer Setup Utility application. And Mac OS X includes support for a large number of printers by default. Four basic categories of printers are available, based on the technology the printer uses to imprint the paper: Inkjet Inkjet printers spray small dots of ink on the paper to form images and text. Inkjet printers produce excellent quality text and good-to-excellent quality graphics. For personal printers or those shared by only a few people, inkjets are hard to beat. A good quality inkjet printer costs less than $150, so they are also an excellent value. Support for many Hewlett-Packard, Epson, and Canon inkjet printers is built in to Mac OS X. Laser Laser printers produce superb quality for both text and graphics. They are also very fast and are the best choice for network printing. Lower-end laser printers are affordable enough to also be a good choice for a personal printer. Unfortunately, all reasonably priced (for home or home office use) laser printers are black-and-white only. Color laser Color laser printers produce excellent text and graphics and also have color capability. Unfortunately, color laser printers are very expensive and are unlikely to be an option for you unless high-quality color printing and network support are required and you have a business that can justify their expense. Other printers Beyond color laser printers are dye-sublimation and other higher-quality printers that are used in graphic design and other high-end businesses.
NOTE A factor to consider when selecting a printer is that inkjets use a lot of ink and cartridges are expensive. If you do much black-and-white printing, a laser printer can be a less expensive option in the long run when you consider the cost of the consumable supplies (ink versus toner).
There are two ways you can connect a printer to your Mac: directly or through a network. To connect a printer directly to your Mac, you simply attach the printer cable to the appropriate port on your Mac (USB or Ethernet for newer Macs; serial or Ethernet for older Macs). How you connect a printer to your network depends on the type of network you are using. If you are using an Ethernet network, you can attach a cable from the nearest hub or print server to your printer. You can also choose to share either type of printer over a wired or wireless network. Mac OS X supports several printer communication protocols, including AppleTalk, IP Printing, Open Directory, Rendezvous, direct connection through USB, and Windows Printing. Mac OS X also enables you to share printers over a wired or wireless network. Choosing a Printer Covering the mind-boggling variety of printers available is beyond the scope of this book. However, we can identify some printer classes you might want to consider, including Inkjet A good-quality inkjet printer will serve almost everyone. Even the inexpensive models can do a great job with text and graphics, including printing photos and other high-resolution images. If your page quantity needs are fairly modest, an inkjet printer is a good choice, especially if you need color output. Laser If you have higher quantity demands or your printer needs to support several users, a laser printer might be a better choice. Laser printers are faster and less expensive per page than are inkjets. Many laser printers are networkable so supporting your local network with a single printer is easy. Other options If you have the need for a color laser printer or dye-sub printer, you are probably in a company that has an IT staff that handles obtaining and installing these devices. As long as the printer uses standard network printer drivers, Mac OS X machines will be capable of printing to them just fine.
Mac OS X includes support for Rendezvous; this technology enables your Mac to actively seek devices to which it is networked. In the case of Rendezvous printers, your Mac can discover the printers it can access and automatically configure itself to use those printers. No configuration on your part is required. However, printers have to be Rendezvous capable for this to work. Even though Rendezvous has been supported since Mac OS X version 10.2, few printers support this technology. Installing Printers There are many types of printers you can install, configure, and use with Mac OS X. In this section, you will learn how to work with the most common types of printers. Installing a Local USB Printer As long as it offers Mac OS X compatible drivers, you can install and use just about any USB printer. Using such devices is relatively straightforward: Connect the printer to the power supply and to your Mac's USB port. Install the printer driver software, if necessary. If the printer you are using is an inkjet from HP, Lexmark, Canon, or Epson, the drivers are probably already built in to Mac OS X. TIP To see which specific printer models are supported natively by Mac OS X, open Mac OS X/Library/Printers, where Mac OS X is the name of your Mac OS X startup volume. You will see folders for each brand of printer you elected to install when you install Mac OS X. Open the folder for the printer brand in which you are interested. The supported models have a .plugin file. Configure the printer in the Mac OS X Printer Setup Utility.
Support for many inkjet printers is built in to Mac OS X. For example, you can use the following steps to install, configure, and use an Epson 740i inkjet. Other models of inkjet printers work similarly: Connect power to the printer. Connect the printer's USB cable to a USB port on your Mac. NOTE If support for the specific model of printer you are using is not built in to Mac OS X, you need to install its specific software prior to configuring the printer on your Mac. If the printer has Mac OS X compatible software, install it support for several printers is built in to the operating system. Open the Printer Setup Utility (Applications/Utilities). In the Printer List window's toolbar, click Add. The Printer List sheet appears. At the top of this sheet is a pop-up menu on which you select the type of printer connection for the printer you are configuring. By default, Rendezvous is selected. Select the type of printer configuration you want to add from the pop-up menu (see Figure 23.9). The choices on the pop-up menu are AppleTalk, IP Printing, Open Directory, Rendezvous, USB, and Windows Printing. At the bottom of the pop-up menu, you will also see various options that relate to any printers that were installed when you installed Mac OS X. Figure 23.9. When you open the pop-up menu at the top of the Printer List sheet, you see all the printer connection methods your Mac supports. 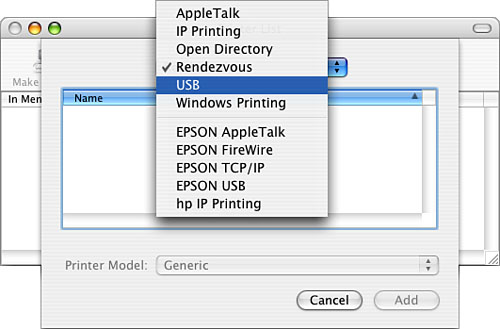
When you make a selection on the pop-up menu, two things happen. First, you return to the Printer List sheet that is reconfigured to reflect the selection you made. Second, the connection method you select, such as USB, is scanned for available printers. For example, if you select USB, the USB buses are scanned and the available USB printers are listed in the window. A list of possible printers for the configuration you selected is shown. Select the printer you want to add from the list of available printers. On the Printer Model pop-up menu, select the specific printer model you are configuring, if it isn't selected by default. TIP If a specific model isn't selected, you see the Auto Select option. This enables Mac OS X to automatically select the model it thinks is the best match. Click Add to return to the Printer List; the printer you added is listed in the window (see Figure 23.10). Figure 23.10. An Epson Stylus Color 740 has been installed on this Mac. 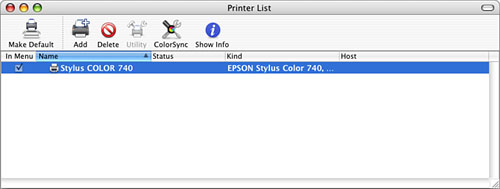
To make the printer you added the default, select it and click the Make Default button. Select the printer and click the Show Info button. The Printer Info window appears. At the top of the window is a pop-up menu that enables you to choose the aspect of the printer about which you want to see information. The options are Name & Location, Printer Model, and Installable Options (see Figure 23.11). Figure 23.11. You can use the Printer Info window to see information about a printer and configure specific properties, such as its name. 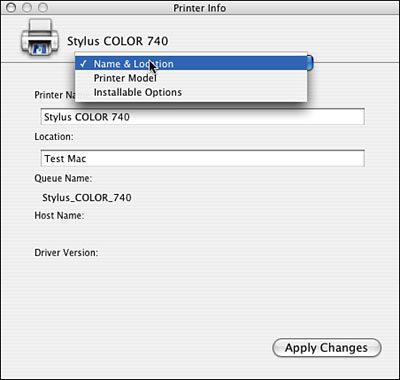
Select Name & Location on the pop-up menu. If you want to name the printer something other than its default name, enter the name in the Printer Name field. In the Location field, enter location information for the printer by default, this is the name of the Mac to which it is connected. You might want to provide a more descriptive location if you will be sharing the printer with people via a network. Select Printer Model on the pop-up menu. At the top of the window is the same list of printer models you used earlier to select the printer. You can choose a different model if you want to try one of the other options. Select Installable Options on the pop-up menu. You can see any additional options that are available for the printer you are configuring. Select the options you want to install. Click Apply Changes, and the information and options you entered are applied to the printer. Close the Printer Info window. Quit the Printer Setup Utility.
TIP If you hold down the  key and click the Hide/Show Toolbar button in the Printer List window, you cycle through toolbar configurations, including various icon sizes and a text-only toolbar. key and click the Hide/Show Toolbar button in the Printer List window, you cycle through toolbar configurations, including various icon sizes and a text-only toolbar.
Installing a Network Printer Using a network printer is a good way to share a printer among multiple users; with the rise of home networks, installing a networked printer in a home or home office is also a practical option. Installing a network printer is similar to installing a local printer. The specific steps you use depend on the network you are using and the particular printer model. Support for most laser printers is built in to Mac OS X. In the following example, an HP LaserJet 2200DN is installed on a small Ethernet network. The steps to install other printers on different types of networks are similar: Connect power to the printer. Connect the printer to an Ethernet hub. If the printer has Mac OS X compatible software, install it support for most laser printers is built in to the operating system. Open the Printer Setup Utility(Applications/Utilities). In the Printer List window's toolbar, click Add. The Printer List sheet appears. Select the type of printer you want to add from the pop-up menu at the top of the Printer List sheet. The choices on the pop-up menu are AppleTalk, IP Printing, Open Directory, Rendezvous, USB, and Windows Printing. At the bottom of the pop-up menu the various options that relate to any printers installed when you installed Mac OS X are listed. For most small Ethernet networks and printers, AppleTalk will work; select AppleTalk on the pop-up menu. On the lower pop-up menu, select the AppleTalk zone you want to access. In many cases, the Local AppleTalk Zone option is what you want to choose. If the printer is installed on a different AppleTalk zone, you must select that zone instead. The network is scanned and the available printers are listed in the Printer List sheet (see Figure 23.12). Figure 23.12. This AppleTalk network includes one LaserJet printer. 
Select the printer (and driver on the Printer Model pop-up menu, if necessary) that you want to add, and click Add. You return to the Printer List, the connection to the printer is opened and configured, and the printer you added is listed in the window (see Figure 23.13). Figure 23.13. Two printers are now available in the Printer Setup Utility; the PET printer is a laser printer installed on the network. 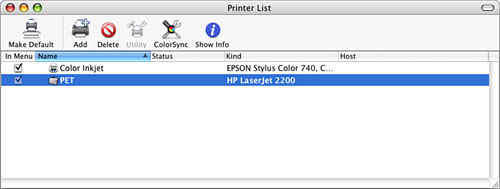
NOTE If the exact printer model has a driver in Mac OS X, the Printer Model pop-up menu is inactive (because the driver for the specific model was found). If the specific model of printer you have selected does not have a corresponding driver installed, the Printer Model pop-up menu becomes active. Select the brand of printer you are installing and then choose the specific driver you want installed on this menu. If you leave the option Auto Select selected, Mac OS X chooses the driver it thinks is the best match. Select the printer and click the Show Info button. The Printer Info window appears. At the top of the window is a pop-up menu that enables you to choose the aspect of the printer about which you want to see information. The options are Name & Location, Printer Model, and Installable Options. Select Name & Location on the pop-up menu. If you want to name the printer something other than its default name, enter the name in the Printer Name field. In the Location field, enter location information for the printer; by default, this is the name of the Mac to which it is connected. You might want to provide a more descriptive location if you will be sharing the printer with people via a network. Select Printer Model on the pop-up menu. At the top of the window is the same list of printer models you used earlier to select the printer. You can select a different model if you want to try one of the other options. Select Installable Options on the pop-up menu to see any additional options available for the printer you are configuring (see Figure 23.14). Select the options you want to install. Figure 23.14. This LaserJet printer has several installable options. 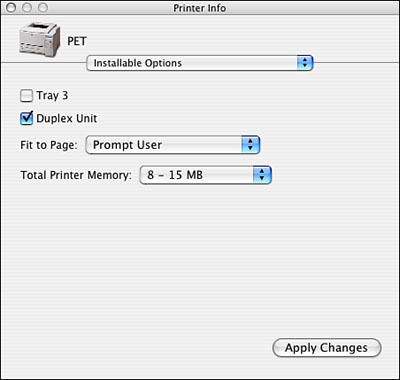
Click Apply Changes. The information and options you entered are applied to the printer. Close the Printer Info window. The list of available printers as you installed and configured them appears (see Figure 23.15). Figure 23.15. This Mac now has two printing options. 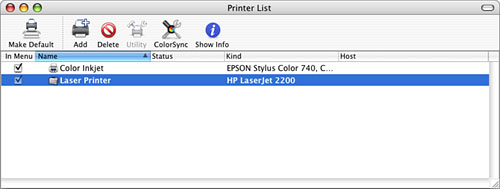
Quit the Printer Setup Utility.
TIP In the Printer List window, the default printer is indicated by its name appearing in bold. To set the default printer, select it in the Printer List window and click the Make Default button.
Installing Other Types of Printers As you can see on the pop-up menu on the Printer List sheet, Mac OS X supports several types of printer connections. Installing and configuring each type is slightly different. Covering all these options is beyond the scope of this chapter; however, you can use the steps in the previous sections as a general guide for configuring any type of printer. TIP If you want to hide a printer that is connected to your Mac so it can't be used, uncheck the In Menu check box in the Printer List window. This removes the printer from the list of available printers on the Print dialog box so it can't be used. To make the printer available again, check its In Menu check box.
Printing with Bluetooth Bluetooth wireless technology enables you to print to and share a wireless printer among many Bluetooth-equipped devices. To do so, you set up a Bluetooth printer much like you set up a Bluetooth PDA or other device. Then, you can choose that printer and print to it just like printers physically attached to or networked to your machine. In addition, Bluetooth adapters are available for many models of printers. These adapters connect to one of the printer's standard ports and enable that printer to communicate via Bluetooth. For example, the MPI Tech Bluetooth Printer Adapter connects to the parallel port on HP printers to enable those printers to communicate via Bluetooth (see Figure 23.16). These adapters also enable you to print from other Bluetooth devices, such as PDAs and cell phones. Figure 23.16. Using a Bluetooth adapter, you can enable a printer to communicate wirelessly. 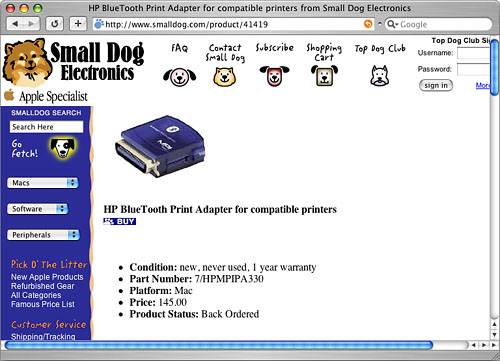
In some cases, you won't choose a Bluetooth printer using Mac OS X's normal Printer Setup and Print dialog box tools. Rather, you'll use the Output Options (covered later in this chapter) to print a PostScript file. Then, you'll send that file to the printer to print it.  To learn how to configure Bluetooth devices, p. 735. To learn how to configure Bluetooth devices, p. 735.
Configuring Print Options and Sharing a Printer Under Mac OS X, version 10.3, you can share printers connected to your Mac over wired and wireless networks, as well as those connected directly to your Mac through USB. You can also configure a couple of aspects of how a printer is configured when the Print command is issued:  | Open the Print & Fax pane of the System Preferences utility. |
TIP If you click the Set Up Printers button, the Printer Setup Utility opens. Click the Printing tab if it isn't selected already (see Figure 23.17). Figure 23.17. You can use the Print & Fax preferences to configure print options and printer sharing. 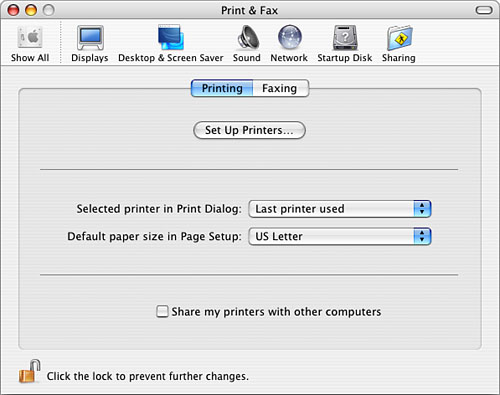
Select a printer from the "Selected printer in Print Dialog" pop-up menu. One option is "Last printer used," which causes the most recently used printer to be selected. Each printer you have installed on your Mac is also listed on this pop-up menu. Configure the default paper size by selecting it on the "Default paper size in Page Setup" pop-up menu. Check the "Share my printers with other computers" check box to share all your Mac's printers with other machines that can connect to yours through a wired or wireless network. Quit the System Preferences utility.
TIP You can also turn on printer sharing by checking the Printer Sharing check box on the Services tab of the Sharing pane of the System Preferences application.
If you share your printers, any printers connected to your Mac are available for others. For example, if you provide an AirPort network, users of that network can print to a USB printer connected directly to your Mac. TIP If your network includes an AirPort Extreme Base Station, you can connect a USB printer to the Base Station to share it.
Configuring and Accessing Shared Printers To access printers being shared on a network, use the following steps: Open the Printer Setup Utility. The list of printers installed on your Mac contains Shared Printers. Click the Expansion triangle next to the Shared Printers item. A list of all printers being shared on your network appears (see Figure 23.18). You also see the name, type, and host for each printer. Figure 23.18. Two printers are being shared on the network. 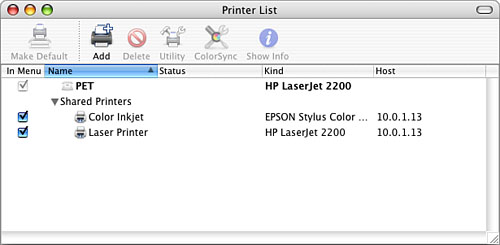
Check the In Menu check box for each printer you want to appear in Print dialog boxes. Quit the Printer Setup Utility.
TIP You don't have to perform the previous steps; they just make selecting a shared printer a bit easier. You can actually choose any shared printer via the Print dialog box by first selecting Shared Printers on the list of available printers and then selecting the specific printer to which you want to print.
Printing Under Mac OS X When you print a document, you see the print dialog box for the default printer. You can choose any other printers that are installed by using the Printer pop-up menu (see Figure 23.19). The Print dialog box contains a variety of pop-up menus and other tools you can use to configure a print job. Figure 23.19. The list of printers available to your Mac, including any that are being shared with you over a network, are shown on the Printer pop-up menu. 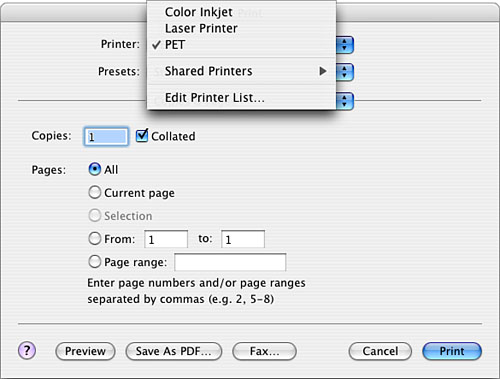
The specific options you see in the Print dialog box depend on the printer you are using. You select the settings you want to configure from the third pop-up menu (counting the Printer and Preset pop-up menus as the first and second) and then configure those settings with the controls that appear in the lower part of the dialog box. Depending on the printer you select, you might have the following options: Printer You can use this pop-up menu to select a printer to which to print. You can also open the Printer Setup Utility by selecting Edit Printer List. You can check for any updates to printer software by selecting Check For Printer Updates. Presets You can switch between the standard settings for the selected printer, or you can save a custom configuration and switch to that one. Copies & Pages These controls enable you to set the number of pages you want to print and choose the part of a document you want to print. Duplex If a printer is capable of duplexing, you use these controls to configure it, such as by printing on both sides of the paper. Layout These commands enable you to control how many pages print per sheet of paper, the direction in which your document layout prints, and whether a border is printed. Output Options This pane enables you to print the document as a PDF or PostScript file. Scheduler This pane enables you to schedule a print job. Paper Feed These controls enable you to select a paper tray for the print job, or you can choose to do a manual feed. Print Settings Controls in this pane enable you to choose a paper type and select from the print modes offered by a printer (such as color, black and white, draft, and so on). Image Quality These controls enable you to determine the quality with which images are printed to save toner, for example. Printer Features This pane can contain various commands, such as halftoning, flipping horizontal, and other specialized settings. ColorSync This pane enables you to choose ColorSync options for the selected printer. Summary The Summary area displays a description of the print job you have currently configured. This can be useful if you have configured a complex print job and want to check it before you run it.
TIP In the Copies & Pages dialog box for most printers, you have the option to collate documents. If you have ever had to hand-collate a large document, you will really appreciate this feature.
You can preview a print job by clicking the Preview button. When you are ready to print, click Print or press Return. You can check the status of a print job by double-clicking the printer on the Printer List; when a job is sent to a printer, the Printer's icon opens on the Dock and begins to bounce; you can click this to open a printer to access its status window (see Figure 23.20). You can use the commands on the Jobs menu to control print jobs. You can also sort the jobs in the queue by Status or Name. You can even use the buttons on the printer window's toolbar to control the printer, such as the Delete button to delete any print jobs that are selected in the window. Figure 23.20. You can monitor the status of print jobs by double-clicking a printer in the Printer List or by clicking the Printer's icon on the Dock to open the monitor window for that printer. 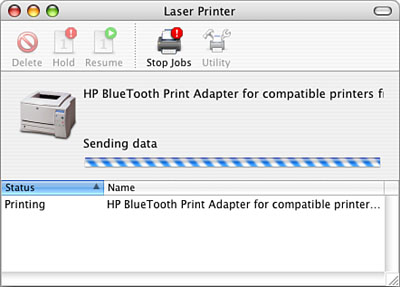
Using a Printer from the Classic Environment Printing from the Classic environment can be a bit problematic because Classic has trouble interfacing properly with the USB ports. Some printers work fine from within Classic, but others do not. To print from within Classic, you need to first install the printer's software in the Classic environment. Then you use the Classic Chooser to select the printer to which you want to print. You will probably have more luck printing to network printers than you will printing to USB or other local printers. The only way to figure out whether the printer you want to use will print under Classic is to give it a try. I had mixed results. An Epson 740i printer could not be selected because Classic Chooser did not find the USB ports printing to my HP PSC 750 was also unsuccessful because the USB port could not be found. However, I was able to print to a networked laser printer.  | If you are unable to print to a printer in Classic, see "I Can't Print Under Classic" in the "Troubleshooting" section at the end of this chapter. |
|