Troubleshooting
Creating Your Own DVDsWatching DVDs others create is fun, but because you use a Mac, you aren't limited to taking what others give. With a Mac equipped with a DVD-R drive, such as an Apple SuperDrive, and Mac OS X, you can use the iDVD application to put your own content on DVD. You can view these DVDs on your Mac using the DVD Player application. But even better, you can play the DVDs you create on most standard DVD players, such as the DVD player connected to your TV. You can place the following two general types of content on DVD:
In addition to being able to place this content on DVDs, with iDVD you can create motion menus and buttons that enable you to showcase your content from the DVD's main menu; these menus work just like the menus on commercially produced DVDs. Unfortunately, iDVD is not part of the standard Mac OS X installation. It is included on all new Macs that have the SuperDrive; otherwise, you have to purchase a copy as part of the iLife package Apple sells. Fortunately, this package sells for only $49 (iTunes, iPhoto, and iMovie are included as well). Because iDVD is not part of the standard Mac OS X installation (and because if this book gets any bigger, it might be dangerous to lift), I don't have room to provide detailed instructions for working with iDVD. What follows is a brief overview of the application so you have a general idea of how it works. Understanding the iDVD WindowWhen you launch iDVD, you see the iDVD window (see Figure 18.6). Similar to iMovie, iDVD automatically opens the last project on which you worked. If you haven't used iDVD before, you can create a new project. Figure 18.6. Don't let the simple appearance of the iDVD mislead you; iDVD is a powerful application.
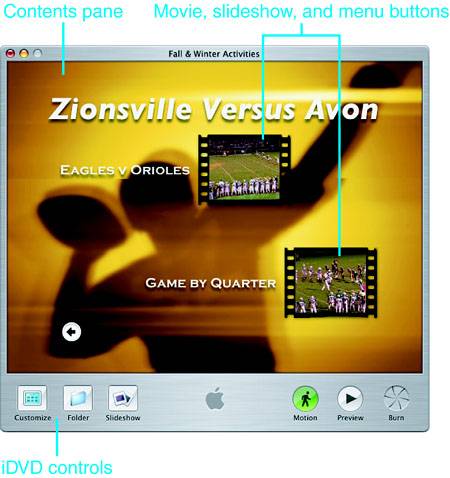
The top and largest pane of the window is the Contents pane. What you see and do in this area depends on the mode in which iDVD is operating (you'll learn more about these modes in the next section). When you are in the Design or Preview mode, the Contents pane shows a menu of buttons on the DVD. Buttons represent each project that has been placed on the DVD, or they can lead to another menu. When viewing a DVD, you click a button to view the content or menu with which it is associated. Each menu can include up to six buttons. Each menu also has a theme that determines how the menu looks and sounds. At the most basic, a theme is simply a static image that is the menu's background. However, menus can contain motion, which means a movie can play as the menu's background while the menu appears onscreen (if you have watched DVD movies, you have no doubt seen examples of motion menus). Motion menus can include a movie with sound, a movie without sound, or a static image with sound. You can apply one of iDVD's default themes to your menus, and you can create and save your own themes. Buttons can also have motion, which means the content accessed by that button plays within the button itself while the button is being viewed. This type of motion provides a preview of the content without the viewer having to actually open it. (Again, if you have viewed commercially produced DVD movies, sometimes the chapter buttons contain motion and show you part of the chapter associated with the button). Along the bottom of the iDVD window is the toolbar that contains six buttons (see Figure 18.7). Each of these enables you to perform a specific task. Figure 18.7. The buttons along the bottom of the iDVD window provide access to its tools.
The available iDVD buttons are
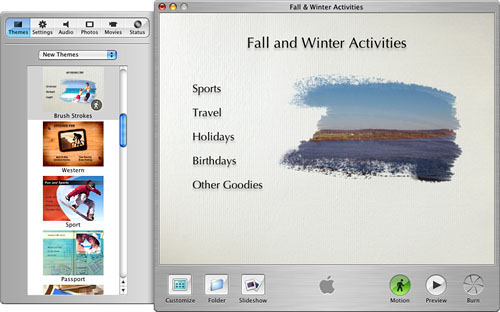
When you click the Customize button, the iDVD Drawer appears (see Figure 18.8). The Drawer contains controls and information you use while you design and build a DVD. Figure 18.8. The Customize pane enables you customize various aspects of an iDVD project.
Along the top of the Customize panel are six buttons:
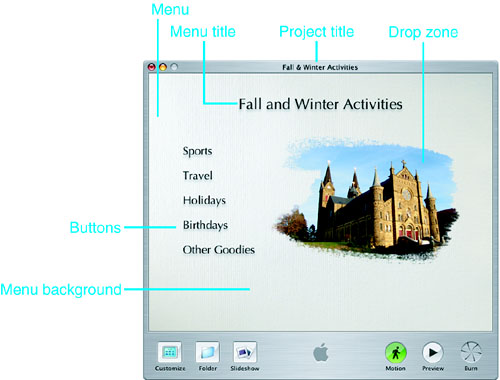
Understanding iDVD ModesiDVD has different modes for different parts of the DVD creation process. The following sections give you an overview of each of these modes. Understanding the Design ModeThe Design mode is the one in which you add movies and other content to a DVD. You also use this mode when you are designing the look and feel of a DVD by applying background images, background sounds, titles, motion effects, and so on to a DVD on which you are working. Some of the major elements of the iDVD window in the Design mode are shown in Figure 18.9 and explained in the following list:
Figure 18.9. You will spend most of your time in the Design mode, in which you add content to a DVD and design its interface.
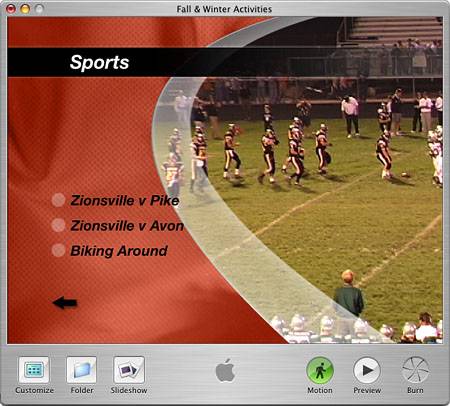
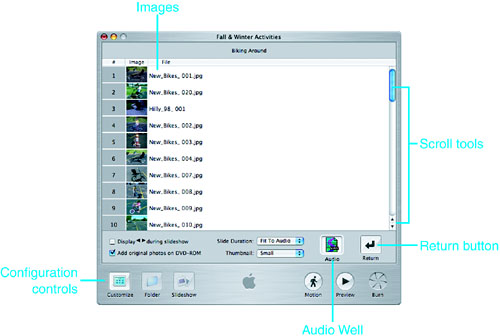
DVDs that you produce with iDVD, just like those produced commercially, can include multiple levels of menus. Each menu can contain content buttons (such as for movies or slideshows) or menu buttons that lead to other menus. All DVDs contain at least the main menu, which is the menu that appears when the DVD is played. The main menu is also the one that appears when you open an iDVD project. You can add menus to the main menu and then add submenus to those menus to build a multitiered structure for a DVD. Each menu can contain up to six buttons, with each button representing either content (a movie or slideshow) or a submenu. A DVD can contain up to 36 menus you aren't likely to want to actually include that many, however. In the Design mode, you can move among menus using the folder, Back, and Forward buttons. Understanding the Slideshow ModeIn the Slideshow mode, you can create slideshows from images contained in your iPhoto Photo Library or anywhere else on your Mac. You can control the order in which the images appear, the amount of time each image appears onscreen, and the soundtrack that plays while the slideshow plays. In the Slideshow mode, the iDVD window provides the tools you need to create your slideshows, as shown in Figure 18.10 and explained in the following list:
Figure 18.10. Using the Slideshow mode, you can create slideshows from images in your iPhoto Library or from any other source.
Understanding the Preview ModeiDVD enables you to preview a DVD before you burn it. In the Preview mode, iDVD behaves just like a DVD player; it even presents an onscreen remote control you use to control the DVD. You use the Preview mode to watch a DVD before you actually burn it to a disc. Previewing a DVD enables you to find and fix mistakes so you don't waste time and money burning discs that have problems. In the Preview mode, the iDVD window looks like that shown in Figure 18.11 and contains the elements explained in the following list:
Figure 18.11. Using the Preview mode can prevent you from creating coasters.
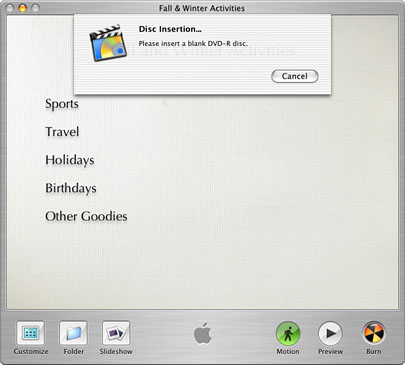
Understanding the Burn ModeThis is the mode you use when you burn a DVD. In this mode, the iDVD window displays a progress bar that shows you the current status of the burn process (see Figure 18.12). Figure 18.12. Burning a DVD with iDVD is a simple matter of clicking the Burn button.
Understanding iDVD ProjectsSimilar to iMovie, when you create a DVD, you first create a project. The project determines what content will appear on the DVD as well as its look and feel. The content you place on a DVD consists of either movies or slideshows. Because you can place any iMovie or QuickTime content on DVD, there is really no limit to the movie content you can place on a DVD. You can create slideshows from still images in the usual image formats, such as JPEG, TIFF, and so on. Again, because iDVD supports all the standard formats, you can add just about any image to an iDVD slideshow. When you place content on a DVD (by adding to a project), it is encoded into the MPEG-2 format, which is the standard for DVD. MPEG-2 provides very high quality with relatively small file sizes (thus making digital movies on DVD possible). Fortunately, iDVD manages the encoding process for you and does so automatically. A DVD created with iDVD can contain up to 90 minutes of content. However, iDVD uses a higher-quality encoding scheme when the content in a DVD project is 60 minutes or less you should try to keep your DVDs within this limit, if possible. (You might think that 60 minutes isn't much, but you will find that creating 60 minutes of good content takes a bit of doing.) Again, iDVD manages this for you; the application selects the 90-min. or 60-min. format for you automatically. |

EAN: 2147483647
Pages: 273