| There are three fundamental ways to connect a Mac to the Internet: dial-up accounts over a phone line and dial-up modem, broadband connections that use Ethernet, and wireless connections using AirPort. Although configuring dial-up accounts is relatively standard, there are many options for an Ethernet-based account. And, when you use AirPort to connect, you will actually connect the AirPort hub (whether it is a Mac or an AirPort Base Station) through one of the two other methods.  A great way to network Macs and connect them to the Internet through a single account is by using AirPort; see Chapter 11, "Using an AirPort Network to Connect to the Internet," p. 265. A great way to network Macs and connect them to the Internet through a single account is by using AirPort; see Chapter 11, "Using an AirPort Network to Connect to the Internet," p. 265.
Providing the details of configuring every type of Internet account is beyond the scope of this chapter, but some examples of each type of access should enable you to configure your particular account. NOTE When you install Mac OS X on a Mac, the Internet Setup Assistant will lead you through the configuration of your Internet account. Unlike previous versions of the OS, you can't launch the Internet Setup Assistant at other times to walk you through the configuration process. This isn't a big deal; it is faster to configure your account manually anyway. If you use a provider that includes configuration software with your account, such as AOL, you can configure your account by using that software. In this section, you will learn how to configure your account manually.
You can configure multiple sets of Internet configurations for your machine so that you switch between them easily. And, you can have multiple accounts configured and active on a machine at the same time (they will be used according to the priority you determine). This is very useful when you use your Mac in different locations; for example, with a PowerBook that you use at a work location and at home or while traveling. Another case in which this is useful is if you have several ways of connecting from the same location, such as via a cable modem or dial-up account. As with previous versions of the Mac OS, you use the Location Manager to manage the Internet configurations on your machine. If you envision needing to do this, you should set up a location before configuring it. If you will need only one set of configurations, you don't need to use the Location Manager. Also, a single location can include multiple configurations, such as a dial-up account and a cable modem account. To learn how to configure and use locations, see "Configuring and Using Locations," p. 872. The Internet accounts you configure on your Mac will be available to all users who have accounts on your machine. However, the configuration you do in the Internet pane of the System Preferences utility can be unique for each account. Connecting To The Net With A Dial-Up Account As you read earlier in the chapter, dial-up access is still the most commonly used connection method. Dial-up access is available everywhere, and is simple to configure and use (although solving connection problems can be tough). Configuring Your Modem All modern Macs include an internal 56K modem as standard equipment; very little work is required to configure the Apple internal modem. NOTE If you use an external dial-up modem for some reason, you will need to obtain a Mac OS X compatible driver for it and then configure that modem using instructions provided by the manufacturer. Covering external modems is beyond the scope of this chapter.
-
Open the System Preferences utility and in the Internet & Network section, click the Network icon. NOTE If you are configuring more than one location, choose the location you want to configure on the Location pop-up menu. You can also choose to create a new location on that menu (see Appendix B for details). -
Choose Internal Modem from the Show pop-up menu. -
Click the Modem tab (see Figure 10.3). Figure 10.3. Generally, you should leave the options in the Modem tab in the default state.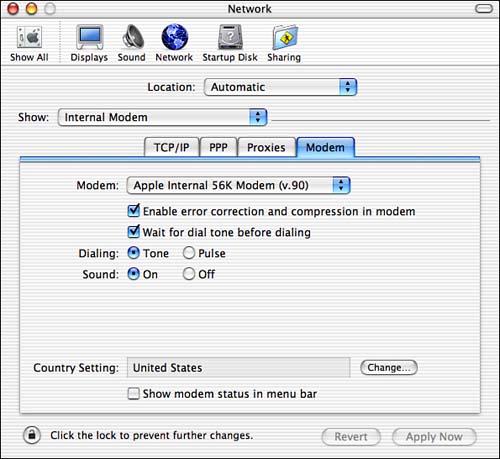
-
Use the pop-up menu, radio buttons, and check boxes to configure your modem. In most cases, the default values will work fine. If you use something other than the Apple Internal 56K Modem, choose your modem from the Modem pop-up menu. If your telephone system is not "touch-tone," you will have to click the "Pulse" radio button. Also, if you have voice mail or another system that can interfere with a standard dial tone (such as beeping to indicate that you have a message waiting for you), you need to uncheck the "Wait for dial tone before dialing" check box. Leave the sound on until you are sure that your connection works reliably; the noise made by your modem can help you troubleshoot connection problems. After you are sure that your connection works, use the "Off" radio button to turn off your modem sound. -
Use the Country Setting tools to configure your modem for the country in which you are using it. -
Check the "Show modem status in menu bar" check box. This places a telephone icon on your menu bar. You can use this to control and monitor your dial-up connection. -
Click Apply Now to save any changes you make.
Configuring TCP/IP and PPP Next, you'll need to configure your TCP/IP and PPP settings. -
Click the TCP/IP tab. -
Choose the configuration option you want from the Configure pop-up menu. For almost all dial-up accounts, this should be Using PPP. However, if your dial-up account includes a static IP address, choose Manually and enter the IP address, Subnet Mask, and Router addresses. -
If your provider provided DNS and Search Domains for your account, enter the information in the appropriate boxes. -
Click the PPP tab (see Figure 10.4). Figure 10.4. You use the PPP tab to configure your specific dial-up account.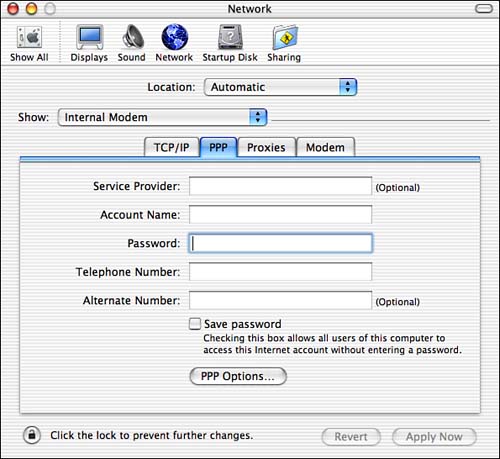
-
Enter the name of your ISP in the Service Provider field. -
Enter your access account name in the Account Name field. Make sure that you use the account name that will access your account; this might be different from your e-mail user account name. -
Enter your access password in the Password field and make sure that the "Save password" check box is checked. Again, your access password might be different from your e-mail account password. If you prefer to have to enter your password each time you connect, leave the Password field empty. NOTE When you enter a password, the "Save password" check box is checked by default; if you uncheck the check box, your password will be deleted from the field. -
Enter the telephone number you need to dial to connect to the provider in the Telephone Number field. Make sure that you enter the number exactly as you would dial it to make a standard phone call to this number. For example, if you need to dial an access code to reach an outside line, enter that code followed by a comma before the number (as in 9, 555-5555). If you need to dial a 1 or the area code to reach that number, make sure that you enter those numbers as well. If you have call waiting, you also need to enter the code to disable it, such as *70. If a call comes in while you are connected to the Net, the call waiting signal might disrupt or cancel your Net connection. Check with your telephone provider to find out the specific code you need to use to turn off call waiting. Remember to turn it back on when you are done with your Internet session. -
If your provider offers more than one access number, enter the second one in the Alternate Number field. If you receive a busy signal when your Mac dials the first number, it will try the alternate number. -
Click the PPP Options button to open the PPP Options sheet (see Figure 10.5). Use the controls on this sheet to configure your dial-up access. Figure 10.5. The Session Options enable you to control how your dial-up account works.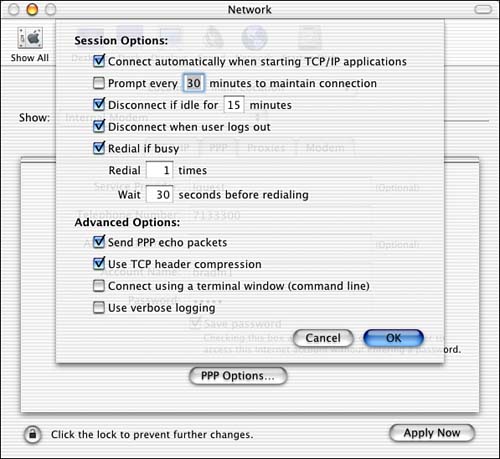
-
In most cases, you should check the "Connect automatically when needed" check box. This enables your Mac to automatically connect to the Net when it needs to. If you have to pay for access by the minute or if you have to pay toll charges, you might want to leave this unchecked. -
Use the next three check boxes to control how your Mac disconnects your connection. If you want to be prompted when your Mac is connected but is not actively using the connection, check the "Prompt every _ minutes to maintain connection" check box and enter the time after which you want to be prompted. If you want your Mac to automatically disconnect after a specific period of time, check the "Disconnect if idle for" check box and enter the idle time. These options are beneficial primarily if you have to pay for access on a time basis or if you share a phone line for Internet access and voice conversations. Most users should check the "Disconnect when user logs out" check box so that the connection is broken when the current user logs out of the machine. -
Use the redial controls to set the number of times you want your Mac to redial in the event of a busy signal and how long you want it to wait between tries. NOTE Only in rare cases will you need to use the controls in the Advanced Options area. The options can be useful when troubleshooting a dial-up connection. -
Click OK to close the sheet and then Apply Now to save your changes.
TIP A proxy server is a server that sits between your machine and the Internet and actually downloads and serves Internet resources to your machine. It is highly unlikely that you will use proxy servers with a dial-up account, although it is possible.
To learn how to configure proxies, see "Configuring TCP/IP Using a DHCP Server," p. 255. Configuring the Internet Pane of the System Preferences Utility The last step is to configure the Internet pane of the System Preferences utility for your account. This enables you to set several defaults for your account. This is optional; everything will work fine if you don't configure the Internet pane. However, it is generally a good idea to do so. NOTE If you want to set the Internet preferences for a user account other than the one you are currently logged in under, log in to that account before configuring the Internet pane.
To configure the Internet pane for the current account, do the following: -
Open the Internet pane of the System Preferences utility. -
Click the .Mac tab and configure your .Mac account. To learn more about .Mac, see "Using .Mac to Create and Serve Your Web Pages," p. 371. -
Click the Email tab (see Figure 10.6). Figure 10.6. You can configure your default e-mail account using the Email tab of the Internet pane of the System Preferences utility (in this case, I configured my .Mac e-mail account).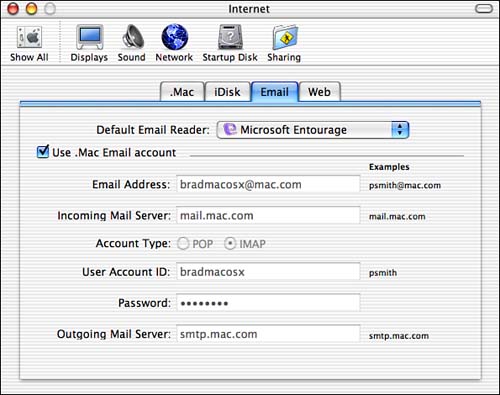
TIP If you have configured a .Mac account on your machine, you can configure the e-mail account by simply checking the "Use .Mac Email account" check box. -
Choose your default e-mail application using the Default Email Reader pop-up menu. -
Use the rest of the fields to configure your default e-mail account. For example, to use your .Mac e-mail account as the default, check the "Use .Mac Email account" check box. For other accounts, use the e-mail account information provided by your ISP to configure the account. For information about the various settings for an e-mail account, see "Configuring E-Mail Accounts," p. 302. -
Click the Web tab. -
Choose your default Web browser from the Default Web browser pop-up menu. -
Set your Home page by entering its URL in the Home Page field. -
Set the default location to which files will be downloaded by clicking the Select button and choosing the directory into which you want files to be downloaded. TIP Consider creating a folder called Downloads in your Home directory. Use the Select button to choose your Downloads directory, and files that you download will always be stored in that directory. -
Quit the System Preferences utility.
You can change or reconfigure the settings in the Internet pane of the System Preferences utility at any time. For example, you might want to reconfigure your Home page or set another download directory. Testing Your Configuration You can test your account by opening an Internet application, such as a Web browser (assuming you enabled your Mac to connect automatically). If you are able to access Internet resources, your configuration is complete. Or, you can use the application that you use to manually connect and disconnect from your account, which is Internet Connect. -
Open the Internet Connect application (Applications directory). You will see the account information you configured earlier. Use the Expand button next to the Configuration pop-up menu to show or hide the details of your configuration. -
Click the Connect button. You will see the status of the connection in the window. You will also hear your modem dialing out and the delightful tones of the handshaking process. If your connection is successful, you will see the connected message and status information in the lower part of the Internet Connect window (see Figure 10.7). Figure 10.7. You can see the amount of time you have been connected as well as your current IP address in the lower part of the Internet Connect window (note that I collapsed the window because I didn't want to reveal my username; if the window is expanded, you will also see the number you dialed, your account name, and the Password field).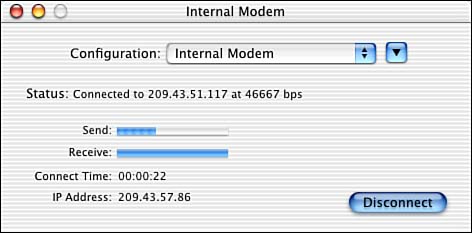
-
Click Disconnect to shut down the connection. -
Quit Internet Connect.
If you are able to connect successfully, you can use Internet applications, such as your e-mail and Web browser. TIP In Internet Connect, choose Window, Connection Log to see information about your connection status, such as the current IP address.
 | If you are unable to connect using your dial-up account, see "My Dial-Up Connection Fails to Connect" in the Troubleshooting section at the end of this chapter. |
Using AirPort, it is very easy to set up a wireless connection to the Internet and to share a single dial-up account among several machines. You can also use Mac OS X's built-in sharing capability to share a single account among several machines. See Chapter 26, "Sharing an Internet Connection," p. 755. If you choose to show the modem status in the menu bar, it is very easy to manage your connection from there. When you open the menu, you will see various options and information, depending on your modem's current status (see Figure 10.8). Figure 10.8. The Modem status icon provides total control over your dial-up account from the desktop.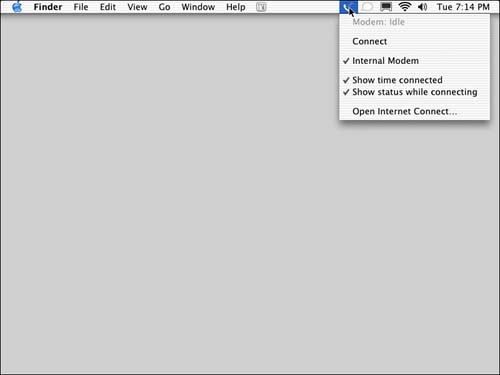
When you open the menu, you will see your modem's status. If disconnected, you can click Connect to connect and vice versa. You will also see which modem you have selected and you can open Internet Connect quickly and easily by choosing Open Internet Connect. You can also choose the status information that is displayed, by selecting Show time connected or Show status while connecting. NOTE When you are connected to the Internet and Internet Connect is open, its icon includes a green lightning bolt. You can install Internet Connect on your Dock if you prefer to manage your connection from there rather than from the menu bar.
Connecting to the Net with Ethernet CAUTION As soon as you connect your Mac to the Internet with an always-on connection, especially one with a fixed IP address, your Mac becomes vulnerable to attacks from hackers. You shouldn't connect a machine to the Internet with a fixed address unless you have some sort of firewall protection in place; fortunately, Mac OS X includes a built-in firewall.
To learn how to protect your Mac from Net attacks, see "Defending Your Mac from Net Attacks," p. 800. Configuring an Internet account for Ethernet connection is actually a bit simpler than configuring a dial-up account. There are three main options you will use for an Ethernet-based Internet account: Manual IP Settings, DHCP Server, or PPPoE. Connect your Mac's Ethernet port to the cable modem or to the hub to which the cable or DSL modem is connected. Then, configure the OS to use that connection. NOTE Some broadband modems connect to a USB port rather than an Ethernet port. However, configuring the account on your Mac works in the same way.
Configuring Static TCP/IP Settings If your provider provides a static or manual address for you, use the following steps to configure it: -
Open the Network pane of the System Preferences utility. -
From the Show pop-up menu, choose Built-in Ethernet. -
Click the TCP/IP tab. -
Choose Manually from the Configure pop-up menu. NOTE You can also use a static IP address with the router being assigned dynamically. If this is the case for you, choose Manually using DHCP Router instead of manually. The rest of the steps are the same except that you don't configure the router because that is done for you by the DHCP router. -
Enter the IP Address, Subnet Mask, Router, DNS, and Search Domains information that your ISP provided in the appropriate fields. -
Click Apply Now to save your changes. -
Open an Internet application, such as a Web browser. If you can access Internet resources, your configuration is complete. -
Configure the Internet pane of the System Preferences utility for your Mac OS X user account.
For more information about configuring the Internet pane, see "Configuring the Internet Pane of the System Preferences Utility," p. 251. | If you are unable to access Internet resources after configuring your account manually, see "My Ethernet Connection Can't Connect" in the Troubleshooting section at the end of this chapter. |
Configuring TCP/IP Using a DHCP Server If your provider provides access through a DHCP server, configuring your account is even easier than using a static IP address. NOTE Many local area networks provide Internet access by installing a DHCP server on the network and connecting that server to the Internet (often with a T-1 line). In such cases, you can configure your Mac to use that DHCP server to connect to the Net just as you can when you deal directly with an ISP for an account.
To configure your account, do the following: -
Open the Network pane of the System Preferences utility. -
From the Show pop-up menu, choose Built-In Ethernet. -
Click the TCP/IP tab. -
Choose Using DHCP from the Configure menu. -
If you have a DHCP Client ID (usually when you are using the account with an ISP), enter it in the DHCP Client ID field. (If you are using a DHCP server on a local network, you can probably leave this field empty. In some cases, you can leave this field empty even when you are using an ISP to gain Internet access.) -
If you have DNS and Search Domain information, enter it in the appropriate fields (these are optional when you use a DHCP server). -
If you are on a network that uses a proxy server, click the Proxies tab and configure the proxies for your network. For more information about proxy servers, see "Understanding and Configuring Proxy Servers," p. 256. -
Click Apply Now to save your changes. -
Open an Internet application, such as a Web browser. If you can access Internet resources, your configuration is complete. -
Configure the Internet pane of the System Preferences utility for your Mac OS X user account.
For more information about configuring the Internet pane, see "Configuring the Internet Pane of the System Preferences Utility," p. 251. | If you are unable to access Internet resources after configuring your account with a DHCP server, see "My Ethernet Connection Can't Connect" in the Troubleshooting section at the end of this chapter. |
Understanding and Configuring Proxy Servers A proxy server is a server that sits "between" end-user computers on a network and the Internet. All Internet traffic of a specific type (such as HTTP for Web pages) passes through a specific proxy server. There can be separate proxy servers for each type of service (such as HTTP, FTP, and so on), or a network can use a single proxy server for all Internet services. When a machine on the network requests a resource (such as a Web page), the proxy server downloads the resource and serves it to the machine as if the resources originated from the proxy server itself (although the user doesn't notice that the page is being served by the proxy server instead of the server hosting the requested page). Proxy servers serve two main purposes: Can improve speed in some cases Because the Internet resources are downloaded to the proxy server and then served to users on the local network, after the first access, subsequent accesses to that resource will be much faster. This is true because the resource must only be downloaded from the Internet to the proxy server once; from there, it can be served to users on the local network rather than downloading it from the Internet each time. Can be used to filter requests Because all information from the Internet flows through a proxy server, that server can be set to block access to specific Internet resources.
NOTE  | For more information on proxy servers, see http://webopedia.internet.com/TERM/p/proxy_server.html. |
If you are on a network that uses proxy servers, you use the Proxies tab of the Network pane of the System Preferences utility to configure them (see Figure 10.9). You configure a proxy for a specific service by checking the check box for that service and entering the proxy address and port in the appropriate fields. Typically, you will obtain the proxy server information you need from your Network Administrator. Figure 10.9. If you need to configure Internet access through a proxy server, you use the Proxies tab to do so.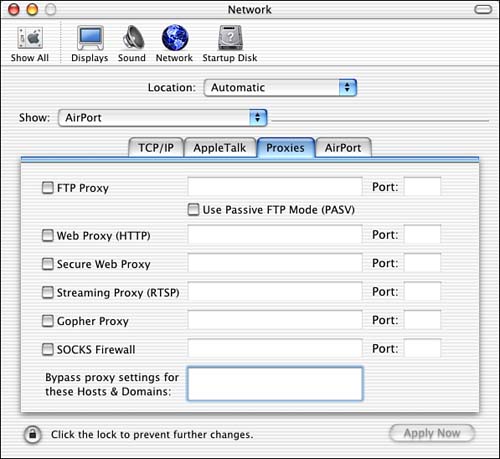
Configuring a PPPoE Account Configuring a PPPoE account is more complicated than the other Ethernet options, but still won't take more than a few minutes. -
Open the Network pane of the System Preferences utility. -
From the Show pop-up menu, choose Built-In Ethernet. -
Configure the TCP/IP settings for your PPPoE account (see the previous sections for details). -
Click the PPPoE tab. -
Check the "Connect Using PPPoE" check box. -
Enter the name of your service provider in the Service Provider field. This is optional. -
Enter your access account name in the Account Name field. -
Enter your access password in the Password field; again this might be different from your e-mail account password. If you leave this field empty, you will have to enter your password each time you connect. (When you enter a password, the "Save password" check box is checked by default; if you uncheck the check box, your password will be deleted from the field.) -
Enter the service name in the PPPoE Service Name field. This is also optional. -
Check the "Show PPPoE status in menu bar" check box. This puts a menu on the menu bar that you can use to control your PPPoE connection. -
Click the PPPoE Options button to open the Session Options sheet. Use the controls on this sheet to configure your Internet access. -
In most cases, you should check the "Connect automatically when needed" check box. This enables your Mac to automatically connect to the Net when it needs to. -
Use the next three check boxes to control how your Mac monitors your connection. If you want to be prompted when your Mac is connected but is not actively using the connection, check the "Prompt every _ minutes to maintain connection" check box and enter the time after which you want to be prompted to maintain the connection. If you want your Mac to automatically disconnect after a specific period of time, check the "Disconnect if idle for" check box and enter the idle time. Most users should check the "Disconnect when user logs out" check box so that the connection is broken when the current user logs out of the machine. NOTE In only rare cases will you need to use the controls in the Advanced Options area. The options can be useful when troubleshooting a PPPoE connection. -
Click OK to close the sheet and then Apply Now to save your changes.
You can test your account by opening an Internet application, such as a Web browser (assuming you enabled your Mac to connect automatically). If you are able to access Internet resources, your configuration is complete. Or, you can use the application that you use to manually connect and disconnect from your account, which is Internet Connect. -
Open the Internet Connect application (if you turned on the PPPoE status menu, open it and choose Open Internet Connect). -
Choose Built-In Ethernet from the Configuration pop-up menu. You will see the PPPoE account information you configured earlier. Use the Expand button next to the Configuration pop-up menu to show or hide the details of your configuration. -
Click the Connect button. You will see the status of the connection in the window. If your connection is successful, you will see the connected message and status information in the lower part of the Internet Connect window. -
Click Disconnect to shut down the connection. -
Quit Internet Connect.
If you are able to connect successfully, you can use Internet applications, such as your e-mail and Web browser. You can monitor and control your connection from the PPPoE status menu on the menu bar. TIP In Internet Connect, choose Window, Connection Log to see information about your connection status, such as the current IP address.
NOTE You can also add Internet Connect to the Dock. When the Internet Connect icon appears in the Dock, it has a green lightning bolt when you are connected to the Internet.
| If you aren't able to connect to the Internet, see "My Ethernet Connection Can't Connect" in the Troubleshooting section at the end of this chapter. |
To learn how to share a single Internet connection among multiple Macs, see Chapter 26, "Sharing an Internet Connection," p. 755. Managing Multiple Internet Accounts If the Internet is vital to you, such as for business purposes, you might have more than one Internet account that you access in different ways. For example, you might use a cable modem as your primary access and maintain a dial-up account as a backup. You can maintain multiple Internet accounts on a single Mac. You can manage the Internet accounts on your machine through the Network Port Configurations pane of the Network pane of the System Preferences utility (see Figure 10.10). Figure 10.10. Use the Active Network Ports controls to manage multiple Internet accounts on a single machine.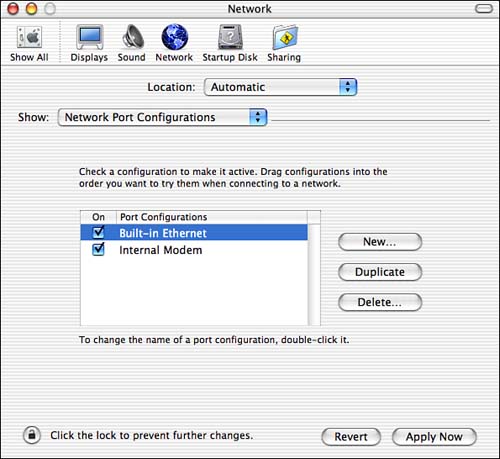
In Figure 10.10, two Internet connections have been configured and are active on two different ports, which are Built-in Ethernet and Internal Modem. The order in which the ports are listed determines which port is tried first when a connection is needed. In this example, the Built-in Ethernet will be tried first, followed by the Internal Modem account should the Mac be unable to connect through Ethernet. To configure multiple accounts, do the following: -
Open the Network pane of the System Preferences utility. -
Choose the port you want to be your primary connection method on the Show menu. -
Configure that port for the related account (see the previous sections in this chapter for details). For example, configure your machine to use an Ethernet network to connect to the Internet. -
From the Show menu, choose Network Port Configurations. -
Make sure that the connection you configured is turned on (its check box is checked) and that it is first on the list of port configurations. -
From the Show menu, choose the next port you want to be the second connection option, such as an Internal Modem. -
Repeat Steps 2 through 4 to configure that account. -
Make sure that the port is turned on; it should appear second on the list of port configurations. -
Continue configuring ports you want to be active and arranging them on the list in the order in which you want them to be used. -
Turn off any ports you don't use. Turning off active ports might provide some small performance and boot time improvements and it might make your Mac a bit more secure. But mostly it is a matter of keeping your configuration settings as accurate as possible. -
Click Apply Now and then quit the System Preferences utility.
When your machine needs to connect to the Internet, it will try the accounts you specified in the order in which you specified them. Following are some other points about managing multiple connections: You can have more than one configuration of the same port. To create a new instance of a port, click the New button. Name the port and then choose the type of port it is (Internal Modem, External Modem, Built-in Ethernet, and so on). Click OK and the new port will appear on the list. You can configure it in the same way as the default ports. For example, new ports you create will appear on the Show menu; choose the port to configure it. AirPort, PPPoE, Internal Modem, and External Modem ports will appear on the Configuration pop-up menu in Internet Connect. You can use that application to manage those connections. The Duplicate button duplicates a port configuration. This can be useful when you are configuring more than one port of the same type. You can edit a port's name by double-clicking it.
And you can also maintain multiple sets of Internet configurations that you create and maintain through the Location Manager. For example, if you use a PowerBook, you might have a configuration when you use the machine from home, another when you use it from work, and so on. To learn how to configure and use locations, see "Configuring and Using Locations," p. 872. |