Controlling a Virtual Machine
| When you want to work with Windows, you first launch Parallels Desktop for Mac and then open the virtual machine containing Windows. After the virtual machine is open, you can control it using the Parallels Desktop for Mac controls. To get started, launch Parallels Desktop for Mac just as you would any other application. By default, the virtual machine you used most recently will open (see Figure 7.1). If you want to work with a different virtual machine, click the Open button. In the resulting sheet, move to the VM you want to use (the filename extension will be .pvs as in winxp.pvs), select it, and click Open. That virtual machine will open in the Parallels Desktop for Mac window and you'll be able to start using it. Figure 7.1. Because the virtual machine called Microsoft Windows XP is the one I used most recently, it's opened automatically when I launch Parallels Desktop for Mac.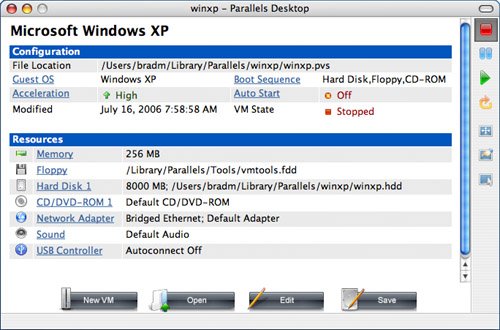 Running a Virtual MachineWhen a virtual machine is first opened, it will appear in the Page Properties view, which you use to view or change configuration information for the VM. This view is organized in several sections. The Configuration section provides information about the current VM's configuration, including the path to the machine's file, acceleration settings, and so on. In the Resources section, you'll see information about hardware devices (some are virtual) available to the VM, such as the hard disk image file size and location, CD/DVD drive, and so on. At the bottom of the window are some basic controls for managing the VM, such as New VM, Open, Edit, and Save. Along the right side of the window are the controls you use to control the virtual machine. Note A virtual machine's "hard drive" is actually a disk image file. This disk image file contains all of the information stored under the guest OS, including the operating system itself, applications you install, and documents you create. Like any other file, if something happens to this disk image file, all the information it contains might be lost. If you store important information in the virtual OS, you should back it up. A VM can be in one of several states. When the machine is not running, its state is Stopped. In this state, you work with the virtual machine itself. When the virtual operating system is being used, the virtual machine's state will be Running. A VM can also be in the Paused or Suspended states, which are somewhat analogous to a DVD player being paused in that the virtual machine is currently not doing anything. When a VM is running, the Parallels Desktop for Mac window switches to the Console view, which displays the operating system that is installed in the virtual machine (see Figure 7.2). Figure 7.2. Control a virtual machine using the buttons located in the Parallels Desktop for Mac toolbar.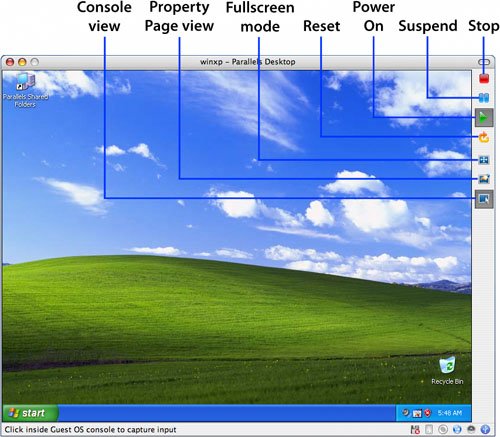 You can control a VM using the buttons that are located along the right side of the window (refer to Figure 7.1). (You can set the location of these buttons using the Parallels Desktop for Mac preferences that you'll learn about later.) A virtual machine's basic controls are the following:
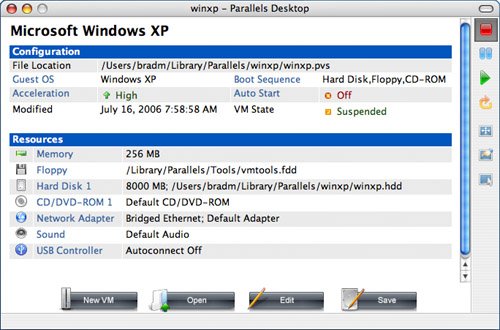
Note Like any other application, running a virtual machine consumes a Mac's resources. There are many variables that determine how much a Mac's performance will be affected by a virtual machine, including what you are doing in the Mac OS, what is happening in the Windows OS, how much RAM a Mac has, how much RAM has been allocated to Parallels Desktop for Mac, and so on. If you notice a performance hit when you are using Mac applications, suspend the virtual machine when you aren't actively using Windows. That should free up resources for Mac applications. If you use Windows infrequently, quit Parallels Desktop for Mac when you don't need to use Windows. All of these commands can be activated by using the buttons in the Parallels Desktop for Mac toolbar or via the VM menu. The exception to this is the Pause command, which can be activated only on the VM menu. Choosing the Operating System to ControlAs you learned in Chapter 6, "Installing Windows XP in a Virtual Machine," when you are running Windows in a VM, you must indicate when you want to control Windows compared to when you want to control Mac OS X. You do this by capturing the mouse and keyboard; whichever OS has these captured is the one that will be controlled when you use the mouse or press a key. When you power on Windows, it will capture the mouse and keyboard automatically. You can tell that Windows has captured these peripherals because the cursor will be the standard Windows pointer, which is the arrow filled with white. When you move the pointer outside of the Parallels Desktop for Mac window, it will change back to the Mac's black arrow, which indicates that Mac OS has captured the mouse and keyboard so that you can again use them to control Mac OS X. This behavior occurs only if you have installed Parallels Tools as described in the previous chapter. If you haven't, you have to manually determine which OS has captured the mouse and keyboard. To work with Windows, perform the following general steps:
As you work with the guest OS, you can monitor its access to system resources using the icons located in the bottom-right corner of the Parallels Desktop for Mac window when it is in Windowed mode (see Figure 7.4). Some of these resources are physical and some are virtual. For example, the hard disk access icon represents the disk image that the guest operating system is using, whereas the CD/DVD icon represents your Mac's CD/DVD drive. The status of the icons changes to reflect activity; for example, the hard disk icon will flash when there is disk activity. Figure 7.4. The icons in the lower-right corner of the Parallels Desktop for Mac window display status information for various system resourcessome real, some virtual.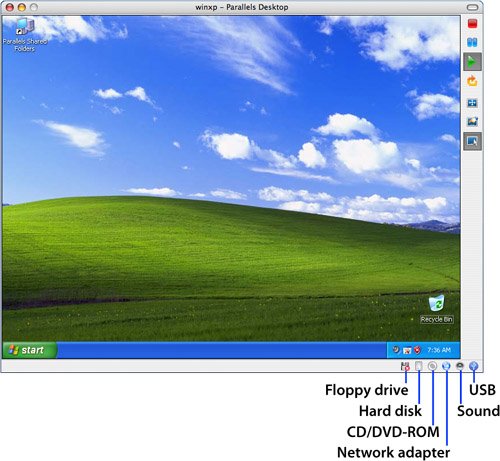 |
EAN: N/A
Pages: 58