| Before you dive into Boot Camp, make sure your Mac meets the minimum requirements, which almost all Intel Macs will. Then, make sure your Mac's software and firmware is current and that you have sufficient free disk space to install Windows. Finally, make sure your data is backed up. Making Sure Your Mac is Windows-ready Following are Apple's official Boot Camp requirements augmented with some commentary from me: - A Macintosh computer with an Intel processor running Mac OS X version 10.4.7 or later, with a USB keyboard and mouse or a built-in keyboard and trackpad, and with the most current firmware.
All Intel Macs include some version of Mac OS X 10.4, so if you have an Intel Mac, all you need to do is to make sure you are running the latest version of OS X, which you can easily do via the Software Update application.
You need to use a USB keyboard and mouse rather than a Bluetooth or other wireless version because there might be times in the process during which your Mac won't have access to the software drivers used to run other kinds of keyboards and mice. If you use a MacBook or MacBook Pro, you will be able to use the built-in keyboard and mouse all the time, so you are set in this area.
- At least 10GB of free hard disk space
This is an important requirement, and what the actual requirement is depends on how much you are going to use the Windows environment. If you intend to create or work with lots of large files, this might not be enough disk space. You'll create a disk partition for the Windows environment and if you intend to use it for large files, you might need a larger partition.
- Boot Camp Assistant application
You'll need to have the Boot Camp Assistant application to get the Windows installation process started.
- A blank recordable CD or DVD
All Intel Macs include at least a recordable CD drive; if your Mac has a SuperDrive, it also has a recordable DVD drive. You'll need a blank disc on which you'll burn the drivers for built-in graphics, USB, audio, Bluetooth, ethernet, AirPort, and more that you'll need to operate under Windows.
- A full version of Windows XP Home or Professional Edition with Service Pack 2 (SP2) or later
You need a full (rather than an Upgrade) Windows installation disc to be able to install Windows on your Mac. The supported versions of Windows are XP Home and XP Professional. Both must be the SP2 release or later. (You can't install an SP1 or earlier version and then upgrade it. You must start with SP2.)
There are a number of ways to get a properly licensed Windows XP Installation disc, such as purchasing it from an online retailer, a local electronics or computer store, and so on.
You can't use an upgrade disc to install Windows; the installation disc must be for a full version of the SP2 release. (There are still packages with older versions so make sure you get an SP2 version when you buy a copy.)
Throughout the remainder of this chapter, you'll get into the details associated with each of these requirements. For now, if your Mac meets the basic list, you are good to move ahead into the Windows world. Updating Your Mac's Software Mac OS X includes the Software Update application to ensure that your Mac is running the most current version of the OS as well as any Apple applications installed on it. Make sure your Mac's software is current by performing the following steps: 1. | On the Apple menu, choose Software Update. The Software Update application will launch and check for more recent versions of Mac OS X along with any Apple applications that are installed.
If your Mac's software is current, you'll see a message telling you so; move to step 2
If there are new versions of the OS or of any Apple applications, you'll see them listed in the Software Update window. Move to step 3
| 2. | If all your software is current, click OK to clear the prompt and close the Software Update application. You can skip the rest of these steps.
| 3. | If there are any updates that you don't want to install for some reason, uncheck their check boxes. I recommend that you leave all the check boxes checked.
| 4. | Click Install. The Software Update application will download the updates to your Mac and install them.
In some cases, you'll have to agree to a new license by clicking the Agree button when prompted to do so.
If the updates included Mac OS X, you'll have to restart your Mac when the installation process is complete.
| 5. | Follow the onscreen prompts to complete the installation process, including restarting your Mac if required.
Tip You should configure the Software Update application to automatically check for updates. Open the Software Update pane of the System Preferences application, check the Check for Updates check box, and choose the frequency on the pop-up menu (the options are Daily, Weekly, or Monthly). |
After you've updated your Mac, it will be running the latest version of Mac OS X. Updating Your Mac's Firmware A Mac's firmware contains the basic software that enables it to start up and to manage its hardware before Mac OS X takes over. Before installing Windows, make sure your Mac has the latest firmware version by doing the following: | | 1. | Open a web browser and go to www.apple.com/downloads.
| 2. | Search for "macmodel firmware update" where macmodel is the model of Mac you use.
You'll see the firmware updates available for the model for which you searched (see Figure 1.1).
Figure 1.1. Here you can see several firmware updates were available for MacBooks. 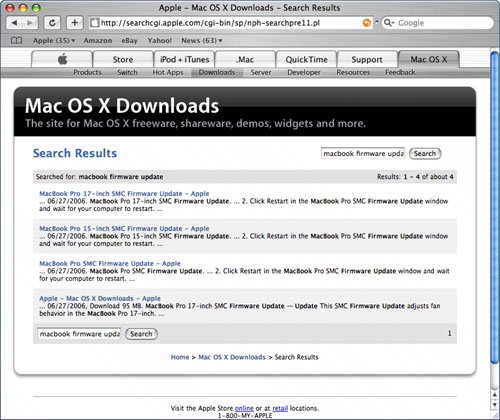
| 3. | Click the link for the firmware version that is applicable for your specific Mac. For example, if you checked for MacBook firmware updates, look for the version of the MacBook that you use, such as the 17-inch.
Note If you don't see a firmware update for your Mac, you are running the latest version and so don't need to update your Mac's firmware. You can skip the rest of these steps. The download page for that firmware version will open. Somewhere on that page, you'll see the firmware version that is provided in the update. Make a note of the version number. Leave this page open.
Note Check out http://docs.info.apple.com/article.html?artnum=303880 for a general discussion of Intel Mac firmware that includes a chart of the firmware requirements. | | | 4. | On the Apple menu, choose About This Mac.
| 5. | In the About This Mac window, click More Info. The System Profiler will open (see Figure 1.2).
Figure 1.2. Use the System Profiler application to determine your Mac's current firmware, which is shown as the SMC version. 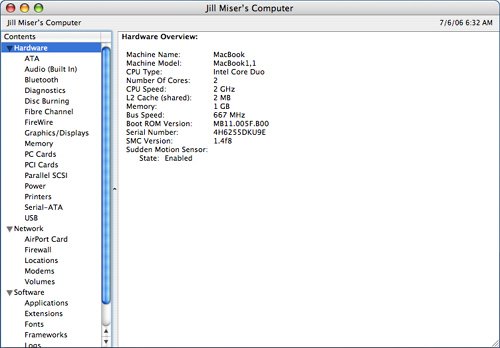
| 6. | In the Hardware section, compare the SMC version shown in the System Profiler to the version shown on the download page. If the version your Mac is running is the same as or newer than the version shown on the firmware update's web page, you don't need to update your Mac's firmware and can skip the rest of these steps.
If a newer version is available, continue with these steps.
| 7. | Move back to the firmware download page and download the firmware update. When the download process is complete, the firmware update application will launch automatically.
| 8. | Follow the onscreen instructions to update your Mac's firmware.
|
Checking Your Mac's Disk to See If It's Ready for Boot Camp Make sure your Mac has enough free disk space to install Windows; you need to have at least 10GB available. Open a Finder window and select the disk on which you're going to install Windows (see Figure 1.3). At the bottom of the window, you'll see the space available on the selected disk. Figure 1.3. The startup disk on this MacBook has almost 70GB of available space, which is more than enough for a Windows installation. 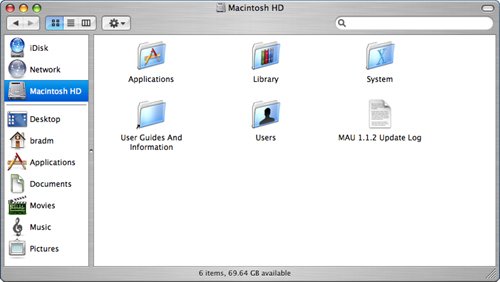
If the disk has 10GB or more of available space, you are good to go from the disk space perspective. You can't install Windows on an external disk, such as a USB or FireWire disk. If you have only one internal hard drive, which will be the case for MacBooks, MacBook Pros, iMacs, and Mac minis, you'll have to install Windows on your startup disk. If you have a Mac Pro with more than one internal hard disk, you can install Windows on any of those disks. If the disk doesn't have at least 10GB of available space, you'll need to delete files on it until it does have this much disk space available. If there are files you no longer use, delete them. If there are files you want to keep, but don't actively use, burn them onto a CD or DVD. If you have other hard disks available to you, move files from your chosen disk onto another hard disk. Continue this until you've freed up at least 10GB of disk space. In addition to having enough free space, the disk you use must be a single partition; a partition is a logical, rather than a physical, division of disk space such that each partition behaves as if it were a separate disk (even though they are physically part of the same disk). If your Mac has only a single drive shown in the Places sidebar (such as shown in Figure 1.3), it has only one partition and you can skip the rest of this section. If there are two or more disks shown, you might or might not remember which partitions are on which hard drives (and you can't tell just by looking at their icons). To make sure your Windows disk has only a single partition, perform the following steps: 1. | Open the Applications folder and then open the Utilities folder.
| | | 2. | Launch the Disk Utility application. As it opens, Disk Utility will identify all the disks available to your Mac as well as the partitions on each disk. The disks and partitions will appear in the left pane of the window (see Figure 1.4).
Figure 1.4. This MacBook has access to two hard disks; the upper disk is the startup disk with a single partition, whereas the lower one is an external USB 2 disk that has two partitions. 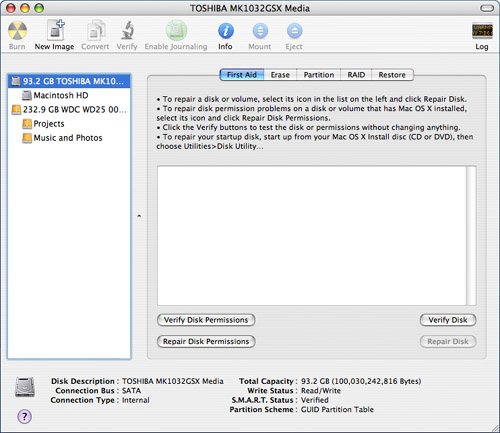
| 3. | Look at your Windows disk. If there is only one partition shown under the disk's icon, the disk is ready for you to proceed. When you move the pointer over a disk image, a text box will tell you the type of storage device as well as whether it is internal or external. If it is an internal disk, you can install Windows on it.
|
If a disk has more than one partition, you'll see more than one icon immediately under the drive's icon. In that case, you'll have to repartition the drive so that it contains only one partition. If the disk is your startup drive, this isn't a trivial exercise; partitioning a drive destroys all the data it contains. Explaining the details of partitioning a drive that you currently use is beyond the scope of this book. But in a nutshell, you need to back up all the drive's information, start up your Mac up from another drive (such as the Mac OS X Installation disc), use Disk Utility to partition the drive into a single partition, reinstall Mac OS X, and then move your data back onto the disk (I did say it isn't a trivial task). For detailed information about using Disk Utility, see my book Special Edition Using Mac OS X Tiger. Backing Up Your Mac Hopefully, you have and use a backup system to ensure that important files on your Mac are protected, such as your music, photos, important financial documents, and so on. If that's the case, give yourself extra points and move on to the next section. If you don't have a backup system in place, now's the time. Make sure any files you can't live without are backed up, to another hard disk, a CD, or a DVD. Almost all the time, installing Windows on a Mac won't have any impact on your Mac's files. However, the keyword here is almost. Unexpected things can happen, and some of them might cause you to lose files. You don't want this to happen. For example, if you lose music that you've purchased from the iTunes Music Store and don't have it saved someplace else, you'll have to pay for that music again to be able to download it again. Some kinds of data are even worse to lose. For example, if you keep your finances on your Mac, you don't want those files to be lost because you might not be able to recreate the data at all. Tip For information about ways to back up your Mac, see my book Special Edition Using Mac OS X Tiger. For example, if you have a .Mac membership on .Mac, you can use the free Backup application to back up your Mac.
Make sure your important files are backed up before you proceed, just in case something unexpected does happen. |