| The required but mundane work of installing iTunes on your computer is done. Now, let's take a quick tour so you get the overall feel of this excellent application. In the following chapters, you'll get down and dirty (well, because we are dealing with electrons here, there isn't really any dirt) with the details. Seeing Through the iTunes Window The iTunes window, like the windows on your house, consists of a number of panes (see Figure 12.9). Let's take a quick look at each of these. Figure 12.9. Working with iTunes panes won't cause you any (pain, that is). 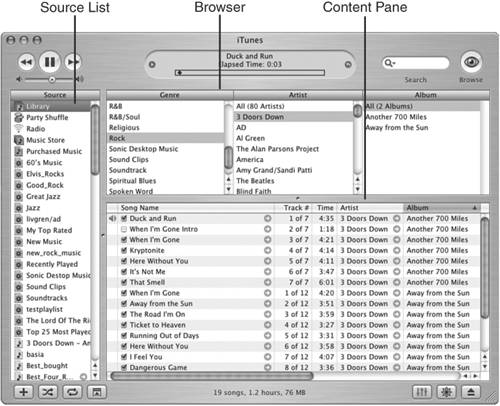
On the far left of the iTunes window is the Source List. On this list, as you might suspect from its name, are the sources of music with which you can work. To work with a source, such as a CD or the iTunes Music Store, you select it by clicking it. When you select a source, its contents will appear in the Content pane and Browser (if you have the Browser open for a selected source). In Figure 12.9, I have selected the Library as the source; its contents are shown in the Browser at the top of the window while the list of individual songs that make up the Library is at the bottom of the window. Note  | Different sources have different icons in the Source List. For example, the Library has a yellow box containing a music note, whereas playlists have a blue box with a musical note. |
You will use many types of sources, including the Library, the Radio, the iTunes Music Store, audio CDs, playlists, and more. As we work though the rest of this part of the book, you will get experience with all these kinds of sources. The Browser presents the contents of the selected source at a summary level, by genre, artist, and album. You can view the contents of the selected source by clicking it in the appropriate column. For example, in Figure 12.9, I have selected the Rock genre. The Artist column then shows all the artists whose music I have in the selected genre. The Album column shows all the albums for the selected artist. The Browser can be shown or hidden. For example, take a look at Figure 12.10, which shows the iTunes window with the Browser hidden. Figure 12.10. Where, oh where, has my Browser gone? Where, oh where, can it be? 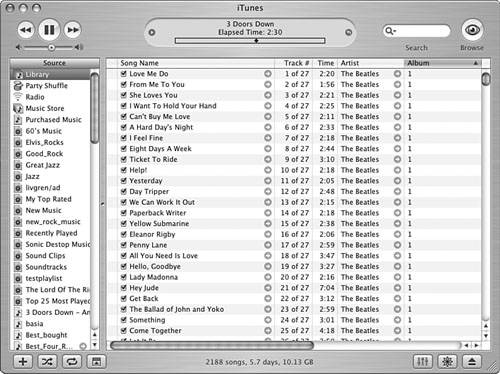
At the bottom of the iTunes window (or filling it if the Browser is hidden) is the Content pane. This area lists each song in the selected source. For each song, you will see a variety of information, such as Song Name, Track #, Time, Artist, and so on. You can choose the information you see on this list to make it contain the information you find the most useful. The order in which songs are listed in the Content pane is the order in which they will play when you play the selected source. Tip  | We will get to working with the Browser later, but for now know that you can open and close it by clicking the Browse button or by choosing Edit, Show Browser or Edit, Hide Browser. |
Going back to Figure 12.9, you can see that several songs by the group 3 Doors Down are listed in the Content pane. Controlling Your Music Surrounding those panes are the controls you use to work with and get information about your music. At the top of the window, from left to right, you will see the following areas (see Figure 12.11): Figure 12.11. At the top of the iTunes window, you see a number of controls you can use to play and manage your music. 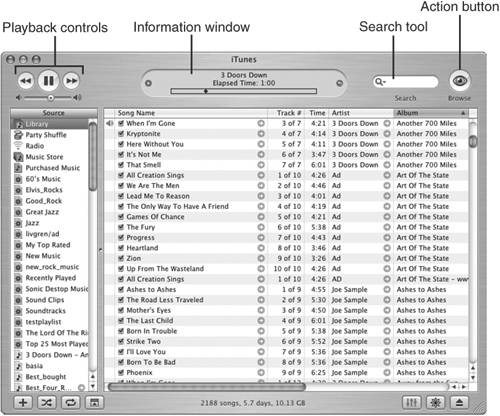
Playback controlsHere, you can see the familiar Play/Stop, Fast Forward, and Rewind buttons along with the Volume Control slider. These work as you probably expect them to. Information windowIn the center of the iTunes window is the Information window. In this area, you will see a variety of information about what you are doing at any point in time. For example, when you are playing music, you will see information about the music currently being played. When you import music, you will see information about the import process. Later, you'll learn how to choose the information displayed here. Search toolYou use the Search tool to search for music. Action buttonThe Action button changes depending on the context you are in. For example, if you have selected the Library, it becomes the Browse button, which you use to open or close the Browser. If you select a playlist, it becomes the Burn button, which enables you to burn a CD.
When you move to the bottom of the iTunes window, you will see the following (see Figure 12.12): Figure 12.12. Not to be outdone by the top, the bottom of the iTunes window is chock full of good stuff, too. 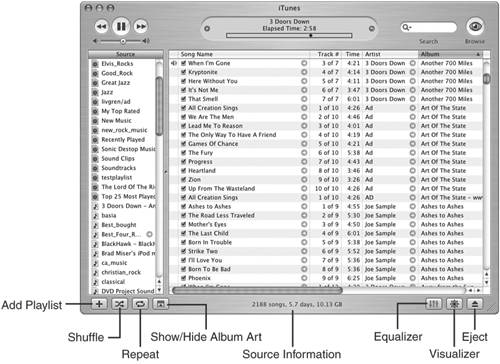
Note  | Because I don't see much value (not even entertainment value) in the Visualizer, I won't be mentioning it again in this book. You can play with it by using the Visualizer menu if you want to. Oh, by the way, the images you see in the Visualizer are not related to any music that might be playing anyway. Want proof? Fire up the Visualizer with no music playing; it looks just like it does when music is playing. |
Add Playlist buttonYou can use this button to create your own playlists. Shuffle and Repeat buttonsYou use the Shuffle button to shuffle the music in the selected source so that it doesn't play in the listed order. You can use the Repeat button to cause songs to repeat within a selected source. Show/Hide Album Art buttonSongsinformation shows you the number can have album art associated with them. When you click this button, you will see the Art Album box at the bottom of the Source pane. In it will appear any art associated with the song that is currently selected. Source informationThis information shows you the number of songs, total playing time, and disk space of the selected source. This becomes especially useful at certain times, such as when you are burning a CD or building a playlist. Equalizer buttonThis button opens the Equalizer window, which provides you with a graphic equalizer. Visualizer buttonOkay, this was one of the most promoted features of iTunes when it was initially released, but I didn't get it then, and I still don't today. When you click this, the iTunes window fills with a graphic display reminiscent of the 1960s (see Figure 12.13). Figure 12.13. Just because I don't think the Visualizer is groovy, that doesn't mean that you can't dig it. 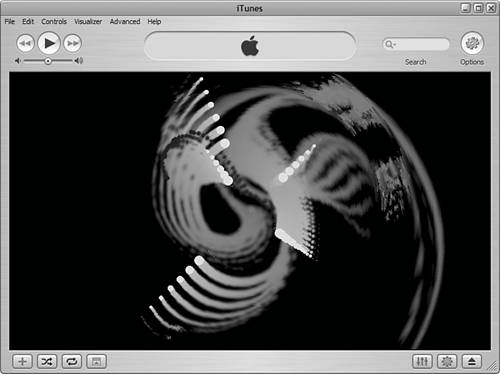
Eject buttonWhen you have selected an ejectable source, such as an audio CD or iPod, you can click this button to eject it.
The Absolute Minimum You are well on your way to total iTunes nirvana. If you have read this chapter, you should be hip to the following iTunes jazz: You have a number of ways to install iTunes on your computerwhether it's a Mac or a Windows PC. The best way is to download and install it from the Internet. No matter how you installed iTunes, make sure you keep it up to date (you'll get to that in Chapter 20, "Maintaining iTunes and Solving Problems"). When you first open iTunes, you work through several configuration settings using the iTunes Setup Assistant. However, you can change these settings at any time using the iTunes Preferences dialog box, which you will be working with throughout the rest of this part of the book. The iTunes window is an elegant mix of functionality and good interface design. As you learn more about the application, you will likely be impressed. The primary components of the iTunes window are the controls, the Information area, the Source List, the Browser, and the Content pane. Although iTunes is one my favorite applications and I use it constantly, it sports one of the silliest features that was ever part of an application. What is it?
|
|


