Creating Your Own Workflows
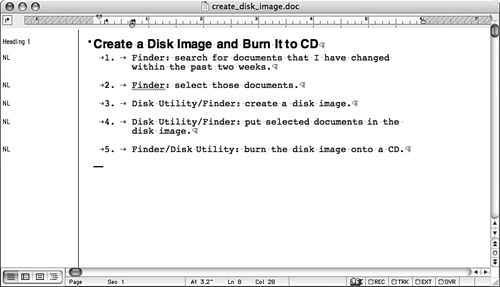
| Any type of programming, which is what you are doing when you use the Automator, requires that you follow a logical path (well, logical to your Mac anyway) that ends up in the result you want. This isn't always easy to do. For best results, you should tackle any automation project by performing a series of steps, as you will learn about in the following sections. Designing a WorkflowThe first step when creating any workflow is to determine the tasks you want to automate. You need to identify the applications those tasks involve and the specific steps that are required. For best results, you should manually perform each step that is required to complete these tasks and document what you do during each one. Create a list of specific applications the tasks involve and the specific steps performed in that application (see Figure 10.5). This might seem tedious, but creating a workflow that actually does what you expect will be much easier if you take the time to design it before you jump into the Automator and start dragging steps into a workflow. Figure 10.5. This document details the steps required to find files modified recently, place them into a disk image, and put the disk image on a CD (you'll see the resulting workflow later in this chapter). NOTE After you have listed the steps in your workflow, you need to make sure that Automator supports both the applications and actions you need to perform to accomplish those tasks. If it doesn't, you'll need to use a different automation tool.
Creating and Saving a WorkflowAfter you have designed a workflow, you are ready to jump into the Automator to create and save it. At this stage, you should save the workflow in the Workflow format so you can continue to work with it. When you save a workflow, you will give it a name. Usually, you'll want its name to describe what it does so you can remember it later. Building a WorkflowTo build your workflow, perform the following general steps:
Testing and Editing a WorkflowAfter you have created the workflow, you should go through a testing process to ensure that the workflow works as you expect it to. It is typical that it won't work quite right at first, so plan on needing to edit it a few times before you get it working properly. The general steps to test and edit a workflow are the following:
You should expect to spend some time testing and editing a workflow until it does just want you want it to. You can increase the odds of your workflow working right the first time by designing it in a good amount of detail before you start creating it. Generally, the more prep work you do designing and documenting your workflow, the less time you will have to spend testing and editing it. Saving a Workflow As an ApplicationAfter your workflow does what you want it to, you can save it as an application. You can then run the workflow by launching the application, which you do just like other applications on your Mac, such as by double-clicking it, putting it on the Dock and clicking its icon, adding it to your Login Items so it runs when you log in, and so on. |
EAN: 2147483647
Pages: 317
 To learn about some other automation tools,