Understanding the Automator
Understanding the Automator ApplicationWhen you open the Automator application, you'll see a three-paned window (see Figure 10.1). On the far left of the window is the list of applications on your Mac that Automator recognizes, which means you can automate actions involving those applications. When you select an application, the actions that can be automated will be shown in the center column. When you select an action or other object, an explanation of the object will be presented in the Information pane. The rightmost pane is the Workflow area, which is where you create your automation. Figure 10.1. Automator makes creating complex programs easy because you can drag steps onto the Workflow area of the Automator window.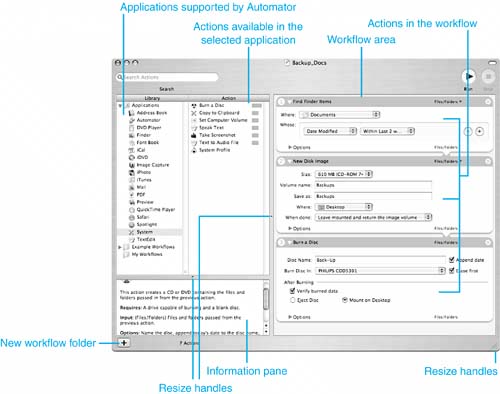 Understanding how the Automator works requires that you understand the following concepts:
Knowing When to Automate TasksUsing the Automator is relatively easy given how powerful it is. Still, it does require some learning, especially if you have never programmed or written macros or scripts using other applications. You'll need to balance the time and effort required to learn to use the Automator to create workflows against the time you save by automating your Mac. In the beginning, while you are learning how to use Automator, it might take more time to create a workflow than it would to perform tasks manually. As you get more proficient with the Automator, though, you'll be able to create workflows more quickly, which in turn will improve your overall efficiency in getting things done on your Mac. Good candidates for automation with the Automator are any series of steps you find yourself repeating again and again. The steps you perform manually can be exactly the same, or you might perform the same series of steps but use different files or folders each time. In such cases, the time you invest in creating an Automator workflow can pay off because you can have your Mac repeat those steps for you. Perhaps the most important consideration when deciding to automate is that the applications you use during the steps you are automating must be supported by the Automator and, more specifically, the individual actions you perform must be available in the Automator for that application. Determining Which Applications Are Supported by the AutomatorTo automate tasks, the applications you use to perform those tasks must be supported by the Automator. Most Apple applications do support the Automator, including those that are part of Mac OS X and those that are included in the iLife suite. NOTE Because the Automator is new for OS X version 10.4, it isn't widely supported by third-party applications yet. Hopefully, this will change as the Automator matures and other companies add support for it in their applications. To determine which applications are supported by the Automator, launch the Automator application and look at the applications shown in the Library pane (see Figure 10.2). If an application appears on this list, it supports the Automator. If not, you'll have to use a different automation tool to automate tasks involving that application. Figure 10.2. In the Library pane, you'll see all the applications on your Mac that support the Automator.
Understanding Actions That Are Supported by the AutomatorEach application supported by the Automator will have one or more actions. Some applications, such as the Finder, support many actions, whereas others support only a few. If all the steps you need to perform to complete a task are available as actions, you can automate a task. If not, you'll need to use a different automation tool. To see which actions are supported, select an application on the Library list. The actions supported for that application will be shown in the Action pane (see Figure 10.3). Figure 10.3. Here you can see that the Finder application supports many actions, including the Create Archive action, which creates a .zip archive of selected files. When you select an action on the Action pane, information about the action will be shown in the Information pane located below the Library and Action panes. This information includes a summary of what the action does along with its input and output. For example, when you select the Finder's Create Archive action, you'll see that this action creates a Zip format archive (.zip) from the files specified. Its input is the files to be archived. The output, called result, is the archived file. To understand an action in more detail, drag it from the Action pane and drop it onto the Workflow area (see Figure 10.4). The action will be added to the workflow, and you will be able to see its details. At the top of the action will be its name and expected input. If expected input is missing, the missing input will be shown in red to the right of the Action's title. For example, if you add an action that has files or folders as input, but there isn't an action prior to that one that has files or folders as the output, the input of the current action will be red to indicate it is missing (in Figure 10.4, you can see the Files/Folders input, but because this book is in black and white, you can't see that the term is red). Figure 10.4. I dragged the Create Archive action into the Workflow area to find out about it in more detail.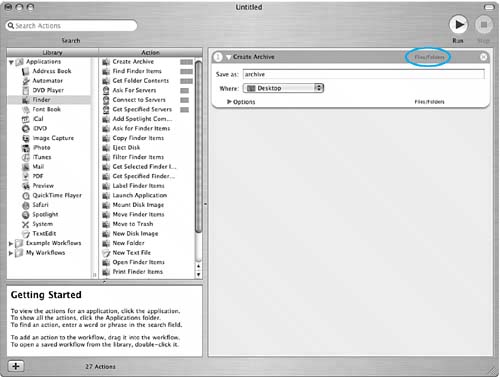 Under the title information, you'll see various tools you use to configure the action. The tools you see will depend on the action you select. Below those tools, you'll see the Options area. When you expand this area, you'll be able to view and configure options for the action. For example, most actions have the "Show Action When Run" option that causes the action to be visible, often requiring you to click the Continue button, when you run the workflow in which that action is contained. |
 To learn about some other automation tools,
 EAN: 2147483647
Pages: 317