| Mac OS X has built-in support for speech recognition. This works both ways you can speak to your Mac to issue commands and your Mac can read on-screen text to you. Whether controlling your Mac with speech works for you or not depends on a lot of variables, such as your speaking voice, the position of your mouth relative to your Mac's microphone, the microphone itself, and so on. Also, don't expect your Mac to start working like the computer on the Starship Enterprise; it will take some time for you to get voice recognition working effectively. NOTE I've tried several voice recognition systems, including the Mac's built-in one. Frankly, beyond the initial gee-whiz factor of being able to speak a command and have the computer respond by doing something, I have found that using the keyboard and mouse is a much more effective way to work. But, you might want to experiment to see if it works better for you, particularly if you have special needs when it comes to interacting with your Mac. This section will get you started, but is certainly not intended to explain all the details.
Configuring Your Mac for Voice Control To configure speech recognition on your Mac, perform the following steps: 1. | Open the Speech pane of the System Preferences application.
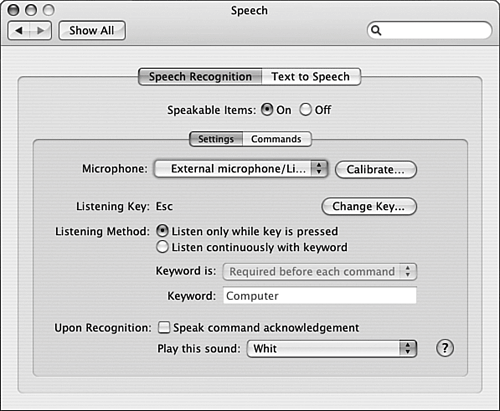
| 2. | Click the Speech Recognition tab and use the controls to configure how speech recognition works. This pane has two tabs: Settings and Commands (see Figure 9.7). Use the Settings tab to configure basic settings of speech recognition.
Figure 9.7. Use the Settings tab of the Speech Recognition pane to configure how your Mac listens to you. 
| 3. | Use the Microphone pop-up menu to choose the microphone you want to use. The options you have will depend on the configuration of your system.
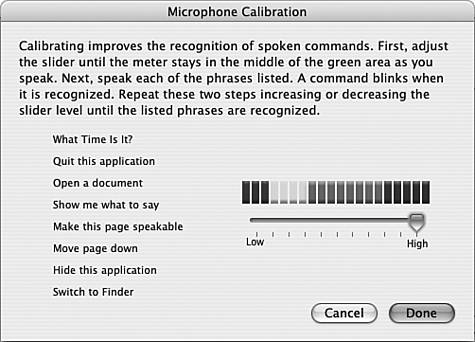
| 4. | Click the Calibrate button. The Microphone Calibration window will appear (see Figure 9.8).
Figure 9.8. Using the Microphone Calibration window, you adjust your microphone's input to easily pick up spoken commands. 
| 5. | Speak some words and drag the slider to the left or right until what you speak is mostly registered near the center of the green band above the slider.
| 6. | Speak each phrase listed along the left edge of the window. If the phrase is recognized by your Mac, it will flash. If it isn't recognized, adjust the slider and repeat the phrase until it is.
| 7. | Continue this process until you can speak all of the phrases and have them recognized without changing the slider.
TIP When you speak to your Mac, you'll probably have to slow down and make sure you enunciate each word more clearly than you probably do in normal conversation. | 8. | When your Mac registers each phrase when you speak it, click Done. The Microphone Calibration window will close.
| 9. | By default the listen key is Esc; if you want to change this, click Change Key and choose the key you want to use. The listen key makes your Mac listen for spoken commands.
| 10. | If you want to press the listen key before you speak a command, click the "Listen only while key is pressed" radio button. With this active, you must press the listen key before you speak a command.
| 11. | If you want your Mac to listen continuously for commands, click the "Listen continuously with keyword" radio button. Then, choose when the keyword is required on the "Keyword is" pop-up menu. The options are "Optional before commands," "Required before each command,""Required 15 seconds after last command," and "Required 30 seconds after last command." Then, enter your keyword in the Keyword field. The default is "Computer," which means you need say the word "Computer" to get your Mac to listen to your commands, but you can change this to something else if you prefer to use a different term.
| 12. | If you want your Mac to acknowledge your command by speaking it, check the "Speak command acknowledgment" check box. When your Mac acknowledges your command, it will speak the command it thinks it heard.
| 13. | Choose the sound you want your Mac to play when it recognizes a command on the "Play this sound" pop-up menu.
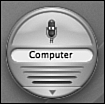
| 14. | Activate speech recognition by clicking the Speakable Items On radio button at the top of the pane. A sheet will appear that provides some tips for success; read these tips and click Continue. A round feedback window will appear on the desktop. In the center of this, you'll see either the current listen key or the phrase you need to speak (see Figure 9.9). When your Mac is listening to you, the lower part of this window will show you how the sound is being registered.
Figure 9.9. The feedback window indicates that the word "Computer" needs to be spoken before voice commands. 
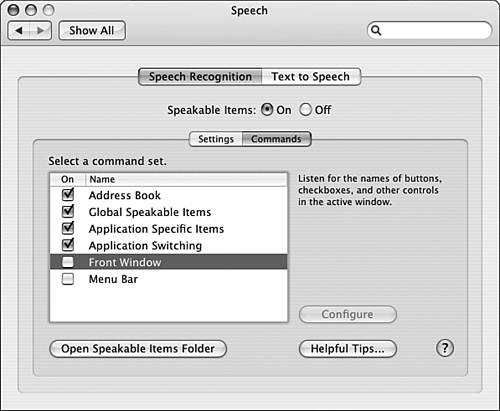
| 15. | Click the Commands tab. You use this pane to determine the command sets you can speak (see Figure 9.10).
Figure 9.10. Use the Commands tab to choose command sets that you want to be able to speak. 
| 16. | Select a command set, such as the Font Window set. A description of the commands will appear to the right of the list.
| 17. | To activate a command set, check its check box. You will then be able to speak the commands in that set. You will be ready to start talking to your Mac.
|
TIP If a command set has additional configuration options, the Configure button will become active when you select that command set. Use this button and resulting sheet to set options for the command set.
NOTE There are a number of commands available in the Speakable Items folder. When you activate the Global Speakable Items command set, these commands will be available to you. To see these commands, click the "Open Speakable Items Folder" button. A Finder window will appear and you will see Speakable items available to you. (For kicks, check out the "Tell me a joke" command.)
Using Speech Recognition After you have configured speech recognition, it will either be easy to use or extremely frustrating depending on how well your Mac recognizes the commands you speak. The only way to find out is to try it. If you configured speech recognition to require the listening key, press it and speak a command. If your Mac recognizes the command, it will act on it and provide you with the feedback you configured it to, such as repeating the command or playing the sound you selected. If you have your Mac listen continuously, speak the keyword you set and then speak the command. If your Mac recognizes the command, it will act on it and provide you with the feedback you configured it to, such as repeating the command or playing the sound you selected. If your Mac does nothing, it doesn't recognize the command. This can be because it didn't "hear" you, didn't understand what you said, or the command you spoke isn't a Speakable command. TIP To see which commands you can speak, click the arrow at the bottom of the feedback window and select "Open Speech Commands window." In the Speech Commands window is the list of commands you can speak. When you open an application that supports speech recognition, that application appears in the Speech Commands window and the list of spoken commands it supports is shown. If you double-click the feedback window, it moves to the Dock.
If you find speaking commands useful, you can continue to talk to your Mac to control it. However, if you are like me, you will quickly grow tired of trying to get it to work reliably and even if you do get it to work well, it is still faster to use your hands to control your Mac. But, this can be kind of fun to play around with. Using Text to Speech As you saw earlier in this chapter, using VoiceOver, your Mac can speak to you. The Text to Speech feature takes this concept much further and can be used across many applications and OS to have your Mac speak to you. To configure Text to Speech, perform the following steps: 1. | Open the Text to Speech tab of the Speech pane of the System Preferences application.
| 2. | Select the voice you want your Mac to use from the Voice pop-up menu and then set the rate at which the voice speaks using the slider. Click the Play button to hear a sample.
| 3. | If you want your Mac to speak alerts to you, check the "Announce when alerts are displayed" check box and use the "Set Alert Options" button to open a sheet that enables you to configure the voice used, the alert phrase, and the delay time. Click OK to set the options you selected.
| 4. | If you want applications to speak when they need your attention, check the "Announce when an application requires your attention" check box.
| 5. | If you want to be able to quickly have your Mac read selected text to you, check the "Speak selected text when the key is pressed" check box. In the resulting sheet, type the key combination you want to use to cause your Mac to read text you select and click OK.
|
TIP You can change this key combination later by clicking the Set Key button.
TIP Your Mac can speak the time to you, as well. Use the Date & Time Preferences pane to configure this option.
Your Mac will start speaking to you when the conditions you selected occur, such when an alert is played. If you enabled the "speak selected text" feature, you can select any text and press the keyboard shortcut to cause your Mac to read it. In applications that support text-to-speech, you can have your Mac read to you by choosing Edit, Speech, Start Speaking. You can shut your Mac up by choosing Edit, Speech Stop Speaking. |


