Monitoring and Administering a Network
| In addition to the tools you need to configure and start various network services, such as file sharing or FTP, Mac OS X includes tools you can use to monitor and administer your network. Two of these are the Network Utility, which enables you to diagnose your network connections, and the NetInfo Manager, which provides comprehensive control over many aspects of a Mac OS X machine. Using the Network Utility to Assess Your NetworkThe Network Utility provides a set of tools you can use to assess the condition of communication across machines on your network as well as a set of tools that enable you to get information about various sites on your network and the Internet. When you launch the Network Utility (Applications/Utilities), you will see a window with nine tabs, one for each service the application provides (see Figure 33.13). Figure 33.13. Ping is a useful way to test your connection to another machine (in this case, I pinged 10.0.1.4, which is another Mac on my LAN).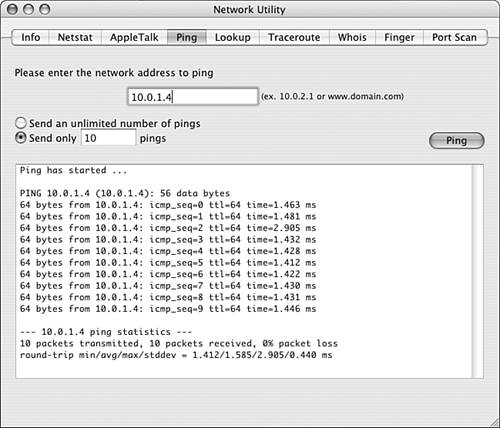 Table 33.2 summarizes the tabs in the Network Utility application.
Covering each of these services in detail is beyond the scope of this chapter, but the next couple of examples should be helpful in getting you started using this tool. Checking Network Connections with PingTroubleshooting network problems can be difficult because identifying where the source of the problem is can be hardfor example, with the machine you are using, with the machine you are accessing, with an application, and so on. Ping is a way to check on the fundamental communication between two machines. If the ping is successful, you know that a valid communication path exists between two machines. If it isn't successful, you know that a fundamental problem exists with the communication between the machines, and this helps you know where to troubleshoot. To ping a machine, perform the following steps:
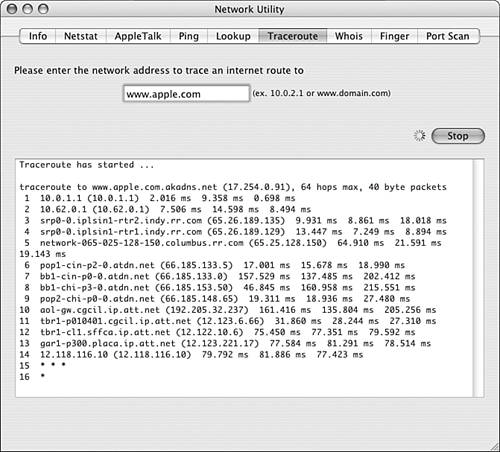
Watch the results in the lower part of the window. You will see your machine attempt to communicate with the machine whose address you entered. If they are able to successfully communicate, you see statistics about how fast the pings are (refer to Figure 33.13). If the pings are successful, you know the communication path between the machines is valid. If not, you know you have a fundamental connection problem between the two machines. Tracing a Route with TracerouteSometimes looking at the specific route between two machines can help identify the source of problems you might be having:
Understanding and Setting PermissionsAccess to items on your Mac OS X machine, whether from the machine directly or over a network, is determined by the access privileges set for those items. Three levels of access privilege can be set for any item; these are the following:
The owner is the owner of the item. The group is a set of users. By default, Mac OS X includes several groups for which various permissions are assigned to different volumes and directories. Many of these default groups look odd, and some are even nonexistent (for example, in certain places, you will see Members of group ""). Others include those users who are neither the owners nor members of a group. Each level of access has four access options:
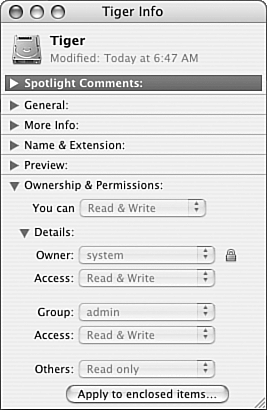
If you open the Info window for an item and expand the Ownership & Permissions area, the current access permissions for the item will be shown. If you expand the Details area, the current permissions set for the owner, group, and others will also be displayed. For example, Figure 33.15 shows the Permissions information for the volume on which Mac OS X is installed, whereas Figure 33.16 shows similar information for a document within the logged-in user's Home directory. Figure 33.15. This Info window for the startup Mac OS X volume shows that the current user (You can) can read and write to the selected volume; the owner (system) and anyone in the admin group has the same access while others can only read from the disk.
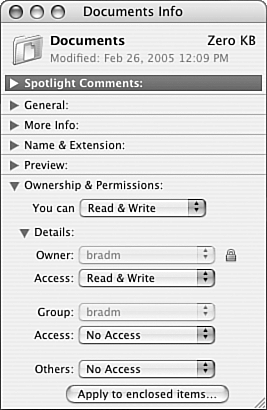
Figure 33.16. This Info window is for the Documents folder within a user's Home directory; its pop-up menus are active and you can use them to set access permissions for the item.
TIP To change permissions, click the Lock icon next to the Owner pop-up menu and authenticate yourself as an administrator of the Mac. When the Lock icon is unlocked, the pop-up menus become active. There are several things you need to know about the Ownership & Permissions information shown in the Info window. First, unless you are logged in under the root or administrator account, you can't use the pop-up menus to change the permissions assigned to items on the Mac OS X startup volume above the current user's Home directory. However, when you open the Ownership & Permissions area of the Info window for an item on another volume or within a user's Home directory, the pop-up menus become active and you can use them to change the privileges for the items that folder contains. Second, the groups you see in the Info window are default groups created when you install Mac OS X. The user accounts that are members of these groups can access the item with the group's privileges. You can't change the members of those groups from the Finder; you have to use the NetInfo Manager application, as you will see in the next section. To configure access privileges for most items, you need to either be logged in as an administrator or authenticate yourself in the Info window. To do so, click the Lock icon and enter an administrator username and password. To set the access privileges for all items, perform the following steps:
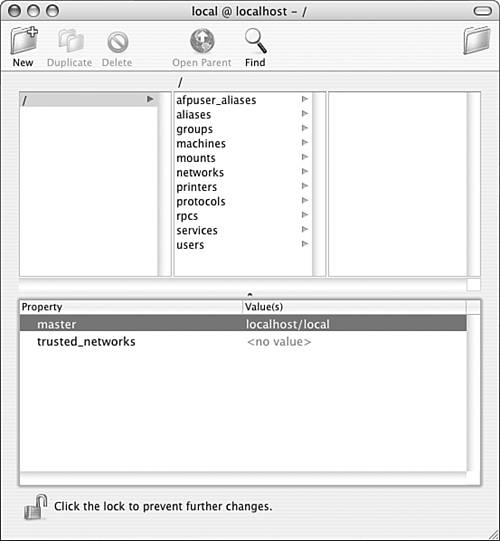
Under Mac OS X, you can open multiple Info windows at the same time. This is a handy way to compare and contrast the permissions provided for different items. Using the NetInfo Manager to Administer Your NetworkThe NetInfo Manager application (Applications/Utilities) can be used to view and change an extensive amount of configuration information for a system. The application presents information based on a selected directory; by default, this is the information for the localhost directory, which is the machine on which Mac OS X is installed. CAUTION Using the NetInfo Manager application is not for the faint of heart. The information it presents and the controls it provides are complicated and can be quite dangerous to your system. This section can only scratch the surface of this application, and you should be careful if you explore the application on your own. When you open the application, click the Lock icon and enter your administrator account information to enable changes to be made. The application's two-paned window and toolbar will become active (see Figure 33.18). Figure 33.18. This NetInfo Manager window shows information for the base level of the localhost machine.
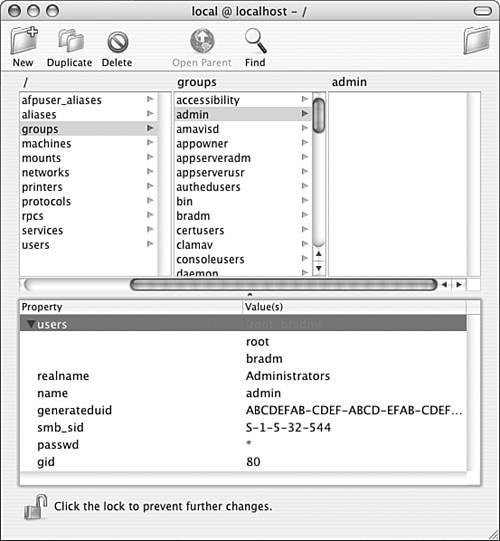
In the upper pane is a browse window that works similarly to a Finder window in the Columns view. In the center column, you can browse the contents of an item selected in the left column. Similarly, in the far right column, you can browse the contents of an item selected in the center column. In the lower pane are the details for the item you have selected in the upper pane. The specific details you see are related to what you have selected in the upper pane. For example, Figure 33.19 shows the details for the user account bradmselected in the upper panein the lower pane of the window. Figure 33.19. You can use the NetInfo Manager to view and change information about the items you select.
When you have selected an item, you can change its information by editing the property and value data in the lower pane of the window. NetInfo Manager is an extremely powerful utility, and you can administer many parts of your system with it. Because of space limitations, I can't cover it in much detail. However, a sample task will show you how it works in general. You can change the members of a group through which access privileges are assigned by changing the members of that group. For example, you can add members to the group admin to change which user accounts have administrator privileges on your machine:
TIP If the changes you make don't appear to be reflected, restart Mac OS X to force the new values to be implemented. NOTE You can make copies of directories so you can make changes to one and use it without writing over the previous version. This gives you a way to recover in case you mess something up. The users you added to the admin group now have the privileges designated for this group. Opening the Accounts pane of the System Preferences application shows that the user accounts you added to the admin group are now designated as administrator accounts. You can change the members of other groups you encounter in the same way. NOTE Of course, it would be a lot faster to use the Accounts pane of the System Preferences application to edit a user account to make it part of the admin group, but this example serves to show you generally how the NetInfo Manager application works. To change the members of other groups, you have to use the NetInfo Manager application; you can do so using the same steps as those to change the members of the admin group. |
 To learn how to log in under the root account,
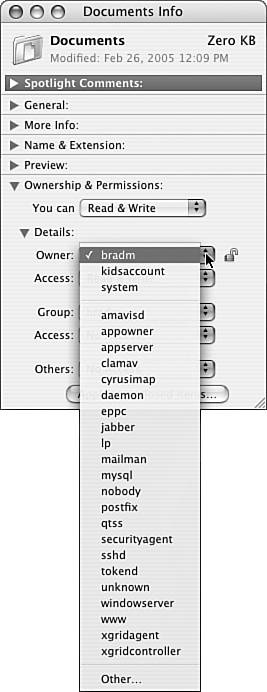

EAN: 2147483647
Pages: 317