| When you create an iDVD project, you should perform the following general steps: 1. | Design the DVD by choosing and preparing the content you want it to contain and your purpose for creating it.
| 2. | Open iDVD and create a new project.
| 3. | Use the Map mode to layout the general content, menus, and organization of the project.
| 4. | Add content to the project.
| 5. | Design the project's menus.
| 6. | Preview the project and fix any problems you find.
| 7. | Burn the project on a disc or save it as a disk image file.
| 8. | Clean up the files you created.
|
NOTE The following sections provide somewhat general information about using iDVD. For specifics, see the mode descriptions presented earlier in the chapter and the iDVD Help system.
Designing a DVD The results of your project will likely be much better if you think about your goals for it before jumping into iDVD. Decide the content you want to deliver, how you want it to be organized, and how you want the disc to be organized. Create the content using other tools, such as iMovie and iPhoto, so that the iDVD project's content will be ready to go. This enables you to focus on the DVD itself when you start working in iDVD. Create a simple roadmap for the DVD that lists each project you want it to contain and how you want to group that content. Creating a DVD Project When your general design is done, jump into iDVD and create a new project by selecting File, New. In the resulting sheet, name your project, choose a location in which to save it, and click Create. The location you choose must have lots of free space. Your DVD can contain up to 4GB of data, plus iDVD will need room to store the encoded version that it will burn to disc. You can store an iDVD project on any volume on your Mac. iDVD will create the new project and you will be ready to get to work. Laying Out a DVD Project Using the Map Use the Map view to design the overall structure and organization of the iDVD project: 1. | Click the Map button to move into the Map view. You'll see the Autoplay box that will be connected to the disc's main menu.
| 2. | If you want to have content play automatically when the disc is inserted in a computer or a DVD player, drag that content onto the Autoplay box.
 To learn how to locate content to drag to the Autoplay box, p. 776. To learn how to locate content to drag to the Autoplay box, p. 776.
| 3. | Add menus to the main menu by selecting it and clicking the Folder button. A new menu attached to the selected one will be created each time you click the button.
| 4. | Continue adding menus and submenus to the project until you have added all that you need according to your plan.
|
NOTE You can have up to 12 buttons on a single menu. If you need to use more than that, create submenus for some of the buttons.
Adding Content to a DVD There are two general types of content you will add to your iDVD projects: iMovie movies and iPhoto slideshows. TIP You can add other kinds of content to an iDVD project as well. For example, you can drag any QuickTime movie onto an iDVD menu to add it to the project. You can also add images directly to a slideshow without having those images in your iPhoto Library.
Adding Movies to a DVD The general steps to add a movie to an iDVD project are as follows: 1. | Move to the menu to which you want to add the movie by double-clicking the menu's button on the map or by clicking the menu's folder icon while in Design mode. The menu will appear in the Content pane.
TIP While you are adding content, click the Motion button to turn off motion effects because they can be distracting. Also ignore menu and button names for now. | 2. | Click the Customize button. The iDVD Drawer will open.
| 3. | Click the Media button to open the Media pane.
| 4. | Select Movies on the pop-up menu. Below the pop-up menu, you'll see your Movies folder.
| 5. | Select the Movies folder. In the lower part of the pane, you'll see all the iMovie projects in that folder.
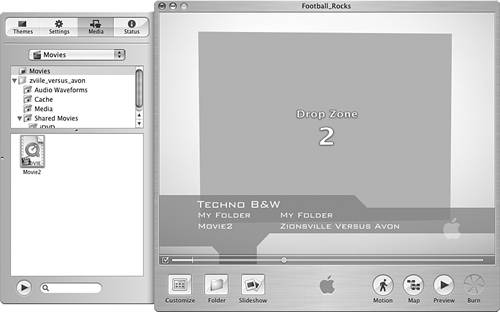
| 6. | Drag the movie file from the Media pane onto the menu being displayed in the Content pane. A new button representing the movie will be added to the menu. The name of the button will be the name of the iMovie project (see Figure 26.11).
Figure 26.11. This menu has two submenus (the My Folder buttons) and two movies. 
TIP If the movie you want to add to a menu is not stored in your Movies folder, open the Movies pane of the iDVD Preferences dialog box and click the Add button. Move to the folder that contains the movie you want to add, select it, and click Open. The folder you selected will appear in the upper pane of the Media pane. Select it to see and select its contents. You can also add the movie to your Movies folder to make it available. | 7. | Continue adding movies to the current menu until you have added all of them called for in your plan.
| 8. | Move back to Map view and then move to the next menu that will have movies on it.
| 9. | Repeat steps 27 until you have added the movies to that menu.
| 10. | Continue this process until you have added all the movies identified in your plan to the iDVD project.
|
NOTE You might be tempted to start designing your DVD's menus before you have added menus and content to it. You can certainly do that, but the process will be more efficient if you do it in the order presented here. That's because the design of your menus will often be impacted by the content you place on them. Get the layout and content done first; then you can focus on the customization of menus and buttons.
Adding Slideshows to a DVD Use the following steps to add slideshows of images in your iPhoto Library to the project: 1. | Move to the menu to which you want to add a slideshow by double-clicking the menu's button on the map or by clicking the menu's folder icon while in Design mode. The menu will appear in the Content pane.
| 2. | Click the Slideshow button. A new slideshow button will be created on the current menu.
| 3. | Double-click the new button to move into Slideshow mode.
| 4. | Click the Customize button. The iDVD Drawer will open.
| 5. | Click the Media button to open the Media pane.
| 6. | Choose Photos on the pop-up menu. The sources in iPhoto will be displayed in the top pane.
TIP You can use the Search tool at the bottom of the Media pane to search for items in the selected source. You can use the Play button to preview movies or music in the pane as well. | 7. | Select the source of images you want to include in the slideshow, such as a photo album. The images in that source will appear in the pane.
| 8. | Drag the images you want to use from the Media pane onto the Content pane. The images will be added to the slideshow and you'll see a thumbnail of each image. In the upper-right corner of the window, you'll see the slideshow's duration.
| 9. | Move the images around the content pane until they are in the order in which you want them to play in the slideshow.
| 10. | Use the configuration tools you learned about earlier in the chapter to configure the slideshow, such as by choosing transitions.
| 11. | On the pop-up menu in the Media pane, select Audio. The sources of music stored in iTunes will be shown in the upper pane.
| 12. | Select the source of the soundtrack you want to add to the slideshow in the upper pane. The songs in that source will be shown in the lower pane.
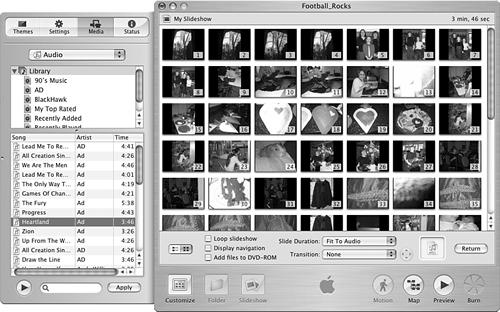
| 13. | Drag the song you want to use as a soundtrack from the Media pane onto the Audio well. The default icon will be replaced by an iTunes icon to show you that the song has been added to the slideshow (see Figure 26.12).
Figure 26.12. Although you can't hear it because this book doesn't have a soundtrack, this slideshow does have one. 
TIP If you want the slideshow and soundtrack to end at precisely the same time, select Fit To Audio on the Slide Duration pop-up menu (it is selected by default when you add something to the Audio well). | 14. | Click Return. You will move back to the previous menu.
| 15. | Repeat these steps until you have added all the slideshows called for in your plans.
|
Designing a DVD's Menus After your project has all the menus and content you intend it to, it's time to start customizing its look and feel. There are lots of ways to do that, and in this section you'll get an overview of some of iDVD's great formatting tools. TIP If you discover menus or content you want to get rid of, select that item's button and press the Delete key.
Naming Buttons and Menus DVD menus and the buttons they contain have text titles to help the viewer identify those items. After you add menus and content to a DVD, you should create meaningful text names for each item on the disc: 1. | Move to the main menu.
| 2. | Click once on the menu title (which will default to be the name of the theme applied to it), pause for a moment, and then click again. The text will become highlighted to indicate that you can edit it.
| 3. | Type a name for the menu.
| 4. | Perform steps 1 and 2 for the name of each button on the menu. Some buttons will already have names, such as the name of an iMovie project. You can leave these names or edit them to suit your purposes.
| 5. | Use the navigation buttons or Map view to move to the next menu in the project.
| 6. | Name the menu and all its buttons.
| 7. | Repeat these steps until you have named all the menus and buttons on the DVD (see Figure 26.13).
Figure 26.13. This menu isn't yet much to look at, but at least the button and title names make sense. 
|
Understanding and Selecting Themes Themes are a general set of formatting options that you can apply to menus to determine how those menus appear onscreen (and sound if the theme includes sounds). To apply themes to your menus, perform the following steps: 1. | Move to the main menu.
| 2. | If it isn't on already, click the Motion button to turn on Motion effects. Some themes include these, and seeing and hearing them can help you choose the right theme for a menu.
| 3. | Click the Themes button in the Drawer to open the Themes pane.
TIP As you will learn later, you can customize themes and then save the result as a favorite that you can apply again as easily as you can apply the built-in themes. | 4. | Use the pop-up menu to choose the category of themes you want to use. The choices include All, 5.0 Themes, and so on. When you make a selection, thumbnails of the themes in that category will be shown beneath the pop-up menu.
| 5. | Scroll through the list of themes until you see one you want to try.
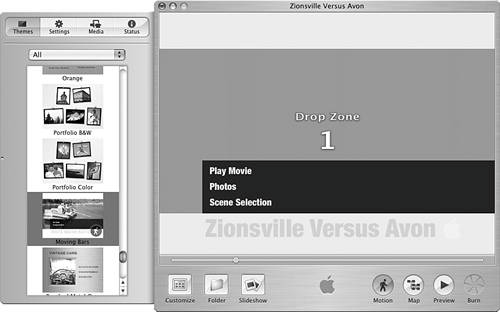
| 6. | Click a theme. The menu will be redesigned according to the theme you selected (see Figure 26.14). If the theme includes motion effects, you will see and hear them. The Scrubber bar will appear just above the toolbar and you will see the Playhead move as the motion effects play. If the theme includes drop zones, you'll see a placeholder for each drop zone.
Figure 26.14. Same menu, different theme. 
TIP If the Intro check box appears, the first part of the motion effect will be the titles moving onto the screen. The length of the introduction will be represented by a vertical line to the right of the check box. If you don't want to use the introduction, uncheck the check box. | 7. | Continue trying themes until you find the right one for the menu.
| 8. | Apply themes to all the menus in the project.
|
TIP Remember that you can apply themes to multiple menus at the same time by selecting them in the Map mode and then choosing a theme.
Configuring Drop Zones Many themes include drop zones, which are zones in which you drop content to have that content displayed while the menu appears onscreen. Some themes have more than one drop zone, with all of them appearing at the same time. Others rotate through each drop zone as the menu appears onscreen. You can place images or movies into any of these drop zones: 1. | Move to a menu containing a drop zone.
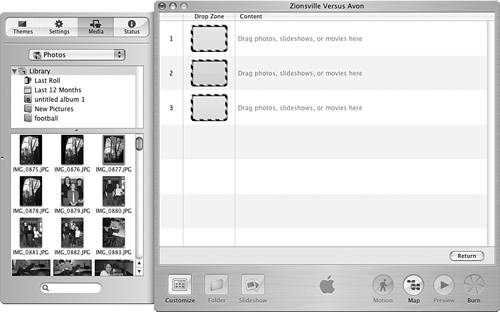
| 2. | Select Project, Edit Drop Zones. You'll see the Drop Zone window and tools (see Figure 26.15). Each drop zone will be represented by a box and numbered accordingly.
Figure 26.15. Use this mode to configure the drop zones on a menu. 
| 3. | Add images, movies, or slideshows to each drop zone. You add content to drop zones by dragging that content from the Media pane or from your Desktop onto the drop zone.
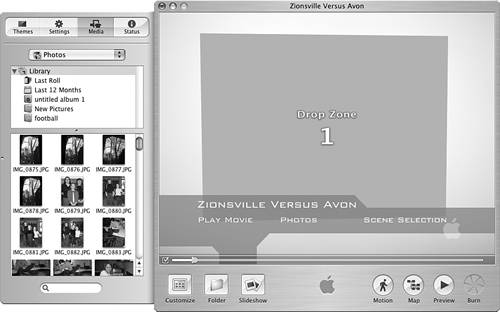
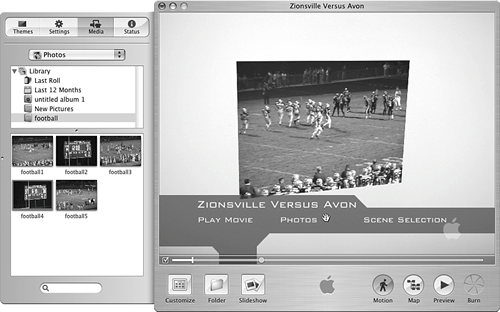
TIP If you drag more than one image onto a drop zone, the images you drag will play as a slideshow in the drop zone. | 4. | Click Return. You'll move back to the menu and the content you placed into each drop zone will play (see Figure 26.16).
Figure 26.16. Too bad you can't see the cool motion effects of these drop zones. 
TIP To adjust the part of an image you see in a drop zone, drag it around the drop zone box. | 5. | Place content in all the drop zones in the project.
|
TIP You can remove the Apple logo from your menus by unchecking the "Show Apple logo watermark" check box on the General pane of the iDVD Preferences dialog box.
Designing Custom Menus and Buttons Using the default themes is great because you can quickly apply a lot of great formatting to your menus. But, you aren't limited to using these themes; you can customize menus in as much detail as you'd like. To do so, click the Settings button in the Drawer and you'll see the customization tools (see Figure 26.17). Figure 26.17. Use the tools on the Settings pane to customize your menus. 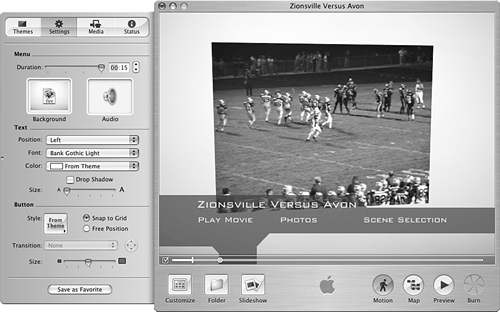
Use the tools in the top part of the pane, labeled Menu, to configure the background of the menu. You can perform the following actions: Set the duration of background motion effects using the Duration slider or input boxes. Apply an image or movie to the background by dragging the image or movie onto the Background well. Apply an audio background to the menu by dragging an audio file onto the Audio well.
In the center part of the pane, you'll see the tools you can use to customize the title of a menu, including its position, font, color, drop shadow, and size. TIP The Text tools apply to the menu title when nothing is selected or the title is selected.
You can customize the buttons on a menu in the following ways: Choose the button style on the Style pop-up menu. Configure button labels by selecting at least one button on the menu and using the Text tools to set the text attributes of those labels. Click the "Snap to Grid" radio button to keep buttons on the menu aligned according to the menu's grid, or click "Free Position" if you want to place them manually by dragging them to new locations on the menu. If you use a button that includes an image box (all except text buttons), you can place images, slideshows, or movies within the buttons just like you can do for drop zones. If you place more than one image in a button, select that button and use the Transition pop-up menu and Direction arrows to configure the transitions between images. Set the size of the buttons using the Size slider. You can save your customizations as a new theme by clicking the "Save as Favorite" button. Name the new favorite. Check the "Shared for all users" check box if you want everyone who uses your Mac to be able use the theme you created. Check the "Replace existing" check box if you have already saved a theme with the same name and want to replace that version with a new one. Click OK. Your customized theme will appear on the Themes pane when you choose the All or Favorites category. You can apply your new theme to other menus by clicking it.
TIP If you will be viewing the DVD on a standard TV, select Advanced, Show TV Safe Area. A red box will appear in the Content pane, and anything inside the box will be displayed on the screen. Things outside the box might or might not be displayed. To be safe, design your DVD so that all the important elements appear within the TV Safe box.
The design process is definitely iterative. Some changes you make won't look quite right and will cause you to make other changes. Expect to go back and forth between menu design, titles, and other elements to get your design just right. Previewing and Fixing a DVD After you have designed the project, use the Preview mode to preview it. Look for problems with both design (layouts, buttons, and menus) and content. Design problems need to be fixed using iDVD. Content problems, such as problems with movies, need to be fixed in the creating application; then add the content to the DVD again. This part of the process tends to be tedious, but it will pay off in the long run by saving you the time and money required to burn discs with which you find problems. Burning a DVD When you project is done, you can put on it a disc. Burning a DVD in iDVD TIP Before burning a disc, make sure you have saved the project in case the burn process goes bad and iDVD quits.
If your Mac has an Apple SuperDrive, click the Burn button to burn a disc. Follow the onscreen instructions and watch the progress information to complete the process. The time required to burn a DVD varies greatly depending on your hardware, how much content the project has, and how complex it is. When the process is complete, the disc will be ready to watch. Saving an iDVD Project As a Disk Image File If you don't have a SuperDrive, you can save an iDVD project as a disk image file. Select File, Save As Disc Image. In the resulting "Save Disc Image As" dialog box, move to the location in which you want to save the file, name it, and click Save. The project will be saved as a disk image. TIP If you need to create multiple copies of a disc, it is usually a good idea to burn one version and then try it before burning copies. Saving it as a disk image makes this convenient.
You can use Disk Utility or other DVD burning application to put the disk image on a DVD. You can also work with the disk image file you created just like other such files. For example, you can mount it on your desktop. Cleaning Up After an iDVD Project iDVD projects take up a lot of disk space. After you have completed a project, you probably won't want to leave it on your Mac. If you are sure that you'll never need it again, you can simply delete the project file. However, that usually isn't a good idea. NOTE The DVD you burn with iDVD can't be edited. If you don't archive it and don't save it and all the files it contains, you'll have to re-create the project to make changes to it. That is never a fun thing to do.
A better idea is to use the File, Archive command to save a complete, working version of the project onto DVDs so you can access it again if you need to. Then, you can safely delete the project from your computer to gain back the disk space it requires. If you ever need to work on the project again, you can restore it by accessing the archived version. If you want to save some disk space and are sure you won't ever need to change the project, you can save it as a disc image file. This will enable you to burn more copies of the project, but you won't be able to edit it. |

 To learn how to locate content to drag to the Autoplay box,