Customizing iTunes and Your Music
| iTunes provides extensive control over how its window looks and how your music sounds when you play it. You can customize the iTunes window itself, and there are several ways you can control how your music sounds. For example, you can configure the iTunes effects preferences and can use the built-in iTunes Equalizer. Configuring the iTunes WindowThere are several ways in which you can customize the iTunes window. TIP Remember that you can control iTunes from the Dock or by using the iTunes widget. Sometimes, hiding iTunes and just using the Dock or widget controls to control your tunes is most convenient. If you click the Maximize button (the green one), the iTunes window shrinks down so that only the playback controls and information window are shown; this is called the mini-player (see Figure 18.22). In this mode, you will see the window, playback, and volume controls along with the Information window. You can drag the resize handle to the left to further reduce the size by hiding the Information window. Click the Maximize button again to restore the iTunes window to its previous size. Figure 18.22. In this mode, the iTunes window takes up much less screen real estate.
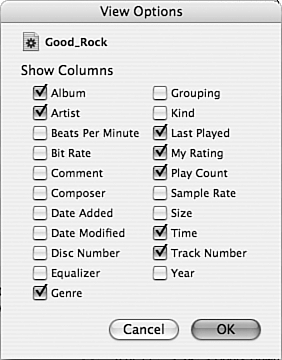
Of course, in the full-size mode, you can manually resize the window by dragging its resize handle. Making it larger displays more information; making it smaller displays less. The window has a minimum size that is quite a bit larger than the reduced size you get with the Maximize button. TIP If you click the Close button in the iTunes window, its window disappears but the music continues to play. When you move from iTunes into another application, such as the Finder, and then back into iTunes, its window appears again. You can also display the window by selecting Window, iTunes. You can also change the relative size of the Source pane or Browser by dragging their resize handles; these are dots that appear in the center of the bars between the various panes. NOTE Unfortunately, iTunes doesn't have a full-screen command (except when you use the Visualizer). You have to set the maximum size of the iTunes window manually using its resize handle. Configuring Views for SourcesAs you have seen, iTunes displays a lot of information for the songs shown in the Content pane, such as song name, track number, artist, and so on. What you might not know is that you can choose the information shown. Even better, you can choose to display different information for different sources; iTunes will remember your preferences for each source and use them each time you view that source. Use the following steps to configure the information that will be displayed for a specific source:
TIP You can also customize the view for a source by holding down the Control key while you click (or right-clicking) in a column heading. A pop-up menu appears and you can quickly add or remove individual columns. You can also have iTunes automatically size one column or all the columns in the window. The custom view you create is saved and appears each time you select that source. You can have different view options for each source you view (meaning your Library, every playlist, each CD, and so on). NOTE Remember that you can drag columns around in the window to change the order in which they appear, resize them, and so on. These tools enable you to completely customize the Content pane for any source you use. Using iTunes EffectsiTunes includes three effects preferences you can set to control how music sounds. These effects are configured on the Audio pane of the iTunes Preferences dialog box:
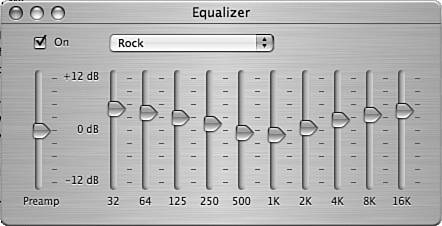
Using the iTunes EqualizeriTunes includes a graphic equalizer you can use to fine-tune the music you listen to. As with hardware graphic equalizers, you can adjust the relative volume levels of various audio frequencies to suit your preferences. Unlike with hardware graphic equalizers, you can select different preset configurations and create your own configurations. You can apply an equalizer configuration to your music even down to individual songs so each tune can have its own equalization. To work with the Equalizer, perform the following steps:
Use the following ideas as you equalize your own music:
When you configure the Equalizer, it will be applied to all the songs you play. However, you can also associate Equalizer presets with specific songs:
TIP If you frequently apply equalizer presets to individual songs, use the View Options window to have the Equalizer column displayed in the Content pane. This column includes an Equalizer preset pop-up menu from which you can choose a preset for the songs shown in the Content pane. |
EAN: 2147483647
Pages: 317


