| Setting up an AirPort base station is slightly different depending on the type of base station you use: the AirPort HAP or an AirPort-equipped Mac OS X machine that provides Internet sharing. The benefit of using an AirPort HAP is that it doesn't place any processing load on an individual Mac and is intended to run at all times, so the AirPort network is always available. It also provides the ability to share an Internet connection with devices to which it is networked using an Ethernet connection. The disadvantage of this device is its cost (currently $199 with a modem and antenna port). If you are going to use an AirPort network regularly to serve more than one or two machines, an AirPort HAP is a good investment. An AirPort Express base station provides many of the same benefits but costs only $99.  To learn about when and how to use an AirPort Express Base Station, p. 398. To learn about when and how to use an AirPort Express Base Station, p. 398.
The benefit of using an AirPort-equipped Mac OS X machine as a base station is that you don't need to purchase any additional hardware (except for the AirPort card in the Mac that will act as the base station). You get most of the functionality of the AirPort HAP but don't have to support another dedicated device. Using this method does have several disadvantages, though. One is that it places additional processing load on the machine that acts as the base station. Another is that the network can be affected by the state of that machine. For example, if the machine is shut down or crashes, the network is taken down as well. Another is that a Mac acting as a base station doesn't support all the HAP's features, such as the option to add an antenna or to wirelessly link base stations together to increase the range of a network. NOTE You can have multiple base stations operating in the same area at the same time to grow your AirPort network to be quite large.
Setting Up an AirPort Hardware Access Point Apple's AirPort Extreme hardware access point (also called the AirPort Extreme base station) is a relatively simple device. It contains a transmitter that broadcasts the signal over which the network is provided. It has two Ethernet ports. One is used to connect to a broadband Internet connection, such as a cable modem. The other is used to connect to a wired Ethernet network so the base station can also share its Internet and network connection with the machines connected to that network. Along with the power adapter port, it offers a USB port to which you can connect a USB printer to share that printer with an AirPort network. The AirPort HAP also includes the software it needs to perform its functions. NOTE The only reason I use the term HAP is to distinguish between a dedicated hardware device and using a Mac as a base station. In practice, these devices are called base stations.
Setting up an AirPort HAP consists of the following two tasks: 1. | Install the AirPort HAP.
| 2. | Configure the AirPort network, including the Internet connection the base station will use to connect to the Internet.
|
Installing the Base Station There is not much to installing the AirPort base station. First, you locate the device in a central area so it provides the maximum amount of coverage where you install it. In most houses, the AirPort base station provides adequate signal strength even if you locate it at one end of the house and place machines you want to network at the other end. However, the closer the machines are to the base station, the stronger the signal is. NOTE AirPort Extreme signals don't offer the range that AirPort Standard signals do. If you want to provide AirPort Extreme services over a large distance (such as greater than 150 feet depending on the environment), you should add an external antenna to it.
Of course, a major consideration for the location of the base station is where your Internet connection will come from. If you use a cable modem, you need to locate the device so that you can connect the cable modem to it. If you use a DSL modem, you need to locate the base station relatively close to the phone line port to which the DSL modem is attached. After you have placed the base station in its location, attach its power adapter to the station and plug it in to a wall outlet. Attach the base station's modem port to a phone jack if you will be connecting to the Internet via a dial-up account. If you will be using the AirPort HAP to connect to the Internet via a cable or other broadband connection, connect the Ethernet (WAN) port on the AirPort HAP to the broadband modem. If you are going to use the base station to act as a sharing hub for an Ethernet network, attach an Ethernet cable to the station's network Ethernet (LAN) port. If you want to use the base station to network your Mac with a single computer, you can connect the Ethernet port on the other computer to the base station with an Ethernet crossover cable. Otherwise, attach a standard Ethernet cable to your base station and to the LAN/WAN port on the Ethernet hub that serves your wired network (not all hubs have a special port for this; if yours doesn't, connect it to any available port). NOTE Some modern Macs, such as the PowerBook G4, don't require the use of an Ethernet crossover cable. The port automatically senses whether it is connected to another machine or to a hub and communicates appropriately.
To learn more about Ethernet, p. 817.
If you want to share a USB printer with all AirPort-equipped Macs that can access the network, connect the printer's USB cable to the USB port on the base station. Configuring the Base Station After you have installed the base station, you need to configure it. You can configure it manually through the AirPort Admin Utility, or you can use the AirPort Setup Assistant to configure it for you. With either method, you configure the base station from a machine with which it can communicate either via AirPort or through an Ethernet network. NOTE The machine you use to configure a base station must have an AirPort card installed in it to use the AirPort Setup Assistant. It does not need to have an AirPort card if it is connected to the access point via Ethernet.
To learn how to install an AirPort card, p. 388.
Configuring the Base Station Using the AirPort Setup Assistant Use the following steps to configure the base station using the AirPort Setup Assistant: 1. | Configure the Internet connection on the Mac from which you will be configuring the base station in the same way that the base station is going to be configured. For example, if the base station will be using a dial-up account, configure the Mac using that account. If you are using a broadband connection, configure the Mac to use that connection.
To learn how to configure a Mac for the Internet, p. 337.
| 2. | Open the AirPort Setup Assistant (Applications/Utilities) to see the first window in the Assistant (see Figure 14.1).
Figure 14.1. The AirPort Setup Assistant guides you through the steps to configure an AirPort base station or an AirPort-equipped Mac to access the AirPort network you create. 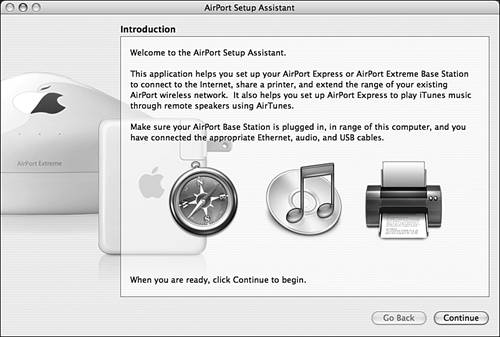
| 3. | Click Continue, click the "Set up a new AirPort Base Station" radio button, and click Continue again.
NOTE These steps assume you are setting up a new base station. If you want to change the settings for an existing station, click "Change settings on an existing AirPort Base Station" instead. CAUTION If you are configuring an access point that has already been configured and is protected by a password, you have to enter that password before you can proceed. If the base station you are configuring has outdated software installed on it, the Setup Assistant attempts to update it. To do so, you must be able to connect to the Internet, which is sort of a Catch-22 in that it assumes that it is already configured and you are reconfiguring it. You can download the update to the Mac you are going to use to configure the base station and then the base station can update its software from there. | 4. | Choose the base station you want to configure from the "" pop-up menu and click Continue. If you have only one base station in range, it is selected automatically. If you are reconfiguring an existing base station, you first choose the network the base station is on and then choose the specific base station.
If the Assistant detects new AirPort firmware is available, it will prompt you to do so. Provide permission for the update and your base station's firmware will be updated.
| 5. | Enter the password for the base station you selected in the previous step and click Continue. If you are configuring a new base station or one that has been reset, the password is public.
NOTE Some base stations have two passwords. One is to join the network, and the other allows you to configure the base station itself. If you are prompted to enter a second password, do so. | 6. | Follow the onscreen instructions to work through the assistant to complete the configuration of the base station.
|
 | If you see an error message stating that the required AirPort hardware was not found when you started the AirPort Setup Assistant, see "No AirPort Hardware Is Found" in the "Troubleshooting" section at the end of this chapter. If you can't access the base station because you don't know the password, see "I Don't Know the Base Station Password" in the "Troubleshooting" section at the end of this chapter. |
Configuring a Base Station Manually You should also know how to manually configure the base station. Manual configuration can be a better and more complete way to configure it, and there are some options you can only configure using the manual technique. If you want to change only one aspect of a base station's configuration, using the manual method is also the way to go. And, it can also be a faster way to configure a base station. For example, you need to manually configure a base station when you want to share an Internet account with other machines on an Ethernet network or to use the AirPort base station as a bridge between the wireless network and a wired one (for example, to allow AirPort-equipped machines to use a printer connected to a wired network). You use the AirPort Admin Utility application to configure an access point manually by performing the following steps: NOTE The original Graphite base station did not include a LAN port that you could use to connect the station to a wired network at the same time you connected it to a broadband modem. Because of this, its configuration is slightly different from the newer Snow and AirPort Extreme base stations. The most significant difference is that you have to configure a Graphite base station to provide services to a wired network. This is explained in the "OS X to the Max" section at the end of this chapter.
1. | Open the AirPort Admin Utility (Applications/Utilities). The Select Base Station window opens (see Figure 14.2).
Figure 14.2. The AirPort Admin Utility enables you to configure a base station manually. 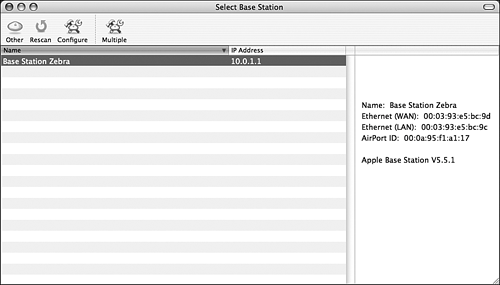
| 2. | Select the base station you want to configure and click Configure (if there is only one base station in range, it is selected automatically).
| If you get an error message when trying to configure your base station manually, see "I Can't Configure My Base Station Manually" in the "Troubleshooting" section at the end of this chapter. |
| 3. | If the base station has been reset, you see a dialog box informing you that the base station has been reset and is not currently configured. (If the base station has not been reset, you won't have to do this step.) Click Automatic and then authenticate yourself using an administrator name and password. The software reconfigures the base station and restarts it. When it is complete, you return to the Select Base Station window. Click Configure again.
NOTE When you have problems with a base station, sometimes you must reset it so that it returns to its default settings (in effect, you start over). You next see a window that has the base station name as its title (see Figure 14.3).
Figure 14.3. This window enables you to access all aspects of a base station. 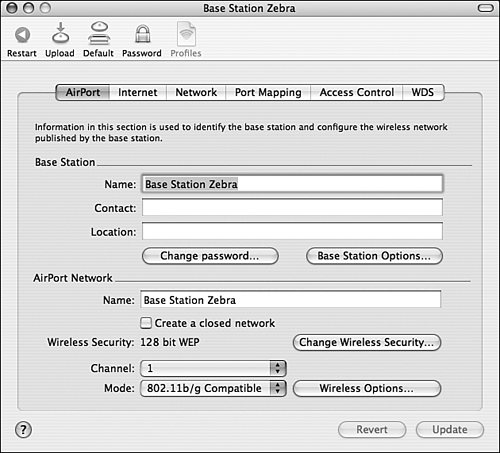
This Admin Utility toolbar has the following controls:
- Restart This button causes the base station to restart. You must do this occasionally if you are experiencing problems.
- Upload This button enables you to upload revised software onto the base station to update it.
- Default This returns the base station to its defaults.
- Password Use this button to change the base station's password.
- Profiles An AirPort Express base station can store up to five configurations on it. You use the Profiles button to access the profile with which you want to work.
NOTE These steps assume the base station you are configuring has been configured previously. If not, the steps might be slightly different. | 4. | Select the AirPort tab if it isn't selected already. On this tab, you can change the identification information for the base station and configure how it serves its network.
| 5. | Enter the base station name (this is the name of the hardware, not the name of the network it provides) in the Name field, the contact for the base station in the Contact field, and the station's location in the Location field (this information can help users contact you for help).
| 6. | To change the base station's password (not the network's password), use the "Change password" button. In the resulting sheet, type and verify the new password and click OK.
| 7. | If you want to configure various aspects of the base station's security settings, click the Base Station Options button. Use the WAN Ethernet Port tab of the resulting sheet to select the security options you want to enable or disable. The available options are the following:
- Enable SNMP Access The Simple Network Management Protocol network management service makes networks easier to manage, but it also makes them somewhat more vulnerable to denial-of-service attacks (where servers are overloaded because numerous, bogus requests for service are received). Generally, you should leave this option on.
- Enable Remote Configuration This setting enables a base station to be configured over its WAN port. If you uncheck this box, you can configure the base station by connecting it to a LAN or by using an AirPort network.
- Enable Default Host If you want to play network games over AirPort, check the Enable Default Host check box and enter the IP address of the machine that will act as the host for the game.
- Enable Remote Printer Access Use this option if you want printers to be accessible via the WAN port.
| 8. | Click the Logging/NTP tab. Use the "Send Base Station Logging to" check box, text box, and pop-up menu to configure logging services for the base station. This can be helpful when you are troubleshooting problems. You can also have your base station's time and date set automatically by checking the "Set Time & Date Automatically" check box and choosing a timeserver on the pop-up menu.
| 9. | Click the USB Printer tab to view information about a printer connected to the base station's USB port.
| 10. | Click OK to close the Options sheet.
| 11. | Enter the name of the network that will be provided in the Name field in the AirPort Network area of the window.
NOTE If the base station is already providing a network and you change the name or password of the network, people who use the network need to change the network they use. The new network name appears as an available network on the client machines, but you must provide the new password to those whom you want to use the network. | 12. | If you want to create a closed network, check the "Create a closed network" check box. A closed network does not appear on other users' AirPort menus. To join closed networks, users have to know the name and password for that network (because they can't see the network on a menu). Using a closed network is a good way to keep your network more secure.
| 13. | Click the "Change Wireless Security" button to configure the network's security. In the resulting sheet, you can choose the type of wireless security and choose the network's password if one is required (see Figure 14.4). On the pop-up menu, choose the type of security you want to use from the following options:
- Not Enabled If you select this option, your network won't be secured and anyone who can find it can join it without a password. You should never use this option unless you are very sure no one whom you don't know about will be able to access your network.
- WPA Personal Wi-Fi Protected Access (WPA) is an encryption technique to protect data from being transmitted wirelessly. Use the WPA Personal option for a small network.
- WPA Enterprise This is a more robust implementation that requires specialized hardware and expertise to implement. In most situations, you will use one of the other options.
- 128 bit WEP Wired Equivalent Privacy (WEP) is an encryption strategy that attempts to provide wireless networks with the same level of protection that wired networks have. WEP does provide improved security compared to nonencrypted transmissions, but be aware that it does have some flaws, as do almost all security measures. If the information transmitted over your network is very sensitive, you should use WEP to provide at least some protection. If supported by the computers that will be connecting to your network, use 128 bit.
- 40 bit WEP This is the same protocol as 128 WEP, except it is provided at the 40-bit level, which is less secure than the 128-bit level.
Figure 14.4. Generally, you should enable security on your network to protect the computers on your network. 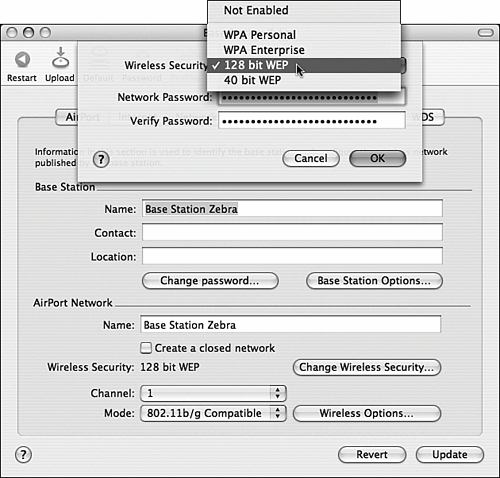
| 14. | Enter the password for the network, verify it, and click OK to set it.
| 15. | Use the Channel pop-up menu to select the channel over which the base station communicates. Generally, the default channel works fine, but if you are having trouble communicating with devices, you can try different channels to improve signal transmission and reception. If you have multiple AirPort networks in the same area, you can use the Channel pop-up menu to have each network use a different channel so that they don't interfere with one another.
| 16. | If you are configuring an AirPort Extreme base station, use the Mode pop-up menu to choose the wireless standard used on the network. Use 802.11b/g Compatible to make the network available to both 802.11b (AirPort) and 802.11g (AirPort Extreme) devices. You can also select 802.11g only or 802.11b only. You use one of these options if you want to restrict the network to one of these protocols for some reason.
| 17. | Click the Wireless Options button to see the Wireless Options sheet (see Figure 14.5). These settings control the physical properties of the base station's signal. Generally, the default settings will work fine. However, if you have problems providing a network, you can adjust these settings, such as the multicast rate, to obtain better performance.
Figure 14.5. Use this sheet to configure certain physical aspects of the signals used on an AirPort network. 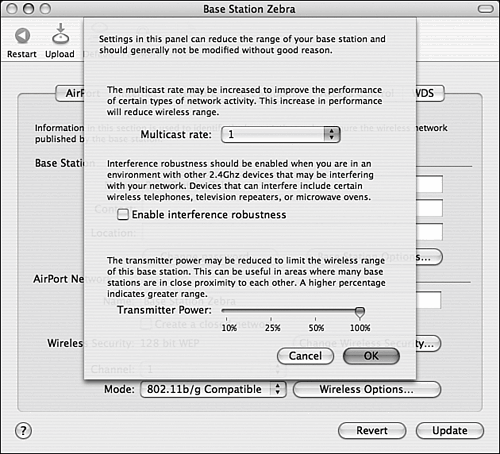
| 18. | Use the "Multicast rate" pop-up menu to set the multicast rate. Choosing a higher value improves performance but also reduces range.
| 19. | Use the "Enable interference robustness" check box to make the AirPort signal less sensitive to interference.
| 20. | Use the Transmitter Power slider to change the strength of the base station's signal. If many base stations exist in the same physical area, reduce the signal strength to limit the interference of these stations with one another. You can also reduce the strength to limit the size of the AirPort network's coverage.
| 21. | Click OK to return to the Base Station window.
| 22. | Click the Internet tab and configure the base station for Internet access. This works similarly to configuring a Mac for Internet access. Choose the connection method from the Connect Using pop-up menu and then enter the settings you want to use in the lower part of the window.
To learn how to configure a Mac for the Internet, p. 337.
NOTE One additional control available for a base station's Internet access that is not present for a Mac is the WAN Ethernet Port pop-up menu. Use this to set the speed at which the base station communicates with a wired network over its WAN port. In most cases, the Automatic (Default) value is the best choice, but you can choose a specific speed. | 23. | Click the Network tab to control how the base station provides services to the network (see Figure 14.6).
Figure 14.6. Use the Network tab to configure the services the base station provides to the network. 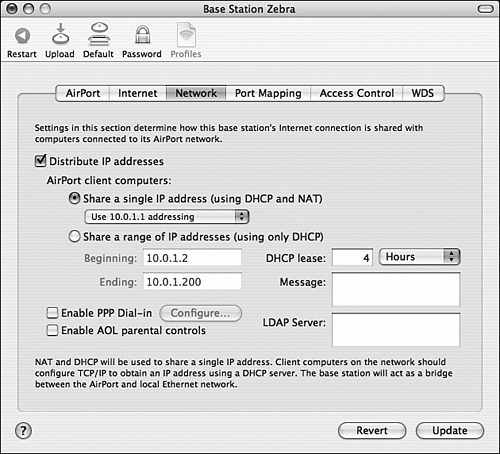
The default settings enable all the machines connecting to the AirPort network to share the base station's Internet account. By default, the base station provides IP addresses to each machine dynamically and uses NAT protection to isolate the IP addresses of each machine from the connection to the Internet. To choose this option, click the "Share a single IP address (using DHCP and NAT)" radio button. Then select the range of addresses that should be assigned to each device on the network using the pop-up menu. In most cases, the "Use 10.0.1.1 addressing" option will work, but you can choose a different range if you want to.
If you want to use a specific set of IP addresses, check the "Share a range of IP addresses (using only DHCP)" check box and enter the starting and ending IP numbers you want to assign. As machines connect to your network, these IP addresses are assigned to each machine that connects (you have to have enough addresses in the range so one is available for each machine). Use the "DHCP lease" box and pop-up menu to set the number of hours for the DHCP lease on each machine. When this time passes, a new address is assigned to each machine. You can enter a DHCP lease message in the Message box.
To learn how to configure a Graphite base station so that all the machines on a network, including machines connected via Ethernet, can share the same Internet account, p. 395.
| 24. | To enable people to connect to the base station via PPP dial in, check the "Enable PPP Dial-in" check box and use the Configure button to configure these connections.
| 25. | If you use AOL, you can enable parental controls by checking the "Enable AOL parental controls" check box.
| 26. | Use the Port Mapping tab to add more ports to the network for other services, such as AppleShare, web sharing, and so on.
| 27. | Use the Access Control tab if you want to limit network access to machines with specific AirPort ID numbers (you find these numbers on the client machines, as you will see in a later section). Click Add (+), enter the AirPort ID of the machines to which you want to allow access to your network, enter a description of the machine, and click OK. Only the machines with AirPort IDs shown in the list can then access your network. (If the list is empty, any AirPort machines can connect by using the network's password.)
| 28. | Use the RADIUS pop-up menu and boxes to configure a RADIUS server for the AirPort network. This prevents AirPort machines without valid IDs from connecting to the network. Explaining the details of this is beyond the scope of this chapter.
| 29. | Use the WDS tab to configure multiple base stations to provide a single network to extend its range.
To learn how to configure WDS, p. 396.
| 30. | Click Update to transfer the settings to the base station. The base station is restarted after the settings have been transferred.
| 31. | When the process is complete, click OK; you return to the Select Base Station window.
| 32. | Quit the AirPort Admin utility.
|
| If you see an error message stating that the required AirPort hardware was not found when you started the AirPort Admin Utility, see "No AirPort Hardware Is Found" in the "Troubleshooting" section at the end of this chapter. |
NOTE  | For more detailed information on AirPort, visit Apple's Knowledge Base at www.apple.com/airport. |
You can now access the Net from an AirPort-equipped Mac using the AirPort network. The base station also provides services to a wired network if it is connected to one. Configuring an AirPort-equipped Mac to Act As a Base Station As you learned earlier, you can use any AirPort-equipped Mac running Mac OS X to act as a base station. When you do this, the Mac OS X machine provides services similar to those that a HAP provides, but you don't have as much control over the AirPort network. To configure a Mac as a base station, perform the following steps: 1. | Install an AirPort card in the machine you are going to use as a base station.
To learn how to install an AirPort card, p. 388.
| 2. | Configure that machine so it can connect to the Internet, such as through DHCP services provided on an Ethernet network or over a dial-up account and activate the AirPort connection via the Network pane.
To learn how to configure a Mac for the Internet, p. 337.
| 3. | Open the Sharing pane of the System Preferences application and click the Internet tab (see Figure 14.7).
Figure 14.7. You use the controls on the Internet tab of the Sharing pane to enable a Mac to share its Internet connection with other computers. 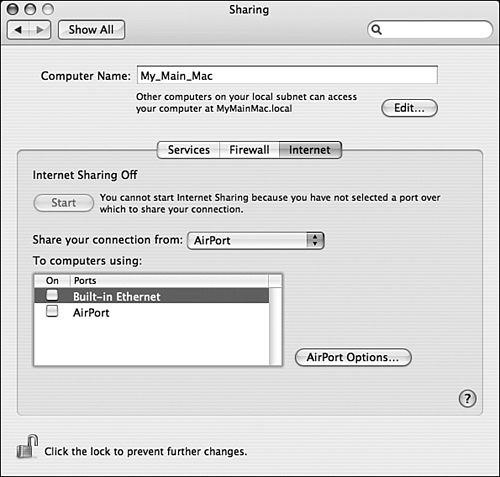
| 4. | Select the Internet connection you want to share with other machines on the "Share your connection from" pop-up menu. For example, if your computer gets its Internet connection from a wired network, select Built-in Ethernet.
NOTE You can choose to share a connection from a wired network to AirPort-equipped machines or from an AirPort-equipped machine to a wired network. | 5. | Select the type of connections with which you are going to share the machine's Internet connection by checking the appropriate "To computers using" check box. For example, if you want to share the connection with computers via AirPort, check AirPort, and if you want to share the connection via a wired network, check the Built-in Ethernet check box. You can choose more than one connection type with which to share the connection.
| 6. | If you enabled AirPort sharing, select AirPort and click the AirPort Options button. The AirPort network configuration sheet appears (see Figure 14.8).
Figure 14.8. With this sheet, you configure the AirPort network your Mac provides to other machines. 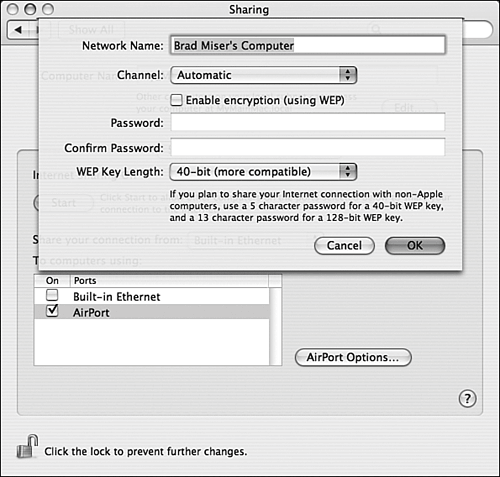
| 7. | Edit the default name as needed. The default name is the name of your computer, but you can make it something more interesting if you want to.
| 8. | Unless you have multiple AirPort networks active in the same area or you experience interference that prevents your network from operating properly, leave the Channel pop-up menu set to Automatic. If you want to choose a channel manually, select it on the pop-up menu.
| 9. | For a more secure network, check the "Enable encryption (using WEP)" check box.
NOTE WEP is an encryption strategy that attempts to provide wireless networks with the same level of protection that wired networks have. WEP does provide improved security compared to nonencrypted transmissions, but be aware that it does have some flaws as do almost all security measures. If the information transmitted over your network is very sensitive, you should use WEP to provide at least some protection. | 10. | Enter the network password in the Password and Confirm Password fields. This is the password users will enter to connect to the network.
| 11. | Select an encryption key length on the WEP Key Length pop-up menu. The options are 40-bit and 128-bit. If only newer Macs running Mac OS X will be connecting to the network, select 128-bit. If you aren't sure which level of encryption other machines can support, select 40-bit. If you don't want to use the encryption at all, uncheck the "Enable encryption (using WEP)" check box.
| 12. | Click OK.
| 13. | Click Start. The Internet connection is shared with other computers via AirPort or built-in Ethernet.
| 14. | Use the Services pane to configure other services you will provide over the network, such as File and Printer Sharing. Your Mac then begins providing services over AirPort and its network becomes available to AirPort-equipped Macs.
|
To learn how to configure sharing services, p. 941.
TIP If Printer Sharing is enabled, USB printers connected to the Mac acting as a base station are also available to the AirPort network. This is a great way to share USB printers with other Macs. Also, the AirPort menu on the menu bar on a Mac acting as a base station is different than the menu on a client machine. This menu also has different options than a client menu.
Using a Mac As a Base Station One of the disadvantages of using a Mac as a base station is that the Mac must be on for the network to be available. If that Mac is turned off or crashes, the AirPort network is lost. If the Mac that is acting as the base station goes into Sleep mode, its services are also lost. Use the Energy Saver pane of the System Preferences utility to ensure that the software base station machine never sleeps while you want the AirPort network to be available. Also, if Sleep interrupts AirPort network services, client machines might have to quit and then restart Internet applications, such as Safari, to resume using the network. |
To learn how to control sleep, p. 320.
|