| To purchase music in the iTunes Music Store, you need to have an account and configure that account on your computer. Obtaining an iTunes Music Store Account If you already have an account with AOL, the Apple online store, or .Mac, you already have an account with the iTunes Music Store because it can use any of those accounts. If you don't have one of these accounts, you can obtain an account in the iTunes Music Store by following these steps: 1. | Select the Music Store source. The Music Store will fill the Content pane (see Figure 24.3).
Figure 24.3. To sign in to the iTunes Music Store, you click the Account button. 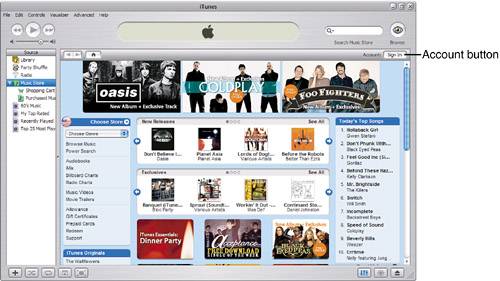
| 2. | Click the Account button, which is labeled Sign In when you are not signed in to an account. You'll see the Account Login dialog box (see Figure 24.4).
Figure 24.4. The Account Login dialog box enables you to log in to an existing account or create a new one. 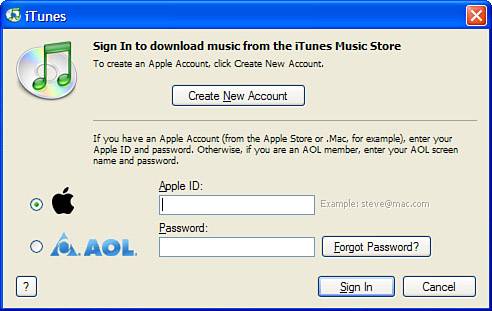
| 3. | Click the Create New Account button. You will return to the Content pane, which will be filled with the first of the three screens you use to create an account.
| 4. | Read the information on the first screen and click the Agree button. (The information on the first screen contains the terms of service to which you must agree if you want to use the iTunes Music Store.)
note  | Apple uses extensive security measures to protect your credit card information. |
| 5. | On the next screen, enter an email address, which will be your account's username (called an Apple ID), and password. Then enter a security question, enter your birth date, and select any information you want to be emailed to you. Then click Continue.
| 6. | On the third screen, enter your credit card information and address and then click Done.
| 7. | If you are prompted to enter any additional information, do so and click the Continue or Done button. When the process is complete, you will see a completion screen. You will then be logged in to your new account. Click Done. You will return to the iTunes Music Store and you can start shopping (see Figure 24.5).
Figure 24.5. When your iTunes Music Store account appears in the Account button, you are logged in to your account and can start shopping for tunes. 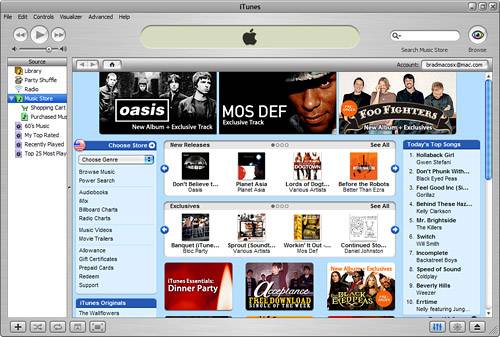
|
Logging In to Your iTunes Music Store Account note | You don't need to log in to an iTunes Music Store account to be able to subscribed to and download podcasts. To learn how to access podcasts in the iTunes Music Store, see "Subscribing and Listening to Podcasts" on page 254. |
To be able to purchase music from the iTunes Music Store, you must log in to your iTunes Music Store account first. To log in to an existing iTunes Music Store account, perform the following steps: 1. | Click the Account button (this will be labeled Sign In when you aren't signed in to your account). You'll see the Sign In dialog box (see Figure 24.6).
Figure 24.6. You can sign in to your iTunes Music Store account by entering your Apple ID or AOL account information in this dialog box. 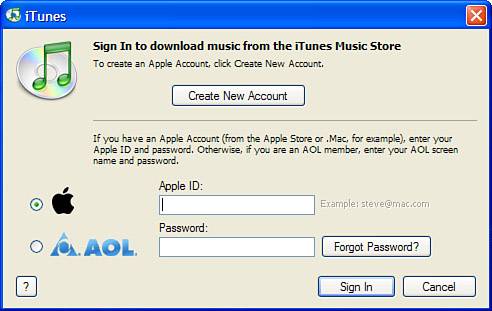
| 2. | If you use an Apple ID to sign in to the store, click the Apple button (this is selected by default). If you use an AOL account to sign in, click the AOL button.
| 3. | Enter your Apple ID in the Apple ID field or your AOL screen name in the AOL Screen Name field.
| 4. | Enter your password in the Password field.
| 5. | Click Sign In. You will be logged in to your account. When you return to the iTunes window, you will see your Apple ID or AOL screen name in the Account field. After you are signed in, you can shop for tunes.
|
note | If a different account is currently logged in, you must log out of that account before you can sign in to another one. |
Logging Out of Your iTunes Music Store Account To sign out of your account, click the Account button, which shows your Apple ID or AOL account name when you are logged in to your account. The Sign In dialog box will appear; click Sign Out. You will return to the Music Store and the Account button will again be labeled Sign In. Changing and Viewing Your iTunes Music Store Account Times change and sometimes so does your personal information, such as your address or the credit card you want to use in the iTunes Music Store. If such changes occur in your life, you can change your Apple ID account information by using the following steps: 1. | Click your iTunes Music Store account name, shown in the Account button, as if you want to sign out. The Sign In dialog box will appear.
| 2. | Enter your password. (Your account name will be filled in already.)
| 3. | Click View Account. The Content pane will be replaced by the Apple Account Information screen. On this screen, you will see various buttons that enable you to change your account information and to manage various aspects of your account, such as your music allowances.
| 4. | To change your account information (such as your address), click the Edit Account Info button and follow the onscreen instructions to change your information.
| 5. | To change your credit card information, click Edit Credit Card and follow the onscreen instructions to change your credit card information.
tip  | On the View Account screen, you'll also see the number of computers currently authorized to play music you have purchased from the iTunes Music Store. (Unfortunately, it doesn't identify those computers for you.) |
| 6. | To view your purchase history, click the Purchase History button. The screen will be filled with a detailed list of all the transactions for your account (see Figure 24.7). Review the list and click Done.
Figure 24.7. Yes, I do use the iTunes Music Store, as my purchase history shows. 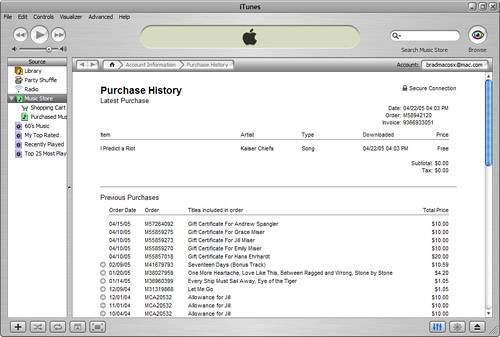
| 7. | If you want to change the country your account is associated with (and sometimes the version of the store you use if the country you select has a different version of the store), click the Change Country button and follow the onscreen instructions to change the country with which your account is associated.
| 8. | When you are done making changes, click Done. You will return to the Music Store.
|
Setting Up and Managing Music Allowances tip | A few other buttons appear on the View Account screen that you aren't likely to use. The Terms and Condition button displays the current terms and conditions for the store. The Privacy Policy enables you to view Apple's privacy policy, and the Reset Warnings button resets all the warning dialog boxes so you see them again the next time they become relevant. |
You can create a music allowance for an iTunes Music Store account. This enables someone using that account to purchase a certain amount of music per month. This is useful if you have kids who you want to be able to buy music at the store and you want to provide a limited amount of credit for them to use. If the person to whom you are going to provide an allowance already has an Apple account, you will need her Apple ID and password. Alternatively, you can create an account for that person when you assign an allowance to her. To create a music allowance, perform the following steps: 1. | Access the Account Information screen for your account (see the previous section for the steps to do this).
| 2. | Click Setup Allowance. You'll see the Set Up an iTunes Allowance screen.
| 3. | Enter your name in the Your Name field.
| 4. | Enter the recipient's name in the Recipient's Name field.
| 5. | Choose the amount of money the recipient will be able to spend each month in the Monthly Allowance menu this amount will be applied to the recipient's account on the first day of each month. You can choose an amount from $10 to $200 per month in $10 increments between $10 and $100 or in $50 increments from $100 to $200.
note | If you use an AOL account to access the store, you change your account information using the AOL software. |
| 6. | If you want the allowance to become available immediately, click the Send now, and on the first of next month radio button (this is the default option). If you want the allowance to start on the first of the next month, click the Don't send now, wait until the first of next month button instead.
| 7. | If the recipient already has an Apple ID, check the Use recipient's existing Apple Account radio button and enter the Apple ID in the two Apple ID fields (one is a verification field). If the recipient does not have an Apple ID, click the Create an Apple Account for Recipient radio button and enter an Apple ID for that person in the two fields.
note | Unfortunately, you can't set up an allowance for the same account you use to create it. You must choose a recipient with an Apple ID different from the one you are using to create the allowance. You can get around this by creating more than one iTunes Music Store account for yourself. Log in to one of them and then create an allowance for the other. When you log in under the second account, you'll have access to the music allowance you created under the first one. |
| 8. | If you want to provide a personal message about the allowance, write it in the Personal Message field.
| 9. | Click Continue. If you indicated you wanted to create a new account, you'll move to the Create an Apple Account screen. If you chose to use an existing Apple ID, you'll move to a purchase confirmation screen that summarizes the allowance you are setting up and can skip to step 11.
| 10. | Complete the information for the new iTunes Music Store account you are creating. This includes the recipient's first name, last name, birthday, and password. When you have entered this information, click Create. You'll move to the purchase confirmation screen.
| 11. | Click Buy to start the allowance, Back to move back to the previous screen so you can change the information for the allowance, or Cancel to stop the transaction.
tip | You can have multiple iTunes Music Store accounts. If you really do want to set up an allowance for yourself, create a second iTunes Music Store account and then use your first account to create an allowance for your second account. Log in under the second account and you will have access to the allowance you create. |
You will see a screen that confirms that the allowance has been completed.
| 12. | Click Done to complete the process or click Set Up Another if you want to set up another iTunes allowance. When you finish setting up allowances, you'll return to the Apple Account Information screen. Click Done to return to the iTunes Music Store, or you can continue to work with your account.
|
The music allowance's recipient will receive an email containing information about the allowance you set up, including the username and password (if you created one for this person). When recipient signs in, her current balance will be shown next to the username in the Account box. This balance always reflects the amount left for the current month. When the recipient has spent all of this, the account won't be able to purchase more music until the next month. note | If the recipient doesn't spend an entire month's allowance, it carries over to the next month. |
To change your allowances, return to the Apple Account Information screen. When you have set up at least one allowance, this screen will contain the Manage Allowances button. Click this and you'll move to the Manage Allowances screen. Here, you have the following options: You can suspend an allowance by clicking the Suspend button. The allowance will remain configured, but any future allowances will be disabled. You can restart a suspended allowance by clicking the Activate button. The allowance will receive the allotted amount on the first of the next month. You can change the amount of an allowance by selecting a new amount on the pop-up menu (which is active only for current allowances). You can remove an allowance entirely by clicking the Remove button. Do this only when you are sure you won't ever use the allowance again. You can create a new allowance by clicking the Create New Allowance button.
Purchasing Gift Certificates If you know music lovers who use iTunes, you can create gift certificates for the iTunes Music Store so the gift recipient can purchase music there. These work similarly to allowances, except that gift certificates are for a set amount and expire when that amount has been spent. To purchase a gift certificate, click the Gift Certificate button on the Apple Account Information screen and follow the onscreen instructions to purchase the certificate. The recipient will receive an email that provides all the information he needs to be able to purchase music up to the full amount of the certificate. Gift certificates are handy when you want to buy music for someone but don't know what they have already or even what their preferences are. Managing Your Artist Alerts If you are interested in specific artists, you can receive an email when new music from that artist is added to the iTunes Music Store. To create an artist alert, click the Add Artist Alert link from the artist's Home screen in the iTunes Music Store (you'll see an example of this later in this part of the book). When music from that artist is added to the store, you'll receive an email letting you know. To remove an artist alert, click the Manage Artist Alerts button on the Apple Account Information screen. You'll see the Manage Artist Alerts screen. Here, you'll see each artist for whom you will receive alert emails. To remove an alert, uncheck the artist's check box and click Save Changes. You'll no longer be notified about that artist. |