| The basic purpose of a smart playlist is the same as a standard playlist that is, to contain a collection of songs to which you can listen, put on a CD, and so on. However, the path smart playlists take to this end is completely different from standard playlists. Rather than choosing specific songs as you do in a standard playlist, you tell iTunes the kind of songs you want in your smart playlist and it picks out the songs for you and places them in the playlist. For example, suppose you want to create a playlist that contains all your classical music. Rather than picking out all the songs in your Library that have the Classical genre (as you would do to create a standard playlist), you can use a smart playlist to tell iTunes to select all the classical music for you. The application then gathers all the music with the Classical genre and places that music in a smart playlist. Understanding Why Smart Playlists Are Called Smart You create a smart playlist by defining a set of criteria based on any number of tags. After you have created these criteria, iTunes chooses songs that match those tags and places them in the playlist. Another example should help clarify this. Suppose you are a big-time Elvis fan and regularly add Elvis music to your Library. You could create a playlist and manually drag your new Elvis tunes to that playlist. But by using a smart playlist instead, you could define the playlist to include all your Elvis music. Anytime you add more Elvis music to your Library, that music would be added to the playlist automatically so it always contains all the Elvis music in your Library. You can also base a smart playlist on more than one attribute at the same time. Going back to the Elvis example, you could add the condition that you want only those songs you have rated four stars or higher so the smart playlist contains only your favorite Elvis songs. As the previous example shows, smart playlists can be dynamic; iTunes calls this live updating. When a smart playlist is set to be live, iTunes changes its contents over time to match changes to the music in your Library. If this feature isn't set for a smart playlist, that playlist will contain only those songs that met the criteria at the time the playlist was created. Finally, you can also link a smart playlist's conditions by the logical expression All or Any. If you use an All logical expression, all the conditions must be true for a song to be included in the smart playlist. If you use the Any option, only one of the conditions has to be met for a song to be included in the smart playlist. note  | iTunes includes several smart playlists by default. These include 60's Music (music based on the Year attribute being 1960 to 1969), My Top Rated (all the music you have rated three stars or above), Recently Played (songs you have played within the past two weeks), and Top 25 Most Played (the 25 songs you have played most often). To see the songs that meet these conditions, select a smart playlist and you will see its songs in the Content pane. |
Creating a Smart Playlist You can create a smart playlist by performing the following steps: 1. | Select File, New Smart Playlist or hold down the Shift (Windows) or Option (Mac) key and click the New Playlist button, which becomes the New Smart Playlist button when the Shift or Option key is pressed down. You will see the Smart Playlist dialog box (see Figure 18.7).
Figure 18.7. The Smart Playlist dialog box enables you to create playlists based on a single tag or many of them. 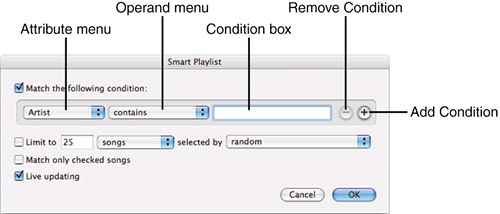
| 2. | Select the first tag on which you want the smart playlist to be based in the Attribute menu. For example, you can select Artist, Genre, My Rating, or Year, among many others. The Operand menu will be updated so that it is applicable to the attribute you selected. For example, if you select Artist, the Operand menu will include contains, does not contain, is, is not, starts with, and ends with.
tip  | You can also create a new smart playlist by pressing Ctrl+Alt+N (Windows) or Option- -N (Mac). -N (Mac). |
| 3. | Select the operand you want to use on the Operand menu. For example, if you want to match data exactly, select is. If you want the condition to be more loose, select contains.
note | As you make selections on the Attribute menu and type conditions in the Condition box, iTunes will attempt to automatically match what you type to data from the songs in your Library. If your Library includes Elvis music and you use Artist as an attribute, iTunes will enter Elvis Presley in the Condition box for you when you start typing "Elvis." |
| 4. | Type the condition you want to match in the Condition box. The more you type, the more specific the condition will be. As an example, if you select Artist in step 1, select contains in step 2, and type Elvis in this step, the condition would look like the one shown in Figure 18.8 and would find all songs that include Elvis, Elvis Presley, Elvis Costello, Elvisiocity, and so on. If you typed Elvis Presley in the Condition box and left the contains operand, iTunes would include only songs whose artist includes Elvis Presley, such as Elvis Presley, Elvis Presley and His Back-up Band, and so on.
Figure 18.8. This smart playlist is getting smarter. 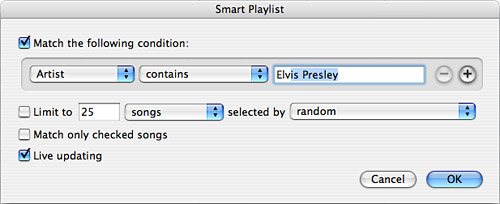
| 5. | To add another condition to the smart playlist, click the Add Condition button. A new, empty condition will appear (see Figure 18.9). At the top of the dialog box, the all or any menu will also appear.
Figure 18.9. This smart playlist now contains two conditions; both are currently based on Artist. 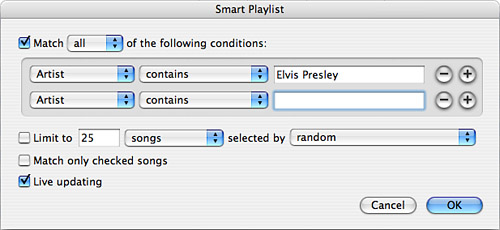
| 6. | Select the second tag on which you want the smart playlist to be based in the second condition's Attribute menu. For example, if you want to include songs from a specific genre, select Genre on the menu.
| 7. | Select the operand you want to use in the Operand menu, such as contains, is, and so on.
| 8. | Type the condition you want to match in the Condition box. If you selected Genre in step 6, type the genre from which the music in the playlist should come. As you type, iTunes will try to match the genre you type with those in your Library.
| 9. | Repeat steps 5 8 to add more conditions to the playlist until you have all the conditions you want to include (see Figure 18.10).
Figure 18.10. This smart playlist is approaching the genius level; it now includes three conditions. 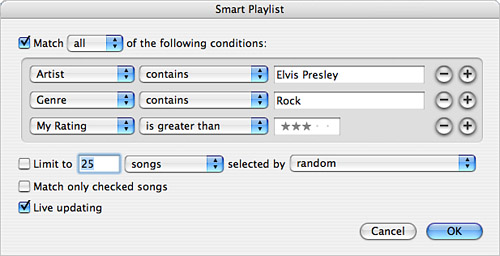
| 10. | Select all on the menu at the top of the dialog box if all the conditions must be met for a song to be included in the smart playlist, or select any if only one of them must be met. For example, you could create a smart playlist based on multiple Artist conditions and the playlist would feature music by those artists. In this case, you would choose any so that if a song is associated with any of the artists for which you created a condition, it would be included in the playlist. As a contrasting example, if you want the playlist to include songs you have rated as three stars or better by a specific artist, you would include both of these conditions and then select all in the menu so that both conditions would have to be met for a song to be included (a song is both by the artist and is rated with three or more stars).
tip | If you want to remove a condition from a smart playlist, click the Remove button for the condition you want to remove. |
note | If you include more than one condition based on the same attribute, you usually don't want to use the All option because the conditions will likely be mutually exclusive, and using the All option will result in no songs being included in the playlist because no song will be able to meet all the conditions at the same time. |
You can limit the length of a smart playlist based on a maximum number of songs, the time it plays, or the size of the files it includes. You set these limits using the Limit to check box and menus.
| 11. | If you want to limit the playlist, check the Limit to check box. If you don't want to set a limit on the playlist, leave the check box unchecked and skip to step 15.
| 12. | Select the attribute by which you want to limit the playlist in the first menu; by default, this menu has songs selected (see Figure 18.11). Your choices include the number of songs (just songs on the menu), the time the playlist will play (in minutes or hours), and the size of the files the playlist contains (in MB or GB).
Figure 18.11. You can choose to limit a smart playlist to a number of songs, a length of time, or by disk space. 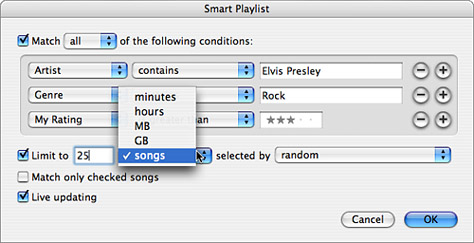
| 13. | Type the data appropriate for the limit you selected in the Limit to box. For example, if you selected minutes in the menu, type the maximum length of the playlist in minutes in the box. If you selected songs, enter the maximum number of songs that can be included in the playlist.
| 14. | Select how you want iTunes to choose the songs it includes based on the limit you selected by using the selected by menu. This menu has many options, including to choose songs randomly, based on your rating, how often the songs are played, and so on (see Figure 18.12).
Figure 18.12. These options tell iTunes how you want it to choose songs for a smart playlist when you limit that playlist's size. 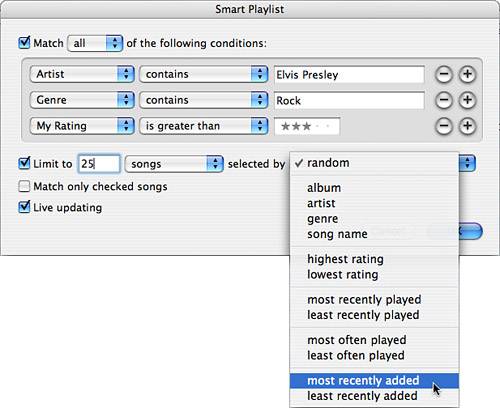
| 15. | If you want the playlist to include only songs whose check box in the Content pane is checked, check the Match only checked songs check box. If you leave this check box unchecked, iTunes will include all songs that meet the playlist's conditions, even if you have unchecked their check box in the Content pane.
| 16. | If you want the playlist to be dynamic, meaning that iTunes will update its contents over time, check the Live updating check box. If you uncheck this check box, the playlist will include only those songs that meet the playlist's conditions when you create it.
| 17. | Review the playlist to see whether it contains the conditions and settings you want (see Figure 18.13).
Figure 18.13. This playlist will include up to 25 songs of the best (rated at four stars or more) of my Elvis music from the Rock genre; as I add music to my Library, it will also be added to this playlist if it meets these conditions. 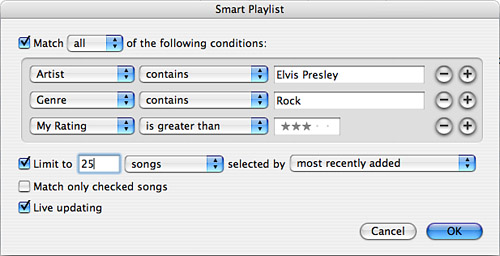
| 18. | Click OK to create the playlist. You will move to the Source list, the smart playlist will be added and selected, and its name will be ready for you to edit. Also, the songs in your Library that match the criteria in the playlist will be added to it and the current contents of the playlist will be shown in the Content pane.
| 19. | Type the playlist's name and press Enter (Windows) or Return (Mac). The smart playlist will be complete (see Figure 18.14).
Figure 18.14. If you compare the songs in this smart playlist to the criteria shown in the previous figure, you will see they match. 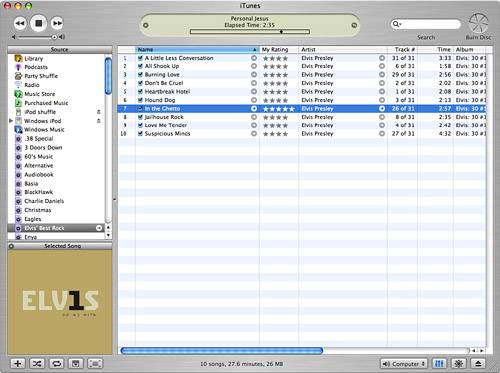
|
Listening to a Smart Playlist Listening to a smart playlist is just like listening to other sources: You select it on the Source list and use the playback controls to listen to it. The one difference is that, if a smart playlist is set to be live, its contents can change over time. note | The smart playlist I built as an example in these steps can be interpreted as follows: Include songs by Elvis Presley in the Rock genre that I have rated at four or five stars. Limit the playlist to 25 songs, and if I have more songs that meet the conditions than this time limit allows, select the songs to include based on those I have most recently added to my Library. Finally, keep adding songs that meet these conditions as I add new Elvis music to my Library. |
Changing a Smart Playlist To change the contents of a smart playlist, you change the smart playlist's criteria (remember that iTunes actually places songs in a smart playlist). Use the following steps to do this: 1. | Select the smart playlist you want to change.
| 2. | Select File, Edit Smart Playlist. The Smart Playlist dialog box will appear, and the playlist's current criteria will be shown.
| 3. | Use the techniques you learned when you created a playlist to change its criteria (see Figure 18.15). For example, you can remove conditions by clicking their Remove buttons. You can also add more conditions or change the other settings for the playlist.
Figure 18.15. I changed the conditions on this smart playlist so that only five-star songs are included. 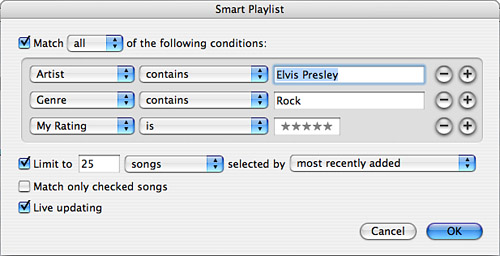
| 4. | Click OK. Your changes will be saved and the contents of the playlist will be updated to match the current criteria.
|
note | Just like other sources, when you select a smart playlist, its information will be shown in the Source Information section at the bottom of the window. This can be useful if you want to create a CD or just to see how big the playlist is (by number of songs, time, or file size). Remember, though, that because a smart playlist's contents can change over time, its source information can also change over time. So, just because a smart playlist will fit on a CD today doesn't mean it still will tomorrow (or even later today). |
You can also change a smart playlist using the same techniques you use on other sources, such as sorting it, selecting the columns you see when you view it, and so on. |