| Now you are ready to put together your MVC application for deployment. Figure 16.1 illustrates the general steps of deploying an enterprise application. Figure 16.1. General steps to deploy an application.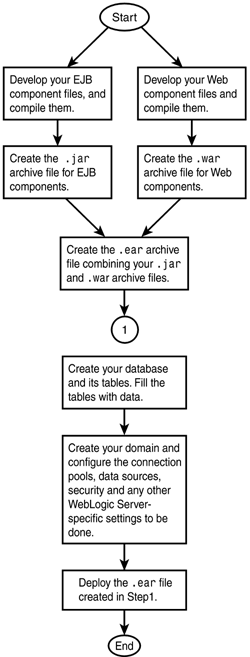
Follow these steps: -
Create the directory structures for the Web component files and EJB component files. Your component files will go into these directories before you create your .war and .jar files. Figure 16.2 illustrates the directory structure for Web and EJB components. Figure 16.2. Directory structure for Web components and EJB components.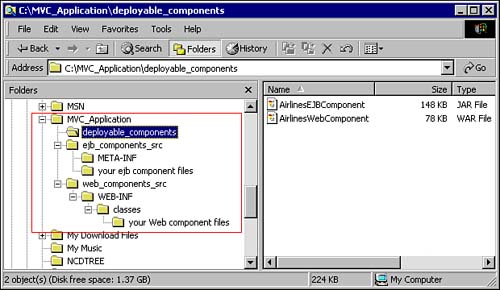
-
Create a directory called MVC_Application, and create the directories web_components_src, ejb_components_src, and deployable_components. -
Classify your components as Web components or EJB. Place your entity bean components, session bean components, constants classes, business object classes, exception classes, util classes, and ejb-jar.xml, weblogic-cmp-rdbms-jar-Flight.xml, weblogic-cmp-rdbms-jar-Passenger.xml, weblogic-cmp-rdbms-jar-TicketInfo.xml, and weblogic-ejb-jar.xml files into the ejb_components_src directory and run the batch file called compile_ejb_components. Make sure you alter the path of the MVC_APP_DIR variable to point to your MVC_Application directory. Also, make sure your transaction has been declared in the ejb-jar.xml file. This batch file creates the required directory structure, compiles the Java classes, and then runs the weblogic.ejbc command. After having done this, it creates the required .jar file and places it into the deployable_components directory. -
The following files will fall into the category of Web components. Place all these files into the web_components_src directory: AirlineTicketBookingServlet.java CheckAvailFlightsPage.jsp, ConfirmFlightDetails.jsp, Error.jsp, Login.jsp, Message.jsp, RegisterUserProfilePage.jsp, ViewAvailFlightsPage.jsp, ViewFlightDetailsPage.jsp, ViewUserProfilePage.jsp web.xml, weblogic.xml weblogic-tags.jar airplane.jpg -
Run the batch file called compile_web_components, which is available in Appendix C. Make sure you alter the path of the MVC_APP_DIR variable to point to your MVC_Application directory. Also, do not forget to add the EJB ear file made in the earlier step into the classpath, where the classloader for the Web components can find it. This batch file creates the directory structure required, compiles the Java classes, and places those files into the appropriate directories. It also copies the image files, XML files, and tag lib directory (tld) files into their appropriate directories. It then creates the .war file and places the .war file into the directory called deployable_components. Note You may have noticed that you have been instructed to place all the files in the EJB components first and then into the web_components_src directory. Also, you have not been instructed to add many of the files needed by the Web components into the web_components_src directory. The Web components refer to the EJB components in the code. Hence, for the Web components to be compiled, the EJB components need to be compiled first. Since the files of the utils, constants, errors, and business objects packages are commonly used across both the Web and EJB components, and you are going to deploy the Web and EJB components as a single application, redundant occurrences of these files are not required. The Web components can gain access to files present in the EJB components that are added to the classpath before you compile the Web components. However, if you are going to deploy the application and keep the Web and EJB components separate, you need to add all of the package files into the Web components directory. Otherwise, you will get an error while running the application. -
Run the batch file called create_deployable_ear. Make sure you alter the path of the MVC_APP_DIR variable to point to your MVC_Application directory. This batch file creates the deployable enterprise archive file to be finally deployed. Setting Up Your Database Create a user with the user id mvcapp, password mvcapp, and URL jdbc:pointbase:mvcapp. Run the batch file pointbase_setup, from Appendix C. The commands in this batch file create the required tables, with the relationships and constraints, and insert some dummy data into the tables. You may enter some more information if you wish to do so. It also creates a table called Test with a dummy column. This table will be used by WebLogic to test the connections of the connection pool at regular intervals. Creating Your Application Domain Using the configuration wizard, create a new domain in your user_domains directory called mvc_app_domain. You will deploy your application into this domain. Create this domain as a managed server (with Admin Server configuration). Give your computer's name for the name of the Admin Server in the Value Administrative Server Info. In the next screen, specify the server name as mvcappserver. Specify the user name and password as mvcappserver for each of these values. |