Sample Program
| The book shopping application that you developed using a JavaServer Page can be further enhanced by adding an order-placing feature. You will add the ability to persist the order data to the PointBase database table transaction_details that you created yesterday. The WebLogic Server has been configured to create a connection pool for the PointBase database. The sample program allows you to use the JDBC concepts that you learned yesterday and today as well as the important interfaces in the JDBC API including the Statement, PreparedStatement, ResultSet, and ResultSetMetaData interfaces. You will also be writing a utility class, namely, the DBConnection class, which will retrieve the database connection from the WebLogic Server's connection pool. Take a look at the DBConnection utility class first. (See Listing 8.1.) The DBConnection utility class demonstrates how to obtain database connections from a connection pool configured in the WebLogic Server. Notice the three different ways that you learned yesterday to configure the connection pool in WebLogic. Listing 8.1 DBConnection.java /****************************************************************************** * Class Name:DBConnection * Description: Gives a single connection, or a connection from a connection * pool, or using a Data source, * @author Mandar S. Chitnis. Pravin S. Tiwari, @version 1.1 * Copyright by Sams Publishing. All Rights Reserved. *******************************************************************************/ package com.sams.learnweblogic7.utils; import java.sql.*; import weblogic.db.jdbc.*; import java.util.Properties; import javax.naming.*; public class DBConnection { //returns a single connection object public static Connection makeConnection(String jdbcClass , String jdbcURL , String userName , String password) throws Exception{ Connection conn=null ; Properties prop = new Properties(); prop.put("user", userName); prop.put("password", password); Driver myDriver = (Driver) Class.forName(jdbcClass).newInstance(); conn = myDriver.connect(jdbcURL, prop); return conn; } //returns a connection from a connection pool public static Connection makeConnectionUsingPool(String driverName , String poolName) throws Exception{ Connection conn = null; Driver myDriver = (Driver) Class.forName(driverName).newInstance(); conn = myDriver.connect("jdbc:weblogic:pool:" + poolName, null); return conn ; } //returns a connection made using a Data source public static Connection makeConnectionUsingDataSource(String dataSource) throws Exception{ Connection conn = null; // Get a context for the JNDI look up Context ctx = new InitialContext(); // Look up myDataSource javax.sql.DataSource ds = (javax.sql.DataSource) ctx.lookup (dataSource); //Create a connection object conn = ds.getConnection(); return conn ; } } The first statement in the class is obviously the package statement, placing this class into the com.sams.learnweblogic7.utils package. Now import the required packages. Here, the weblogic.db.jdbc package is imported to get the drivers to connect to the PointBase DBMS. Use the makeConnection() method to create a connection to the PointBase database using the JDBC driver. The makeConnection() method loads the jdbc driver and then creates a connection object using jdbcURL, user id, and password of the DBMS schema to be connected to. Properties prop = new Properties (); prop.put("user", userName); prop.put("password", password); Driver myDriver = (Driver) Class.forName (jdbcClass). newInstance(); conn = myDriver.connect(jdbcURL, prop); The makeConnectionUsingPool() method is the second way that you can create a connection object from the WebLogic connection pool. Initially, this WebLogic connection pool has to be configured either through the WebLogic Administration Console dynamically, or by using the WebLogic command line interface. Use driverName to load the jdbc driver, and specify the name of the pool as poolName as discussed in yesterday's lesson. Driver myDriver = (Driver) Class.forName(driverName).newInstance(); conn = myDriver.connect("jdbc:weblogic:pool:" + poolName, null); Use the makeConnectionUsingDataSource() method to create a connection object using a data source object. The dataSource object has to be configured on the WebLogic Server to use this method. A JNDI lookup is then performed on this dataSource to get a connection. A javax.sql.DataSource object should be returned. Context ctx = new InitialContext(); javax.sql.DataSource ds = (javax.sql.DataSource) ctx.lookup (dataSource); conn = ds.getConnection(); Each of the makeConnectionsXXX() methods discussed previously returns a database connection object. Your utility class that provides the database connection class is now ready. Study the ProcessTransaction.jsp Web application to use the DBConnection class and then persist the order data to the transaction_details table in the PointBase. See Listing 8.2. Listing 8.2 ProcessTransaction.jsp /****************************************************************************** * Class Name:ProcessTransaction.jsp * Description: This page is displayed after the user has entered his credit * card details, enters the details into a table, and displays a success * message * @author Mandar S. Chitnis. Pravin S. Tiwari, @version 1.1 * Copyright by Sams Publishing. All Rights Reserved. *******************************************************************************/ <html> <head> <title>Transaction Details</title> </head> <body bgcolor=#FFFFFF> <center><strong> <font size=3 face='arial' color=#336600><H1>Transaction Details</H1></font> </strong></center> <p> <%@ page import=" java.io.*, java.sql.*, javax.servlet.*, javax.servlet.http.*, java.util.Properties, javax.naming.*, weblogic.db.jdbc.*, com.sams.learnweblogic7.utils.* "%> <%! private static final String JDBC_CLASS = "com.pointbase.jdbc.jdbcUniversalDriver"; private static final String JDBC_URL = "jdbc:pointbase:learnweblogic7"; private static final String USER_NAME = "system"; private static final String PASSWORD = "password"; private static final String DRIVER_NAME = "weblogic.jdbc.pool.Driver"; private static final String POOL_NAME = "learnWeblogic7"; private static final String DATA_SOURCE = "examples-dataSource-demoPool"; %> <% Connection conn = null; try { // Let us initialize all the variables that will be used for inserting //transaction details in to the database. int intTransactionID = 0; String strCustomerName = ""; double totalAmount = 0; String creditCardNo = ""; String cardType = ""; // Get the Connection Object from the WebLogic Connection Pool conn = DBConnection.makeConnectionUsingPool(DRIVER_NAME , POOL_NAME); ServletContext sc = getServletConfig().getServletContext(); // First Generate the Transaction ID for this New Purchase Statement stmt = conn.createStatement(); stmt.execute("select max(transaction_id) as maxid from transaction_details "); ResultSet rs = stmt.getResultSet(); if(rs.next()) { intTransactionID = rs.getInt("maxid") + 1; } // now get the transaction details strCustomerName = request.getParameter("CardHolderName"); creditCardNo = request.getParameter("CardNumber"); totalAmount = ((Double)sc.getAttribute("grandTotal")).doubleValue(); cardType = request.getParameter("CardType"); // insert into transaction details into database String insertSQL = "insert into transaction_details (transaction_id , customer_name , total_amount , creditcard_no , card_type)values (? , ? , ? , ? , ?)"; PreparedStatement insertStmt = conn.prepareStatement(insertSQL) ; insertStmt.setInt(1 , intTransactionID); insertStmt.setString(2 , strCustomerName); insertStmt.setDouble(3 , totalAmount); insertStmt.setString(4 , creditCardNo); insertStmt.setString(5 , cardType); insertStmt.executeUpdate(); out.println("<FORM name=\"back\" action=\"/ShoppingApp/BookShoppingServlet\ ">"); out.println("<br><br><center><strong> <font size=2 face='verdana' color=#663300> Your Transaction has been Approved !</font></strong></center>"); out.println("<br><br><font size=2 face='arial' color=#663300> Transaction ID = </font><font size=2 face='arial' color=blue>" +intTransactionID+"</font>"); out.println("<br><font size=2 face='arial' color=#663300>Please Note the transaction id for your future reference</font>"); ResultSetMetaData rsMetaData = rs.getMetaData(); out.println("<br><br><br><br><EM><strong> <font size=2 face='verdana' color=#663300> ** SAMPLE RESULTSET META DATA INFORMATION FOR FIELD : TRANSACTION ID **"); out.println("<br>Column Label = "+rsMetaData.getColumnLabel(1)); out.println("<br>Column type = "+rsMetaData.getColumnType(1)); out.println("<br>Column Precision = "+rsMetaData.getPrecision(1)); out.println("<br>Column Scale = "+rsMetaData.getScale(1)); out.println("<br><br><center><input type =\"submit\" name =\"buttonName\" value=\"Empty Shopping Cart\"></center></EM>"); out.println("</FORM>"); }catch (Exception e){ e.printStackTrace(); out.print("Please Check your program. The error is: " + e.getMessage()); } finally { if(conn != null) try{ conn.close(); } catch (Exception e){ out.print("Exception:" + e); } } %> <p> <font size=-1>Sams - Teach Yourself WebLogic in 21 Days.</font> </body> </html> Figure 8.3 enables you to understand the flow of interaction from the JSP. From the previous code listing, note that the initial statements are for importing the required packages. The static strings are set for the jdbc driver class to be used for creating a normal jdbc connection, the PointBase URL, the user id, and the password for the DBMS from which a connection will be made. You may recall that when you made the PointBase schema yesterday, you gave system and password as the user ID and password, respectively. Then you set the WebLogic driver and pool name variables to be used in case you wanted to use the WebLogic connection pooling. private static final String JDBC_CLASS = "com.pointbase.jdbc.jdbcUniversalDriver"; private static final String JDBC_URL = "jdbc:pointbase:learnweblogic7"; private static final String USER_NAME = "system"; private static final String PASSWORD = "password"; private static final String DRIVER_NAME = "weblogic.jdbc.pool.Driver"; private static final String POOL_NAME = "learnWeblogic7"; private static final String DATA_SOURCE = "examples-dataSource-demoPool"; Figure 8.3. Sequence diagram for the ProcessTransaction JSP.
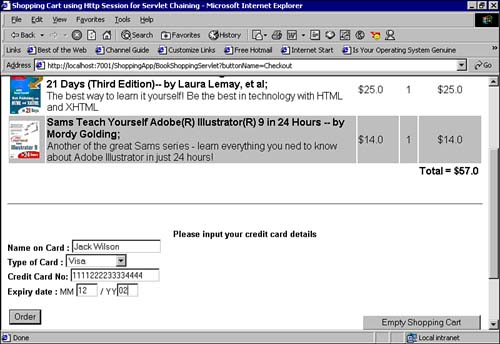
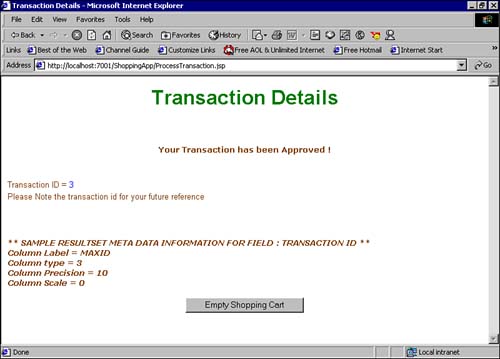
The next step that you take is to open a connection to the database and create a Statement object. The SQL statement will be executed by this Statement object. // Get the Connection Object from the WebLogic Connection Pool conn = DBConnection.makeConnectionUsingPool(DRIVER_NAME , POOL_NAME); // First Generate the Transaction ID for this New Purchase Statement stmt = conn.createStatement(); The values returned from the database are packaged into the ResultSet object. The executed SQL statement retrieves the maximum transaction ID. stmt.execute("select max(transaction_id) as maxid from transaction_details"); ResultSet rs = stmt.getResultSet(); if(rs.next()) { intTransactionID = rs.getInt("maxid") + 1; } This maximum transaction ID is incremented by one, and then the insert statement for the information about the new transaction, including credit card number, credit card type, and credit card expiration date are all inserted into the table's transaction_details. In order to insert the information into the table, a prepared statement is used and the input parameters are bound to the statement by the setXXX() functions. // insert into transaction details into database String insertSQL = "insert into transaction_details (transaction_id, customer_name, total_amount, creditcard_no, card_type)values (? , ? , ? , ? , ?)"; PreparedStatement insertStmt = conn.prepareStatement(insertSQL) ; insertStmt.setInt(1 , intTransactionID); insertStmt.setString(2 , strCustomerName); insertStmt.setDouble(3 , totalAmount); insertStmt.setString(4 , creditCardNo); insertStmt.setString(5 , cardType); insertStmt.executeUpdate(); Finally, use the ResultSetMetaData interface to retrieve the metadata information when it retrieves the maximum transaction ID. You'll print this metadata on the browser and display the following to the browser: ResultSetMetaData rsMetaData = rs.getMetaData(); out.println("<br><br><br><br><EM><strong> <font size=2 face='verdana' color=#663300> ** SAMPLE RESULTSET META DATA INFORMATION FOR FIELD : TRANSACTION ID **"); out.println("<br>Column Label = "+rsMetaData.getColumnLabel(1)); out.println("<br>Column type = "+rsMetaData.getColumnType(1)); out.println("<br>Column Precision = "+rsMetaData.getPrecision(1)); out.println("<br>Column Scale = "+rsMetaData.getScale(1)); out.println("<br><br><center><input type =\"submit\" name =\"buttonName\" value=\"Empty Shopping Cart\"></center></EM>"); Compile the ProgramThe DBConnection.java utility class handles all the JDBC-related activities and needs to be compiled on the MS-DOS prompt. Include the JDBC driver used for the PointBase database in the CLASSPATH before you compile the DBConnection.java file. The DBConnection.class will be produced as a result of using the javac compiler. The ProcessTransaction.jsp will be automatically compiled by the WebLogic Server. Deploy the ProgramTo deploy this application, copy the DBConnection.class to the same directory where the JSP is deployed and add it to the CLASSPATH of the WebLogic Server. To do this, add the entry in the setEnv.cmd or the startWebLogicServer.cmd batch files. Execute the ProgramThe checkout page is invoked from the browser by calling the following URL: http://localhost:7001/ShoppingApp/BookShoppingServlet and by clicking on the CheckOut button in the View Cart page. Figure 8.4 shows the Order button and the CheckOut page where the transaction details will be filled in. Figure 8.4. Screen shot of the ProcessTransaction JSP.
Clicking the Order button invokes the ProcessTransaction.jsp, which persists the data to the transaction_details table in the PointBase database (see Figure 8.5). Figure 8.5. The output from the ProcessTransaction JSP.
|
EAN: 2147483647
Pages: 339